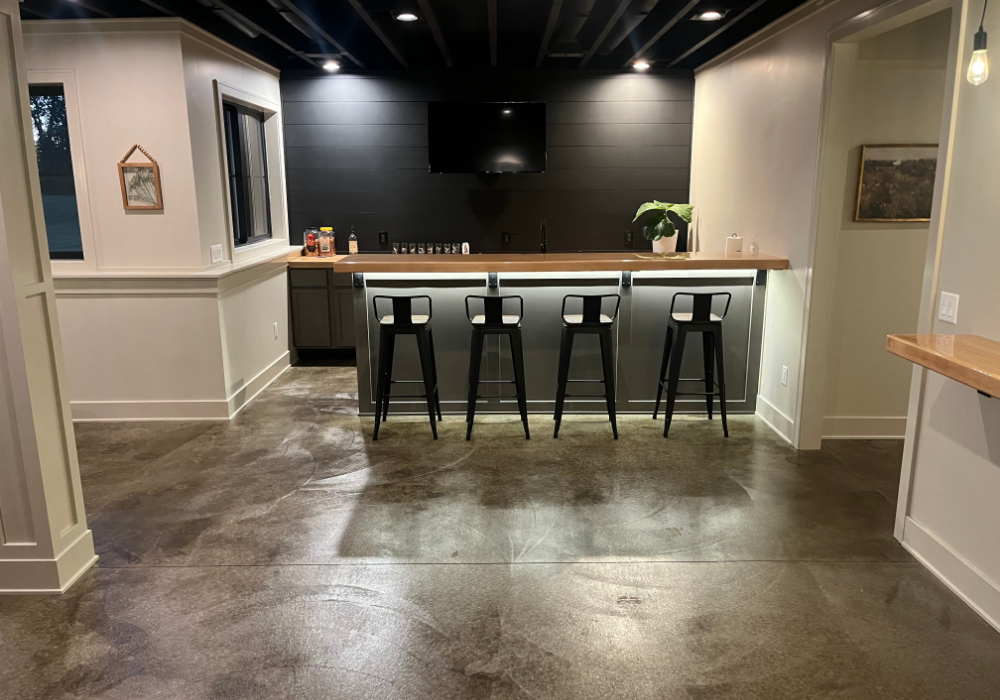
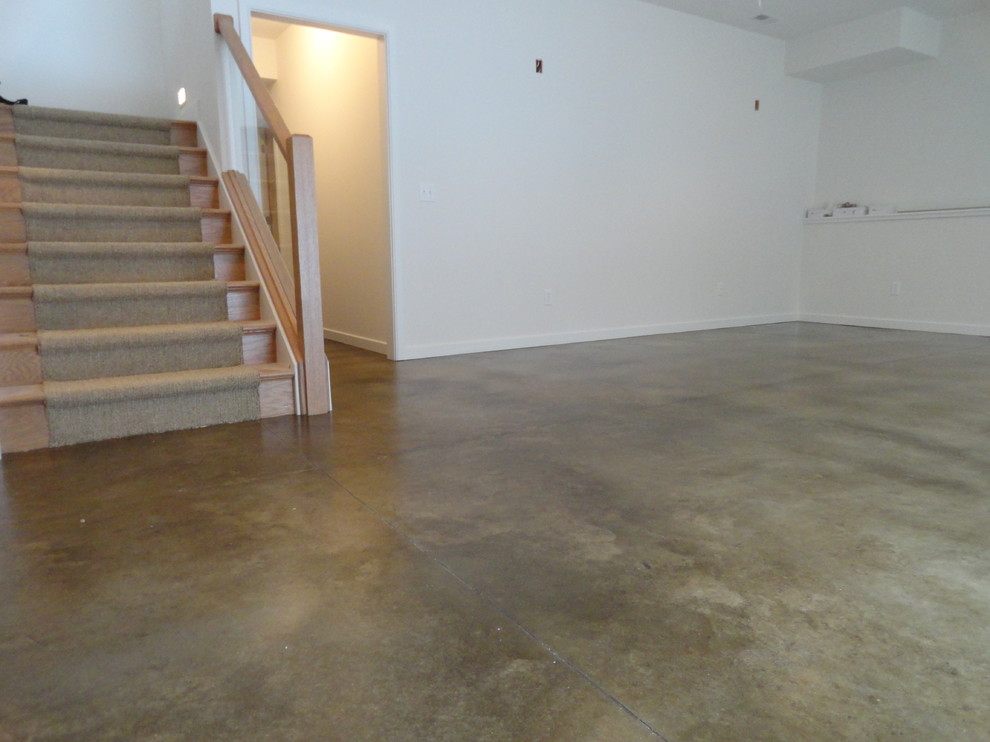
When I first looked at my unfinished basement, all I saw was cold, gray concrete that felt more like a parking garage than a potential living space. I’d considered carpet, vinyl, and laminate, but they all felt wrong for a basement prone to occasional moisture issues. That’s when I discovered acid-stained concrete, and it completely changed my perspective.
What I thought was the problem, that bare concrete slab, actually became the solution and the star of my basement transformation. Staining concrete turned out to be more affordable, more durable, and frankly more beautiful than any other flooring option I’d considered. Let me walk you through everything I learned about turning a boring concrete basement floor into a stunning, practical surface that’s become one of my favorite features of the house.
Understanding Different Types of Concrete Stains
Choosing between acid-based and water-based stains was my first major decision, and understanding the differences helped me pick the right option for my basement. Acid stains create those gorgeous, variegated earth tones through a chemical reaction with the concrete itself. I went with acid stain because I loved the organic, mottled appearance that looks almost like natural stone. The stain actually etches into the concrete rather than sitting on top, which means it won’t peel or chip off over time. Colors are limited to warm earth tones like terra cotta, brown, amber, and blue-green.
Water-based stains offered more color options but worked differently from acid stains. They penetrate the concrete without a chemical reaction, creating a more uniform, predictable color. I tested both types on sample boards before committing to my whole basement. The water-based stains gave me consistent color, which some people prefer, but I found them less interesting visually. They’re easier to apply and have less intense fumes, which matters in a basement with limited ventilation. They also dry faster, which was tempting when I wanted to finish quickly.
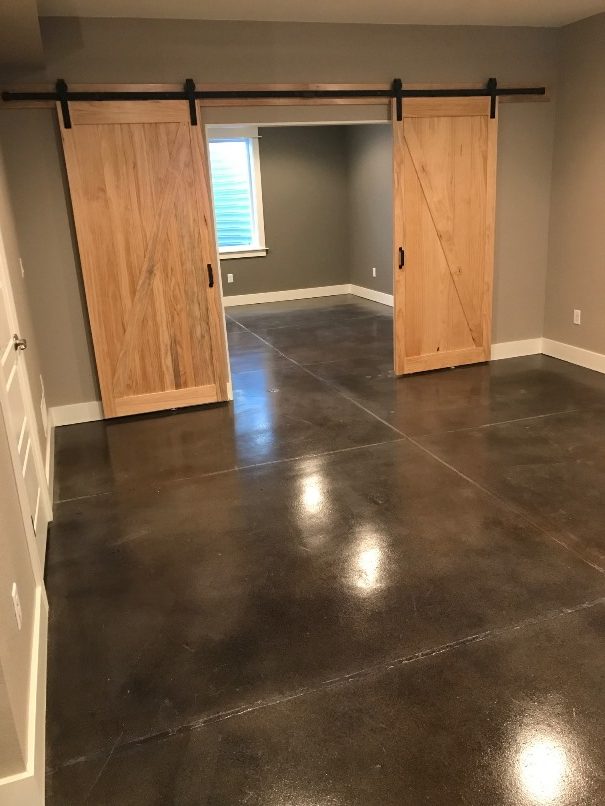
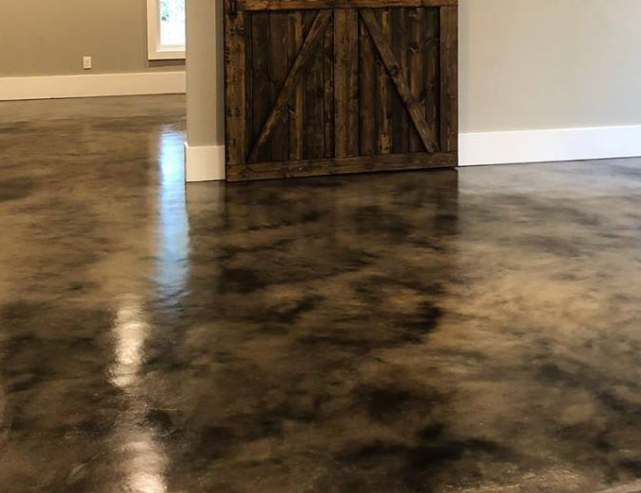
I ultimately chose acid stain for my main basement area because I wanted that unique, unrepeatable pattern that makes each floor one-of-a-kind. The chemical reaction creates natural variations based on the concrete’s composition, moisture content, and age. No two floors look exactly alike, which I found appealing rather than concerning. I did use a water-based stain in my basement bathroom area, where I wanted more uniform color and had concerns about the acid stain’s fumes in that smaller enclosed space. Mixing both types in different areas gave me the best of both approaches.
Preparing Your Concrete Surface Properly
Surface preparation made the difference between a professional-looking result and a disappointing mess, and I learned this couldn’t be rushed. I started by thoroughly cleaning my basement floor, which was covered in years of dust, oil spots, and miscellaneous stains. I used a concrete degreaser on any oil spots, scrubbing them multiple times until they were completely gone. Then I rented a floor buffer with a scrubbing pad and went over the entire surface with a concrete cleaner, working in sections to ensure nothing was missed.
Etching the concrete came next, opening up the pores so the stain could penetrate properly. For this, I used muriatic acid diluted according to the manufacturer’s instructions, working in small sections and being extremely careful with safety gear, heavy-duty gloves, respirator, and eye protection. The acid fizzes and bubbles when it contacts the concrete, which tells you it’s working. I scrubbed with a stiff brush, then neutralized with a baking soda solution and rinsed thoroughly with lots of water. My wet-dry vacuum became my best friend for removing all the rinse water.
Patching and leveling addressed the cracks and low spots in my slab. I used a concrete patching compound for the cracks, following them completely and making sure the compound filled them. For larger low areas that pooled water, I used a self-leveling concrete compound, which flows to create a smooth, level surface. I let all patches cure for the recommended time before proceeding. Testing for moisture was crucial; I taped plastic sheets to various spots on the floor and checked after 24 hours for condensation underneath. Any moisture issues need resolution before staining, or the stain wouldn’t penetrate properly and could fail over time.
Applying Acid Stain Safely and Effectively
The actual staining process was both nerve-wracking and exciting because the acid stain is somewhat unpredictable. I couldn’t just roll it on and expect even coverage. I started by sectioning my basement into manageable areas, planning my application pattern so I wouldn’t trap myself in a corner. I wore full protective gear, including rubber boots, chemical-resistant gloves, eye protection, and a respirator, because acid stain fumes are no joke. I opened windows and set up fans to create airflow, though I was careful not to blow dust onto the wet stain.
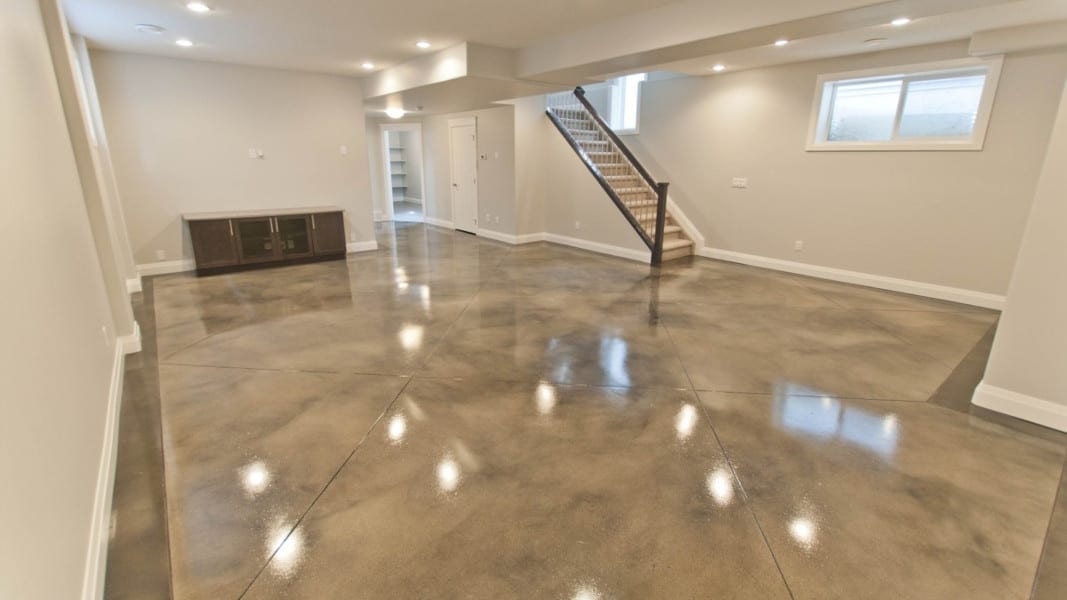
I applied the stain with a pump sprayer, using a sweeping motion to create even coverage without puddles. The key was applying thin, consistent coats rather than trying to achieve full color in one pass. I worked in overlapping patterns, being careful not to leave obvious start and stop marks. The stain reacted immediately when it hit the concrete, fizzing slightly and beginning to change color. I let the first coat react for several hours, watching as the color developed and deepened. Areas with different mineral content in the concrete reacted differently, creating that beautiful mottled effect I wanted.
Multiple coats built up the color intensity gradually. I applied a second coat after the first had fully reacted and dried, usually waiting 4-6 hours between coats. Some areas needed a third coat to reach the depth of color I wanted. I learned to embrace the variations rather than fighting them; those lighter and darker patches created visual interest that made my floor unique. After the final coat reacted fully, I neutralized the floor with a baking soda and water solution to stop the chemical reaction, then rinsed thoroughly multiple times. The concrete looked incredible at this stage, but it was still vulnerable and needed sealing for protection.

Sealing and Protecting Your Stained Floor
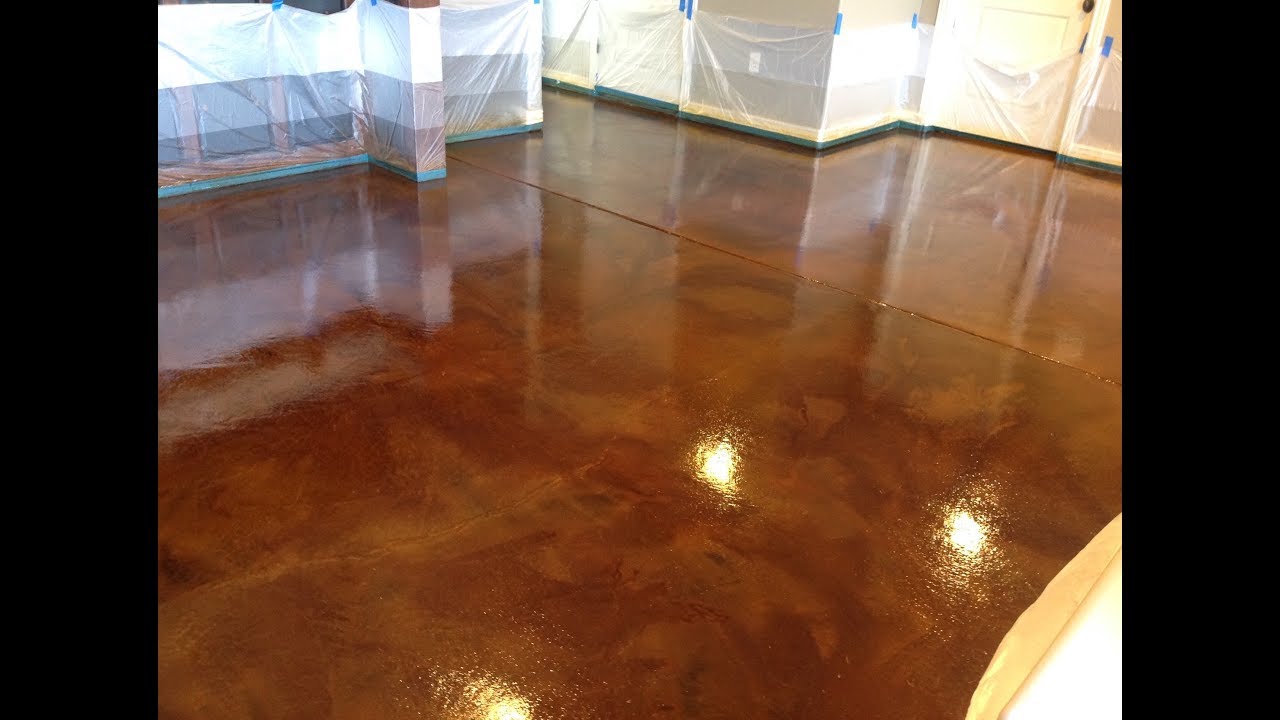
Choosing the right sealer protected my investment and determined how my floor would look and perform long-term. I researched extensively and learned that sealers come in different sheens, from matte to high-gloss, and different chemistries that affect durability and appearance. I chose a penetrating sealer for the first coat, which soaks into the concrete and protects from within without changing the appearance much. This created a strong foundation and ensured the color was locked in permanently.
For the topcoat, I used a water-based urethane sealer with a satin finish. I considered epoxy, which is extremely durable, but decided it was overkill for residential basement use, and I didn’t want the plastic-looking high gloss that epoxy typically creates. The urethane gave me excellent protection against foot traffic, furniture scratches, and spills while maintaining a more natural appearance. I applied three coats total, waiting for each to dry completely before adding the next. I used a microfiber applicator pad on a pole, working in thin, even coats to avoid bubbles and streaks.
The drying and curing process required patience. While each coat dried to the touch in a few hours, I waited overnight between coats for proper curing. After the final coat, I kept everyone off the floor for 72 hours before allowing light foot traffic. Full curing took about a week, during which I avoided moving furniture back or placing rugs on the surface. I learned that rushing this process risks damaging the sealer before it’s fully hardened. Now, several years later, my sealed floor still looks fantastic. I reapply a maintenance coat of sealer annually in high-traffic areas, which takes just a few hours and keeps everything looking fresh.

Creating Patterns and Design Effects
Once I mastered basic staining, I got creative with patterns and effects in different areas of my basement. I used painter’s tape to create a border pattern around the perimeter of my main room, applying a darker stain color within the taped area to create definition. The tape had to be carefully applied to clean, dry concrete and removed while the stain was still wet to avoid pulling up color. The result was a subtle frame effect that defined the space and added visual interest without overwhelming the room.
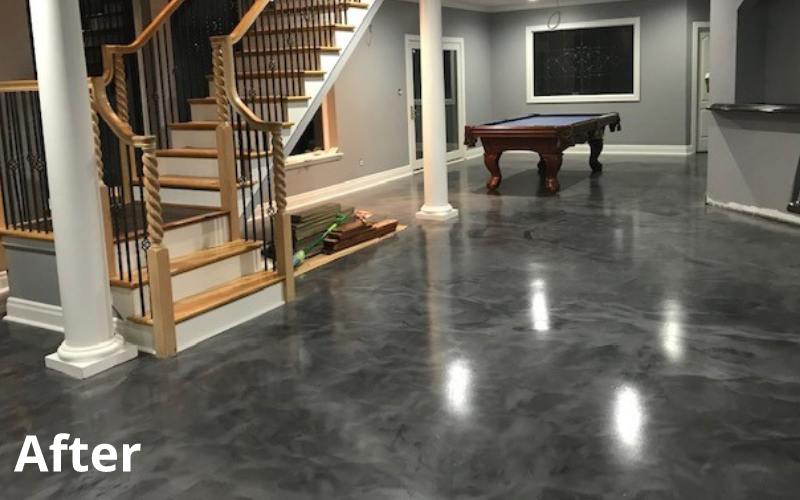
I experimented with layering different stain colors to create depth and complexity. In my media room area, I applied a terra cotta base coat first, let it fully react, then sprayed a lighter amber color over it in random, organic patterns using a spray bottle. This created a rich, layered look with multiple tones blending. The key was applying the second color while thinking about how it would interact with the first, testing on sample boards before committing to the full floor. I loved how this technique made the floor look even more like natural stone.
Stenciling added decorative elements without the permanence of inlaid designs. I found a large medallion stencil that I positioned in the center of my basement lounge area. I secured it carefully with spray adhesive, then applied a contrasting stain color within the stencil boundaries using a sponge dauber for controlled application. Removing the stencil revealed a beautiful compass rose design that became a conversation piece. I sealed over it along with the rest of the floor, so it’s as durable as the base stain. These creative techniques transformed my floor from simply stained concrete into a true design feature that people always comment on when they visit.

Maintaining Your Stained Concrete Floor
Daily maintenance of my stained concrete floor is remarkably easy compared to other flooring types I’ve had. I sweep or dust mop regularly to remove grit and debris that could scratch the sealer over time. For deeper cleaning, I use a pH-neutral floor cleaner diluted in water, mopping with a barely damp mop rather than soaking the floor. I avoid harsh chemicals, ammonia, and acidic cleaners that could damage the sealer or dull the appearance. A microfiber mop works beautifully and dries quickly, leaving no streaks or residue.
Protecting the floor from damage became second nature once I established good habits. I placed felt pads under all furniture legs to prevent scratching when things get moved. Area rugs in high-traffic zones, like in front of the basement stairs and under my desk, distribute wear and add comfort underfoot. I’m careful about what I bring onto the floor; salt and de-icing chemicals tracked in during winter can be particularly harsh, so I keep a mat at the basement entrance and enforce a shoe-removal policy during snowy months.
Resealing maintains the floor’s protection and appearance over time. I spot-check the sealer annually by sprinkling water on the surface in several locations. If water beads up, the sealer is still working. If it soaks in quickly, it’s time to reseal. High-traffic areas wear faster than others, so I sometimes just reseal those spots rather than doing the whole floor. The resealing process is straightforward: clean thoroughly, lightly scuff with fine sandpaper to help the new sealer bond, then apply one or two coats of the same sealer I originally used. This maintenance has kept my floor looking as good as the day I finished it, and I expect it will continue to look great for many more years.

How much does it cost to stain a basement concrete floor yourself?
I spent about $400 for my 800-square-foot basement, including stain, sealer, cleaning supplies, and equipment rentals. Acid stain costs $30-50 per gallon, covering roughly 200-400 square feet depending on porosity. Sealer runs $40-80 per gallon with similar coverage. I rented a floor buffer for cleaning ($50 for the day) and bought safety gear, sprayers, and brushes. Professional installation would have cost $3-7 per square foot, so DIY saved me significantly. Larger spaces cost less per square foot due to better material efficiency.
Can I stain concrete that already has old paint or coating on it?
Generally, no, not successfully. I learned that stains must penetrate concrete to work properly, and old coatings create a barrier that prevents penetration. You’d need to remove all existing paint or sealer first, which involves grinding or chemical stripping. I used a concrete grinder rental to remove old paint in one section of my basement, which was time-consuming and messy but necessary. If removal isn’t practical, consider a water-based concrete paint designed to go over existing coatings instead of staining.

How long does stained concrete flooring last in a basement?
With proper sealing and maintenance, stained concrete can last indefinitely. The stain becomes part of the concrete through a chemical reaction, so it won’t wear off like surface coatings. The sealer is what needs maintenance, typically reapplying every 2-5 years, depending on traffic. My basement floor looks virtually the same as when I finished it four years ago. The concrete slab itself will outlast the house. Unlike carpet or vinyl that need replacing every 10-15 years, stained concrete is essentially permanent, making it incredibly cost-effective long-term.
Will stained concrete work if my basement has moisture issues?
You must address moisture problems before staining. I did a plastic sheet test for 24 hours, and condensation underneath indicates moisture problems that will prevent proper stain adhesion and sealer bonding. Minor moisture can be managed with moisture-mitigating sealers, but active water intrusion requires fixing first through drainage improvements, sump pumps, or waterproofing. Stained concrete handles occasional dampness better than carpet or wood once properly sealed, but chronic moisture issues will cause any flooring to fail. Get moisture under control first, then stain.

Is stained concrete cold and uncomfortable for a basement living space?
Concrete does feel cool to the touch, which I actually appreciate in summer. In winter, I use area rugs in seating areas for warmth and comfort underfoot. The concrete’s thermal mass helps regulate temperature, staying warmer than you’d expect. I considered radiant floor heating, but found rugs sufficient. Some people install floating subfloor systems over stained concrete for insulation, though you’d lose the visual appeal. I wear slippers or socks indoors, and the temperature never bothers me. The durability and beauty outweigh any minor comfort considerations.
Can I change the color later if I don’t like how it turns out?
Changing color is difficult since the acid stain penetrates permanently. You could apply a darker stain over the existing stain, but not lighter colors. I tested extensively on sample boards before committing to avoid this problem. If you truly hate the result, options include grinding off the top layer of concrete (expensive and messy), applying a solid concrete coating or paint over it (hiding the stain), or installing new flooring over it. This is why testing and careful color selection up front are crucial. I recommend doing a large test section, at least 4×4 feet, before committing to the entire floor.

MARBLELIFE® BASEMENT
Polished Concrete Basement – Treadwell
Commercial, Residential, Stained Concrete Flooring
Stained Concrete Basement Floor – Modern – Indianapolis – by
Birmingham Residence Basement Stained Concrete Flooring Photos
![]()
Acid Stained Basement Floor
The Best Concrete Stain Designs for Your Basement

Related articles: