When I first heard about epoxy flooring three years ago, I thought it was just for industrial warehouses and auto shops. But after seeing a friend’s stunning metallic epoxy basement floor that looked like liquid silver, I became obsessed with exploring all the creative possibilities this versatile material offers.
Since then, I’ve installed epoxy flooring in my garage, basement workshop, and even my laundry room, each with completely different aesthetics and purposes. The durability, endless design options, and surprisingly reasonable cost have made epoxy one of my favorite home improvement discoveries, transforming utilitarian spaces into areas I enjoy spending time in.
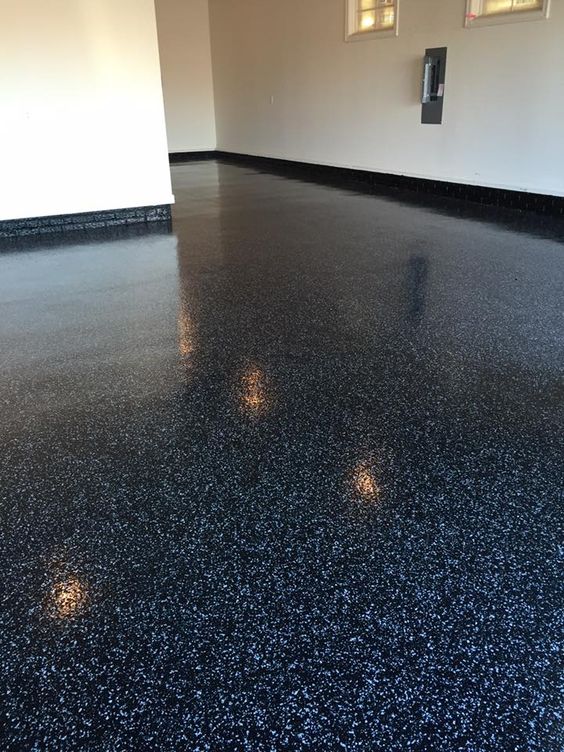
Garage Transformation: From Concrete Slab to Show Floor
My garage epoxy project started as a purely practical decision to protect my concrete floor from oil stains and make cleaning easier. I chose a classic gray base with black flakes, thinking it would hide dirt and look professional. What I didn’t expect was how dramatically it would change the entire feel of my garage space. The glossy finish reflects light so well that I barely need overhead lighting during the day, and the seamless surface makes sweeping and mopping incredibly easy.
The preparation process was more intensive than I anticipated, requiring thorough concrete cleaning, etching with muriatic acid, and filling any cracks or imperfections. I rented a concrete grinder to create the proper surface profile for adhesion, which was loud and dusty but absolutely essential for long-term durability. The entire prep work took two full days, but seeing the professional results three years later, I’m grateful I didn’t rush this critical step.
Living with garage epoxy flooring has exceeded every expectation I had for both function and appearance. Dropped tools don’t chip or crack the surface, oil changes are stress-free because spills wipe up instantly, and the space stays much cleaner overall. I’ve even started using my garage as extended entertaining space during parties because it looks so polished and professional. The investment of time and materials has paid for itself in reduced maintenance and increased usable space.

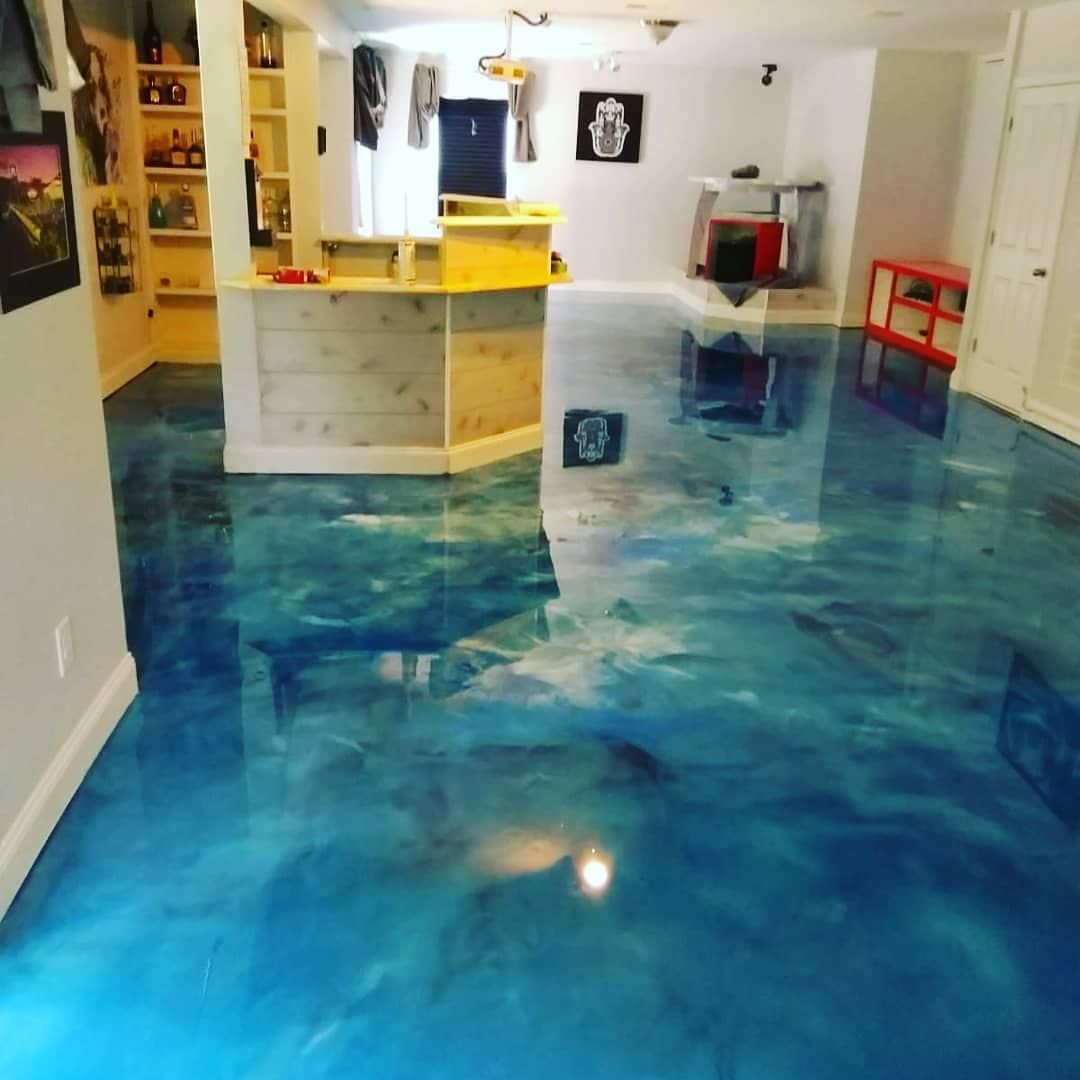
Basement Workshop: Creating a Metallic Masterpiece
Inspired by my garage success, I decided to get creative with my basement workshop using metallic epoxy that creates stunning, almost three-dimensional effects. I chose a bronze and copper blend that gives the floor an aged patina appearance, perfectly complementing the industrial feel I wanted in my woodworking space. The metallic pigments swirl and blend during application, creating unique patterns that make every square foot look like custom artwork.
The application process for metallic epoxy requires different techniques than standard colored epoxy, with multiple layers and careful timing to achieve the desired effects. I learned to work in smaller sections, using special brushes and rollers to manipulate the metallic pigments while they remained workable. The temperature and humidity in my basement had to be carefully controlled during application, requiring a dehumidifier and space heater to maintain ideal conditions throughout the three-day process.
The finished metallic epoxy floor has become the showpiece of my workshop, impressing every visitor and making me excited to spend time on projects down there. The surface is incredibly durable, easily handling dropped lumber, rolling tool carts, and occasional chemical spills from staining projects. More importantly, the beautiful floor inspired me to organize and upgrade other aspects of my workshop, creating a space that feels more like a professional studio than a basement storage area.
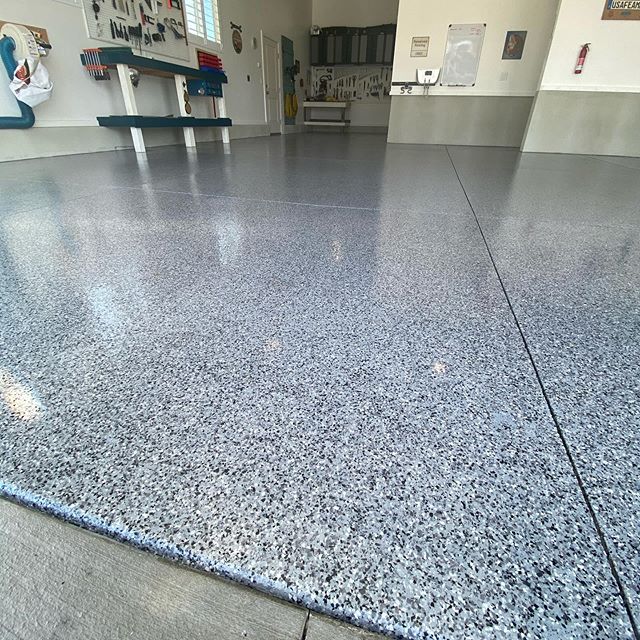
Kitchen and Living Area Applications: Beyond the Expected
After my success with utilitarian spaces, I started exploring epoxy flooring options for main living areas, particularly after seeing stunning residential installations online. My laundry room became my testing ground for a more refined epoxy application using neutral colors and subtle texture additives. I chose a warm gray base with tiny quartz chips that create a sophisticated speckled appearance reminiscent of terrazzo flooring, but at a fraction of the cost.
The key to using epoxy in living spaces is choosing appropriate colors, textures, and finishes that complement your home’s overall aesthetic rather than screaming “industrial.” I incorporated decorative flakes in coordinating colors and applied multiple topcoats for a smooth, furniture-friendly surface. The result looks nothing like a garage floor and everything like expensive custom flooring, proving that epoxy can work beautifully in residential applications when thoughtfully designed.
Maintenance in living areas requires slightly different considerations than garage applications, particularly regarding furniture protection and cleaning products. I use furniture pads religiously to prevent scratches and stick to pH-neutral cleaners that won’t damage the topcoat. The seamless surface means no grout lines to scrub, and the non-porous finish resists stains completely. After two years of daily use, my laundry room floor still looks exactly like installation day, with just regular mopping.

DIY Installation: My Trial and Error Learning Process
I decided to tackle my first epoxy installation myself after getting quotes from professionals that seemed excessive for my garage project. The learning curve was steep, with several mistakes that taught me valuable lessons about proper technique and timing. My biggest error was rushing the surface preparation, which resulted in some adhesion issues that required grinding and reapplication in certain areas, ultimately costing more time and materials than doing it right initially.
Temperature and humidity control proved critical for successful DIY epoxy installation, something I underestimated during my first attempt. I learned to use a digital thermometer and hygrometer religiously, planning installations only during optimal weather conditions or when I could control the environment with heating and dehumidification equipment. Epoxy chemistry is unforgiving, and environmental conditions directly impact cure times, finish quality, and long-term durability.
Tool selection and technique development required practice and patience to achieve professional-looking results. I invested in quality rollers, brushes, and mixing equipment after initial attempts with cheap tools produced disappointing results. Proper mixing ratios, working times, and application patterns all require attention to detail and practice to master. While DIY installation is possible, I recommend starting with smaller, less visible areas to develop skills before tackling major projects.
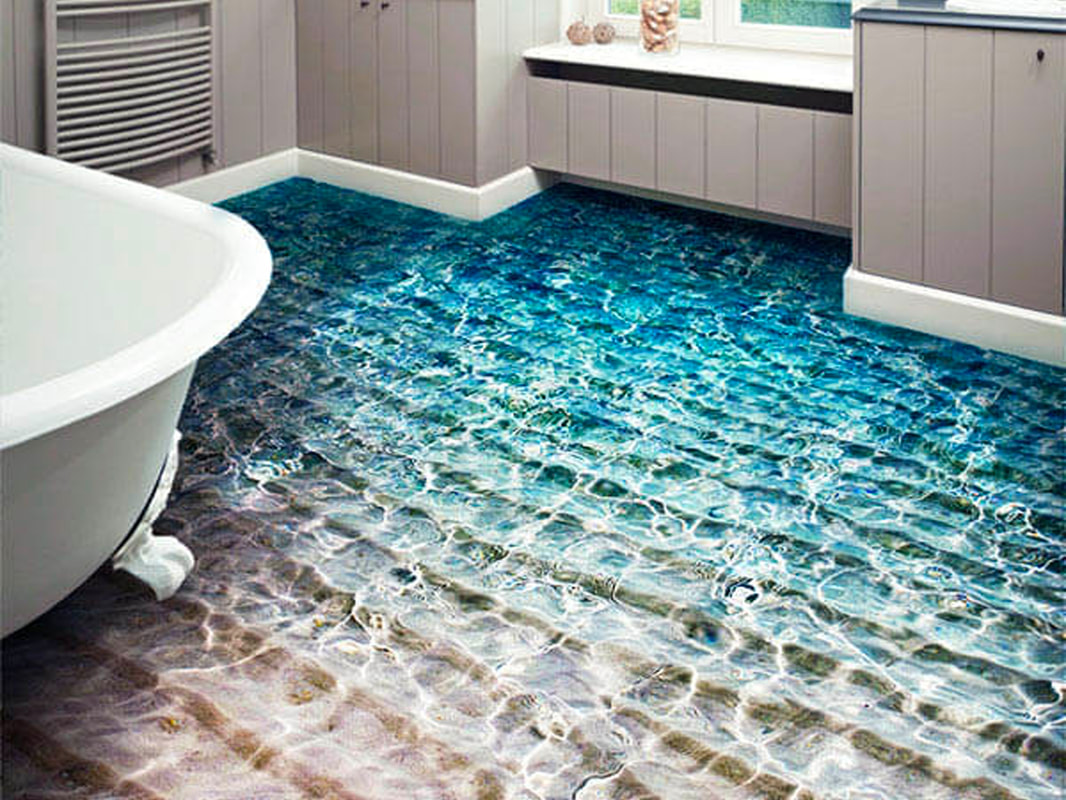
Color and Design Options: Unleashing Creative Possibilities
The design possibilities with epoxy flooring are virtually limitless, something I discovered through experimentation and research. Beyond solid colors, I’ve explored flake systems, quartz blends, metallic effects, and even custom graphics embedded in the epoxy matrix. Each technique creates completely different aesthetics, from subtle and sophisticated to bold and dramatic. The key is matching the design to the space’s intended use and your personal style preferences.
Color psychology plays a significant role in epoxy floor design, particularly in spaces where you spend considerable time. I chose energizing colors like blues and greens for my workshop to maintain alertness during detailed projects, while selecting calming neutrals for living areas. Light colors reflect more light and make spaces feel larger, while darker colors hide dirt better but can make areas feel smaller. Metallic options add luxury and visual interest but require more maintenance to preserve their luster.
Pattern integration opens up even more creative possibilities, from simple geometric designs to complex artistic installations. I’ve experimented with masking tape to create stripes and checkerboard patterns, embedded decorative elements like coins or logos, and even created faux marble effects using special application techniques. The key is planning designs carefully and having realistic expectations about your skill level, as complex patterns require considerable expertise to execute properly.

Long-Term Performance: What I’ve Learned After Years of Use
After three years of living with multiple epoxy installations, I can honestly assess the long-term performance across different applications and conditions. My garage floor, which sees the heaviest abuse, still looks excellent with only minor wear in high-traffic areas. The basement workshop floor shows virtually no wear despite constant use with heavy tools and equipment. The laundry room installation maintains its original appearance with just regular cleaning and occasional reapplication of the topcoat.
Maintenance requirements have proven much lower than I initially expected, particularly compared to other flooring options I’ve used previously. Daily cleaning consists of simple sweeping or dry mopping, while weekly maintenance involves damp mopping with mild detergent. Annual deep cleaning with specialized epoxy cleaners keeps the floors looking fresh, and spot touch-ups are simple when needed. The sealed surface prevents stains and makes the cleanup of spills immediate and stress-free.
The biggest surprise has been how epoxy flooring has improved the overall functionality and enjoyment of every space where I’ve installed it. Rooms feel cleaner, brighter, and more organized because the seamless, glossy surface creates a sense of order and professionalism. Property values have benefited as well, with my real estate agent noting that updated epoxy floors in utility areas are increasingly attractive to buyers who appreciate low-maintenance, durable solutions.

Cost Analysis: Investment vs Long-term Value
My total investment in epoxy flooring across three spaces came to approximately $2,800, including materials, tools, and rental equipment for DIY installation. Professional installation would have cost nearly double, but I valued the learning experience and satisfaction of completing the work myself. When compared to other flooring options like tile, hardwood, or high-end vinyl, epoxy provided superior durability and unique aesthetic options at competitive costs.
Material costs vary significantly based on the type of epoxy system and decorative elements chosen. Basic solid color epoxy runs about $3-5 per square foot for DIY installation, while metallic systems cost $6-8 per square foot. Professional installation adds $3-7 per square foo,t depending on complexity and local labor rates. While initial costs seem reasonable, quality preparation and application tools represent additional investments that shouldn’t be overlooked in budget planning.
Long-term value calculations favor epoxy flooring heavily due to minimal maintenance costs and exceptional durability. Over ten years, I estimate saving thousands of dollars compared to other flooring options that require replacement, refinishing, or extensive maintenance. The increased functionality and enjoyment of my spaces add intangible value that’s difficult to quantify but significantly improves daily life. For homeowners considering epoxy, the investment pays dividends in both practical benefits and aesthetic satisfaction.

How long does epoxy flooring typically last in residential applications?
My oldest epoxy installation is three years old and still looks brand new with proper maintenance. Quality residential epoxy floors typically last 10-20 years, depending on traffic and care. Garage floors handle heavy use excellently, while living areas with normal foot traffic could last even longer. The key factors are proper preparation, quality materials, and regular maintenance. I expect my floors to outlast most traditional flooring options significantly.
Can I install epoxy flooring myself, or do I need professionals?
I successfully installed all my epoxy floors DIY, but it requires patience, proper tools, and careful attention to instructions. Start with smaller, less visible areas to develop skills. Surface preparation is critical and often underestimated by DIYers. While possible to do yourself, complex designs or large areas might benefit from professional installation. I’d recommend professionals for living areas where perfection matters most.

What maintenance does epoxy flooring require long-term?
Maintenance is surprisingly minimal compared to other flooring types. Daily sweeping, weekly damp mopping with mild detergent, and annual deep cleaning keep my floors perfect. Avoid harsh chemicals and use furniture pads to prevent scratches. I reapply topcoat every 3-5 years in high-traffic areas. The sealed surface means no waxing, special treatments, or intensive maintenance routines are required.
How does epoxy flooring handle moisture and spills?
Epoxy creates a completely waterproof, non-porous surface that handles moisture excellently. Spills wipe up instantly without staining or damage. My basement floor in a naturally humid environment shows no moisture issues after three years. This makes epoxy perfect for laundry rooms, bathrooms, and basements where moisture is a concern. Just ensure proper concrete moisture testing before installation.

What are the biggest mistakes to avoid with DIY epoxy installation?
Rushing surface preparation was my biggest mistake, causing adhesion problems that required rework. Other common errors include working in poor environmental conditions, improper mixing ratios, and inadequate tools. Take time for thorough cleaning, etching, and crack repair. Control temperature and humidity during application. Invest in quality mixing and application tools. Don’t attempt complex designs without experience on simpler projects first.
Is epoxy flooring suitable for homes with children and pets?
Absolutely! The smooth, seamless surface is incredibly easy to clean and doesn’t harbor bacteria or allergens like carpet or grout lines. My floors handle pet accidents, dropped food, and kids’ messes without staining or damage. The slip-resistant additives I used provide good traction when wet. Just use furniture pads under heavy items and clean spills promptly. It’s more kid and pet-friendly than most traditional flooring options.
Epoxy Polyaspartic Floor Systems – Concrete coatings – Epoxy
Flooring ideas for home renovation – Page 2 of 2 – RTF

Related articles: