When I first stumbled across photos of 3D epoxy floors on Pinterest three years ago, I was absolutely mesmerized by the optical illusion of walking on water or stepping over deep canyons. The realistic depth and stunning visual effects seemed almost too good to be true.
After months of research, three failed DIY attempts, and finally hiring professionals for my basement renovation, I learned that 3D epoxy flooring is both more challenging and more rewarding than I ever imagined. The process taught me everything about surface preparation, design selection, installation techniques, and long-term maintenance that I wish I’d known before starting this ambitious project.
Understanding the 3D Epoxy Installation Process
Surface preparation became my biggest learning curve when I attempted my first DIY installation in my garage workshop. I thought a simple concrete cleaning would suffice, but I quickly discovered that 3D epoxy requires absolutely pristine surfaces free of oils, stains, and even microscopic dust particles. After my first attempt failed due to poor adhesion, I invested in diamond grinding equipment to create the proper surface profile. The concrete needs to be completely dry and chemically neutral, which means waiting two weeks after cleaning with degreasing agents.
The layering process demands precision timing that I underestimated during my second DIY attempt. First comes the primer coat, followed by a base color layer, then the 3D image installation, and finally multiple clear topcoats. Each layer must cure to the exact right stage before applying the next, and environmental factors like temperature and humidity dramatically affect working time. I learned that rushing between coats creates adhesion problems, bubbles, and cloudy finishes that ruin the entire effect.
Image placement and bubble removal require patience and skill that took me several attempts to master. The 3D vinyl or fabric image must be installed perfectly flat without wrinkles or air pockets that show through the final clear coats. I developed techniques using squeegees and heat guns to work out bubbles systematically, but the window for corrections is very narrow once the image touches the wet epoxy. Professional installers use specialized tools and techniques that make this process look deceptively simple.
Choosing the Right 3D Design for Your Space
Design selection proved more complex than simply picking a pretty picture online. I learned that certain designs work better in specific room sizes and lighting conditions. My first choice was an intricate underwater scene that looked stunning in photos but became overwhelming in my small bathroom space. Simpler designs with fewer visual elements work better in compact areas, while complex scenes need larger spaces to be properly appreciated without feeling claustrophobic.
Lighting considerations became crucial for achieving the desired 3D effect in my installations. Natural light enhances the depth illusion dramatically, but artificial lighting placement can either enhance or destroy the visual impact. I discovered that overhead lighting directly above creates harsh shadows that flatten the 3D effect, while angled lighting from multiple sources maintains the illusion beautifully. Some designs look completely different under LED versus incandescent lighting, so testing samples under your actual lighting conditions is essential.
Custom versus pre-made designs present significant cost and quality differences that I learned through experience. Pre-made vinyl images cost $2-5 per square foot but offer limited size and customization options. Custom printed designs range from $8-20 per square foot but can be tailored exactly to your space dimensions and personal preferences. I splurged on a custom ocean scene for my main bathroom and used pre-made geometric patterns for smaller areas, finding both approaches successful when matched appropriately to the space.

DIY Versus Professional Installation Considerations
Cost analysis initially drew me toward DIY installation, but hidden expenses quickly accumulated beyond my original budget calculations. Basic epoxy materials seemed affordable at $200-400 for a small bathroom, but specialized tools, primers, sealers, and replacement materials for mistakes pushed my actual costs much higher. By my third attempt, I’d spent more on materials and tools than hiring professionals would have cost initially, though I gained valuable experience and skills for future projects.
Skill requirements proved more demanding than YouTube tutorials suggested, particularly for achieving bubble-free installations and proper curing conditions. Temperature and humidity control, precise mixing ratios, and timing coordination require experience that develops over multiple projects. My early attempts suffered from various issues like cloudy finishes, trapped bubbles, and poor adhesion that professional installers avoid through experience and proper equipment. The learning curve is steep and expensive when mistakes require complete removal and reinstallation.
Time investment became a major consideration as my DIY projects stretched over weeks instead of the planned weekend installations. Each coat requires specific curing times that can’t be rushed, and environmental conditions often delay progress unexpectedly. Professional teams complete installations in 3-5 days with proper scheduling and climate control, while my DIY attempts took 2-3 weeks with multiple delays for temperature, humidity, and material availability issues that disrupted the carefully timed process.

Long-Term Durability and Maintenance Requirements
Wear resistance exceeded my expectations after three years of daily use in high-traffic areas throughout my home. The thick topcoat layers protect the 3D image effectively from scratches, stains, and impact damage that would ruin other flooring types. My kitchen installation shows minimal wear despite constant foot traffic, dropped objects, and spilled liquids. However, I learned that quality varies significantly between different epoxy formulations, and cheaper systems show wear much faster than premium UV-resistant products.
Chemical resistance proved excellent for most household substances, but certain products can cause permanent damage that I discovered through unfortunate experimentation. Standard cleaning products, oils, and even pet accidents clean up easily without staining or etching. However, paint thinners, acetone-based nail polish removers, and certain automotive fluids can soften or discolor the epoxy surface permanently. I learned to clean spills immediately and avoid harsh chemicals that weren’t specifically approved for epoxy surfaces.
Maintenance routines remain surprisingly simple compared to other specialty flooring options. Daily sweeping and weekly mopping with neutral pH cleaners keep my floors looking pristine with minimal effort. I apply a maintenance coat every 2-3 years in high-traffic areas to refresh the surface shine and protection. The seamless surface eliminates grout lines and crevices that trap dirt and bacteria, making these floors more hygienic than traditional options while requiring less intensive cleaning than natural stone or tile installations.
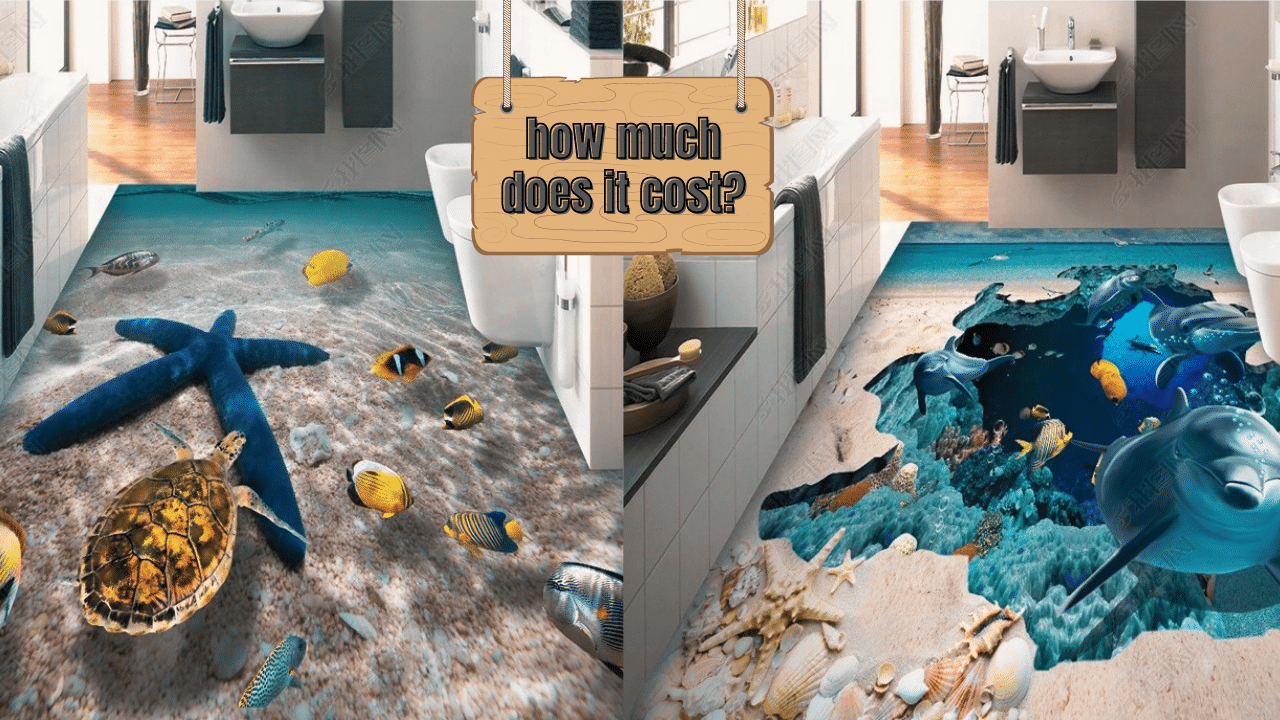
Cost Analysis and Budget Planning
Material costs vary dramatically based on quality level and customization requirements, which I learned to evaluate carefully. Basic DIY kits start around $300-500 for small bathroom installations, but often produce disappointing results compared to professional-grade materials. Mid-range systems cost $800-1500 for materials alone, while premium UV-resistant formulations with custom images can reach $2000-3000 for average-sized rooms. I found that investing in quality materials upfront prevents expensive do-overs and delivers better long-term results.
Professional installation pricing reflects the specialized skills and equipment required for consistently successful results. In my area, professional quotes ranged from $12-25 per square foot, depending on design complexity and room conditions. Simple geometric patterns in prepared spaces cost less, while complex custom images requiring extensive surface preparation command premium pricing. I learned that the lowest bids often indicate inexperienced installers who may lack proper equipment or use inferior materials.
Hidden costs caught me off guard during my budget planning process, adding significantly to initial estimates. Surface preparation often requires concrete grinding, crack repair, or moisture mitigation that wasn’t obvious initially. Design customization, expedited shipping for materials, and climate control during installation add expenses that aren’t included in basic quotes. I recommend budgeting an additional 25-30% beyond initial estimates to cover unexpected requirements that commonly arise during actual installation.

Design Ideas and Creative Applications
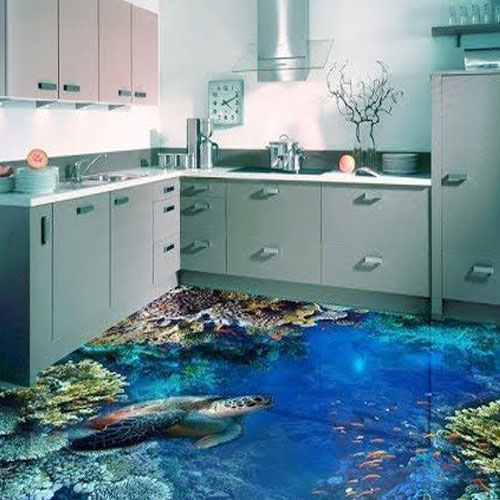
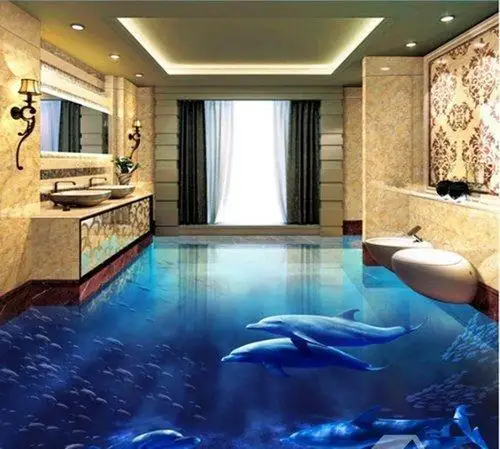
Theme selection opened up endless creative possibilities that transformed ordinary spaces into stunning conversation pieces throughout my home. Ocean themes work beautifully in bathrooms and pool areas, creating the illusion of walking on water or coral reefs. I used a galaxy design in my home theater that makes the floor appear to drop into deep space, while geometric patterns in my kitchen provide visual interest without overwhelming the cooking workspace. Each room’s function influenced my design choice for optimal visual impact.
Color coordination with existing décor required careful planning to ensure the dramatic floor enhancement complemented rather than competed with other design elements. I learned that 3D floors work best as focal points supported by neutral wall colors and simple furnishings. Bold patterns require restraint in other design elements, while subtle 3D effects can support more colorful room schemes. Testing design samples under actual room lighting conditions prevented several potential mismatches that looked different than expected.
Transition planning between 3D epoxy and adjacent flooring types presented practical challenges that required creative solutions. Threshold strips work for standard height differences, but the thick epoxy buildup often creates awkward transitions to carpet, tile, or hardwood. I used custom beveled edges and coordinating materials to create smooth transitions that maintain the illusion while providing practical functionality. Planning these details early prevents installation problems and ensures professional-looking results throughout connected spaces.
How long does 3D epoxy flooring typically last in high-traffic areas?
With proper installation and maintenance, my floors have performed excellently for three years in busy family areas. Quality systems should last 10-15 years with normal residential use. I apply maintenance coats every 2-3 years in high-traffic zones to refresh protection. The key is using UV-resistant formulations and proper surface preparation during installation.
Can 3D epoxy flooring be installed over existing tile or other surfaces?
It’s possible but requires extensive preparation I learned through experience. Existing surfaces must be completely clean, deglossed, and structurally sound. Loose tiles need removal, and grout lines require filling to create smooth surfaces. I recommend concrete substrates for best results, though I’ve successfully installed over properly prepared existing floors with extra primer coats.

What’s the biggest mistake people make with 3D epoxy flooring?
Rushing the process causes most failures I’ve observed. Each coat needs a proper curing time that can’t be accelerated safely. Temperature and humidity control during installation is crucial but often ignored. Poor surface preparation causes adhesion failures months later. I learned that patience and proper preparation prevent expensive do-overs that cost more than hiring professionals initially.
How do I clean and maintain 3D epoxy floors properly?
A: Daily sweeping and weekly mopping with neutral pH cleaners keep mine looking perfect. Avoid abrasive cleaners, scrubbing pads, or harsh chemicals like acetone. Clean spills immediately to prevent staining. I use microfiber mops and manufacturer-approved cleaners. The seamless surface makes cleaning easier than grout lines in traditional tile installations.

Are 3D epoxy floors slippery when wet?
Standard finishes can be slippery when wet, which I addressed with anti-slip additives in topcoats for bathroom installations. Textured topcoats provide better traction but slightly reduce the 3D visual effect. I use smooth finishes in dry areas and textured versions near water sources. Proper design planning addresses slip resistance without sacrificing appearance.
Can damaged 3D epoxy flooring be repaired without complete replacement?
Minor scratches and small damaged areas can often be spot-repaired with matching materials, though perfect blending requires skill. I’ve successfully patched small areas using careful color matching and blending techniques. However, major damage or widespread wear typically requires complete refinishing. The seamless nature makes partial repairs challenging to blend invisibly with the surrounding areas.

3D Epoxy Flooring Painting Art Murals Prices

3D Epoxy Flooring: Pros, Cons & Costs – Home Improvement Cents
Related articles: