When I decided to tackle my first bathroom floor tile project five years ago, I was terrified but determined to save thousands on professional installation costs. What started as a weekend project taught me invaluable lessons about preparation, patience, and the incredible satisfaction of creating something beautiful with my own hands. Through three successful bathroom renovations and several learning experiences, I’ve discovered that DIY tile installation is absolutely achievable for determined homeowners willing to invest time in proper planning and execution.
Planning and Measuring Your Bathroom Space
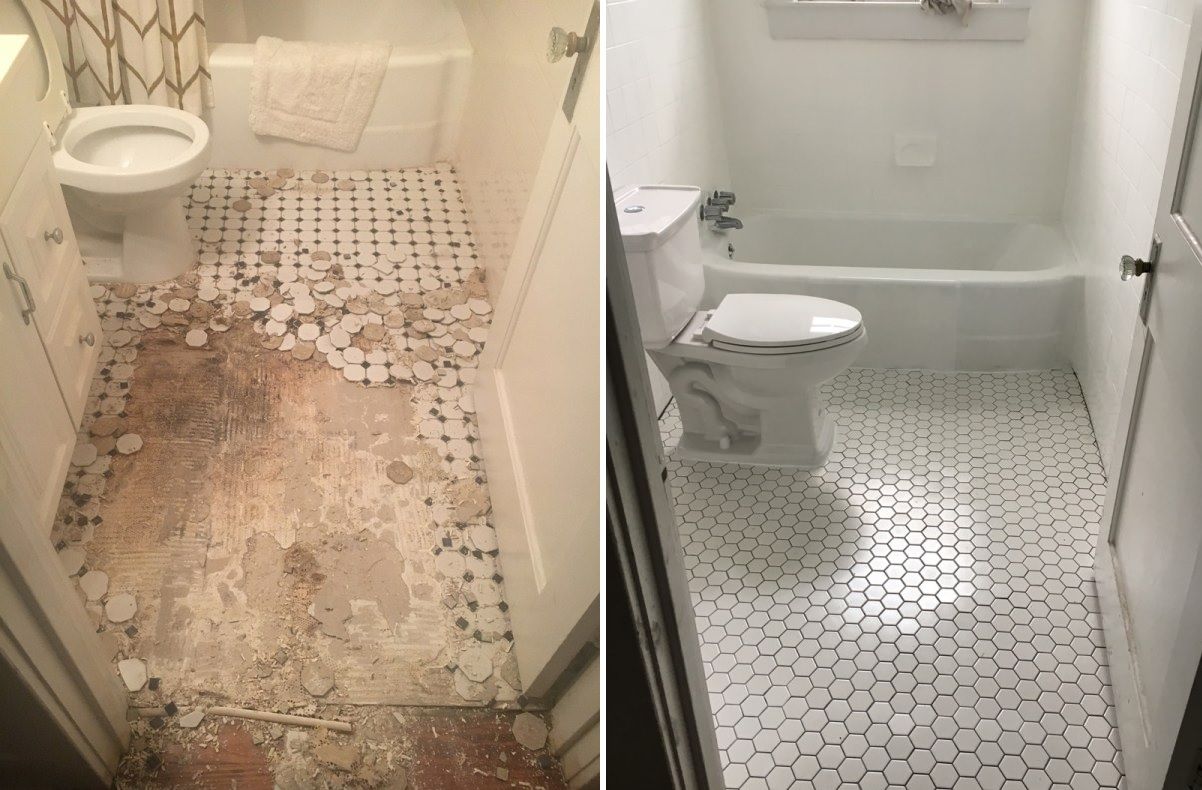
I learned the hard way that accurate measurements make the difference between a professional-looking installation and a disaster that requires expensive corrections. My first project suffered from poor planning when I underestimated tile quantities and had to wait weeks for additional materials that didn’t quite match my original purchase.
The color variation between batches was subtle but noticeable, creating an inconsistent appearance that bothered me every time I walked into that bathroom. Now I measure multiple times, calculate square footage carefully, and always order 10-15% extra tiles to account for cuts, breakage, and future repairs. I also verify that all tiles come from the same production lot to ensure consistent coloring throughout the installation.
Creating a detailed floor plan on graph paper helped me visualize tile layouts and identify potential problem areas before starting installation. I mark all fixtures, doors, and obstacles, then experiment with different starting points to minimize awkward cuts around toilets and vanities. The goal is to avoid having narrow slivers of tile along visible edges, which scream amateur installation to anyone who notices.
I learned to center my layout on the most prominent wall or fixture, working outward to ensure balanced appearances. This planning phase prevents costly mistakes and ensures the most visually appealing tile arrangement possible while maximizing the use of full tiles in high-visibility areas.
I always test my layout with actual tiles before applying any adhesive, using chalk lines and spacers to verify that my plan works in reality. This dry run reveals issues that drawings cannot predict and allows me to make adjustments without wasting materials or time. During one project, my paper plan looked perfect, but when I laid out actual tiles, I discovered that my toilet flange placement would create an awkward partial tile that looked terrible. Adjusting the layout by shifting everything two inches solved the problem completely. The extra hour spent in planning saves days of frustration during actual installation and prevents expensive mistakes that require starting over with new materials.
Essential Tools and Materials for Success
My tool collection has evolved through trial and error, but certain items prove essential for every bathroom tile project I tackle. A high-quality wet tile saw makes precise cuts that hand tools simply cannot achieve, and I’ve found that renting professional-grade equipment produces far better results than buying cheap alternatives that struggle with dense bathroom tiles. The difference becomes obvious when cutting porcelain or natural stone tiles that can chip or crack with inferior tools. I typically rent a good wet saw for $40-60 per day rather than buying a $200 saw that performs poorly and frustrates me throughout the project. Professional tools also include features like laser guides and adjustable fences that ensure accurate, repeatable cuts.
I invest in proper safety equipment because bathroom tile work involves sharp edges, chemical adhesives, and potential respiratory hazards from cutting dust. Safety glasses, knee pads, dust masks, and rubber gloves protect me during long installation days while maintaining the precision and focus necessary for quality work that I’ll live with for years. I learned about the importance of knee protection after spending an entire day kneeling on hard surfaces and being unable to walk normally for days afterward. Good knee pads with thick cushioning and stable straps make eight-hour installation days manageable and prevent long-term joint damage that could affect my ability to tackle future projects.
Quality spacers, levels, and measuring tools ensure consistent gaps and straight lines that separate amateur installations from professional-looking results. I learned that cheap spacers break easily and inconsistent spacing shows immediately in finished installations, creating grout lines that wander and look sloppy. My 4-foot level helps ensure that tile rows stay straight across long runs, while smaller levels help with individual tile placement. I also rely on a good tape measure, chalk line, and square for layout accuracy. Investing in proper tools pays dividends in both efficiency and final appearance, and good tools last through multiple projects, making them cost-effective investments for serious DIY enthusiasts.
Surface Preparation That Prevents Future Problems
I spent an entire weekend removing old flooring and preparing my bathroom subfloor, but this preparation phase determines the success of everything that follows. Any shortcuts in surface preparation show up as cracked tiles, uneven surfaces, or premature failure that requires complete reinstallation. During my second bathroom project, I was tempted to skip thorough floor prep because the existing surface looked adequate, but a friend who’s a professional contractor convinced me otherwise. That extra preparation work prevented problems that could have cost thousands to fix later. Proper preparation takes time but prevents expensive disasters and ensures that beautiful tiles stay beautiful for decades rather than years.
Checking for level surfaces and structural soundness prevents tiles from cracking due to subfloor movement or settling. I use a long level to identify high and low spots, then use floor leveling compound to create the smooth, stable surface that quality tile installation requires. Even small irregularities become obvious once tiles are installed, as light catches on uneven surfaces and creates shadows that highlight imperfections. I’ve learned to be ruthless about achieving level surfaces, even when it means additional work with self-leveling compound or shimming. This step cannot be skipped without compromising the entire project, and the smooth, professional appearance of properly leveled tiles justifies every minute spent on this crucial preparation phase.
Moisture barriers became crucial in my bathroom projects after learning how water damage can destroy beautiful tile work from underneath. I apply waterproof membrane systems according to manufacturer specifications, paying special attention to corners, penetrations, and areas around fixtures where water intrusion most commonly occurs. My first bathroom renovation didn’t include proper moisture barriers, and three years later, I discovered water damage to the subfloor that required extensive repairs. Now I treat moisture barrier installation as insurance against costly future problems. The additional cost and time for quality waterproofing systems pale compared to the expense of repairing water damage and completely reinstalling failed tile floors.

Installation Techniques for Professional Results
Starting with a straight, square layout line prevents the accumulation of errors that ruin tile projects and require expensive corrections. I establish my starting point using the longest, straightest wall as reference, then verify the square using the 3-4-5 triangle method my contractor friend taught me. These layout lines guide the entire installation and determine the final appearance.
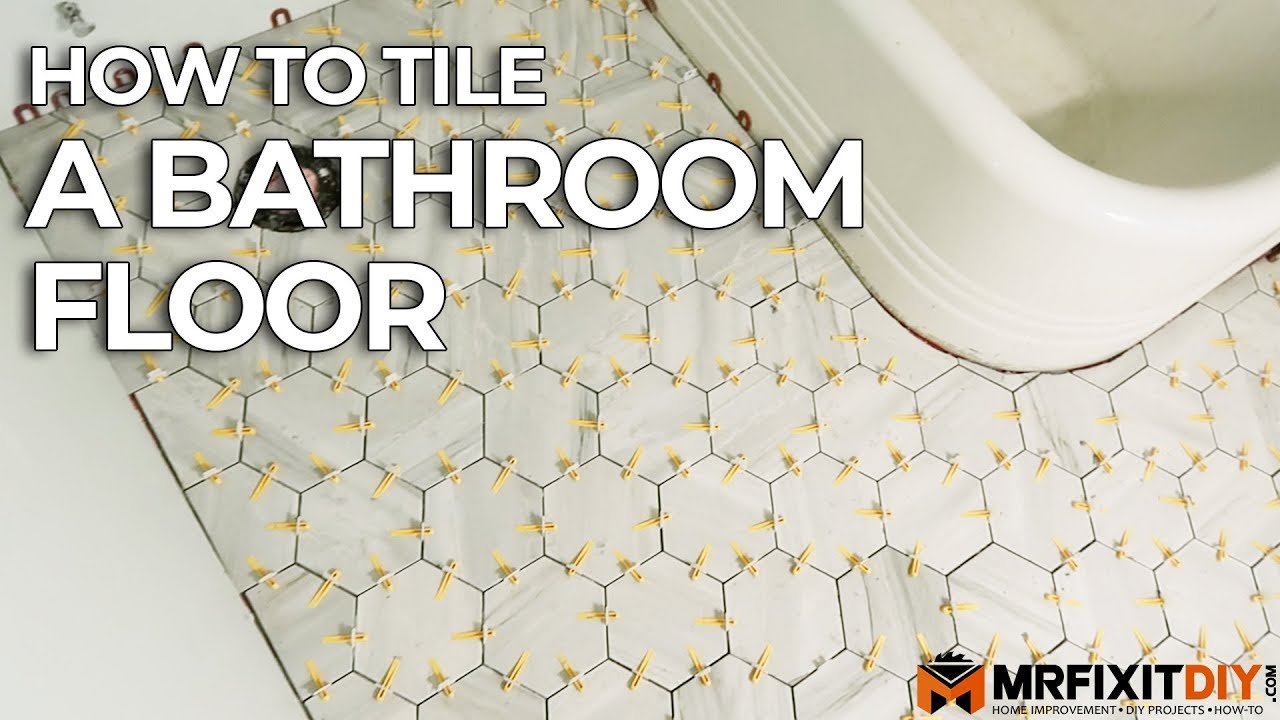
I work in small sections, typically 3-4 square feet at a time, to maintain proper adhesive working time and ensure consistent spacing throughout the installation. Rushing leads to mistakes, uneven tiles, and adhesive that skins over before tiles can be properly embedded. Patience during installation prevents problems that take days to correct.
My tapping technique using a rubber mallet and beating block ensures tiles sit level and properly embedded in adhesive without cracking delicate ceramic surfaces. I check frequently with a straight edge to maintain consistent surface planes and adjust tiles before the adhesive sets. This attention to detail creates the smooth, professional finish I want.

Grouting and Finishing for Lasting Beauty
I learned that grout selection impacts both appearance and maintenance requirements for years to come, so I chose epoxy grouts for bathroom floors despite the higher cost and more challenging application. The superior stain resistance and waterproof properties justify the extra effort in moisture-prone bathroom environments where traditional grouts can fail.
My grouting technique involves working diagonally across tiles to ensure complete joint filling without pulling grout out of previous sections. I use a rubber float held at 4-5 degree angle, removing excess immediately to prevent difficult cleanup later. Proper technique during this phase determines how professional the finished installation appears.
Curing time patience prevents problems that destroy beautiful installations through premature use or water exposure. I wait the full recommended time before allowing foot traffic or moisture exposure, even though the tiles look finished. This final patience protects the investment of time and materials I’ve committed to the project.
Troubleshooting Common DIY Installation Issues
Lippage, where adjacent tiles sit at different heights, plagued my early installations until I learned proper techniques for maintaining level surfaces throughout the project. I now use tile leveling systems and check frequently with straight edges to catch problems before the adhesive sets. Prevention proves much easier than correction after installation.
Uneven grout lines show immediately in finished installations and scream amateur work to anyone who sees them. I maintain consistent spacing using quality spacers and checking alignment frequently during installation. Small adjustments during installation prevent obvious problems in the finished floor.
Color variations in tiles can create patchy appearances unless properly managed during installation. I blend tiles from multiple boxes and arrange them to distribute color variations evenly across the floor. This planning creates natural-looking installations that enhance rather than detract from the overall bathroom design.

How long does DIY bathroom floor tile installation typically take?
My bathroom projects usually take 4-6 days from start to finish, including surface preparation, installation, grouting, and curing time. The actual tile laying represents only about 40% of the total time, with preparation and finishing work consuming most hours. Weekend warriors should plan for 2-3 weekends to complete quality installations without rushing critical steps that determine long-term success.
What’s the most challenging part of DIY bathroom tile installation?
I find that cutting tiles around toilets, pipes, and irregular shapes requires the most skill and patience. These precision cuts determine how professional the finished installation appears. I recommend practicing on scrap tiles and investing in quality cutting tools. Taking time for accurate measurements and templates prevents expensive mistakes during these critical phases.
Can I install bathroom floor tiles over existing flooring?
Sometimes, but I prefer removing old flooring to ensure proper adhesion and eliminate height issues with door clearances and transitions. Installing over existing floors can work with thin tiles and stable substrates, but adds complexity and potential failure points. The extra work of removal usually pays off in better long-term performance and appearance.
How do I know if my bathroom subfloor is suitable for tile?
I check for deflection by walking across the floor and looking for movement, squeaks, or bounce that indicate structural issues. Subfloors should be solid, level within 1/4 inch over 10 feet, and properly secured. Any sponginess or movement requires correction before tile installation. When in doubt, I consult with contractors about structural adequacy.
What’s the biggest mistake DIY installers make with bathroom tiles?
Rushing the preparation phase causes most failures I’ve seen in amateur installations. Skipping moisture barriers, inadequate surface preparation, or poor layout planning creates problems that show up months later as cracked tiles or water damage. Investing time in proper preparation prevents expensive corrections and ensures installations that last for decades rather than years.
How much money can I save doing bathroom tile installation myself?
I typically save 60-70% of professional installation costs by doing the work myself, with savings ranging from $1,500 to $4,000 depending on bathroom size and tile complexity. However, I factor in tool costs, time investment, and the learning curve for first projects. The financial savings become most significant on the second and subsequent projects when I already own tools and have developed skills.

Easy DIY Bathroom Floor Makeover Idea on a Budget Floor makeover

DIY Painted Bathroom Floor

Related articles: