Retro linoleum flooring is making a stylish comeback, offering a blend of nostalgia and practicality that’s perfect for kitchens. This type of flooring combines durability with a vintage aesthetic, making it an excellent choice for homeowners looking to create a unique and inviting kitchen space. Let’s discuss the benefits, popular styles, installation tips, maintenance advice, and design ideas for retro linoleum kitchen flooring.
Benefits of Retro Linoleum Flooring
- Durability: One of the key advantages of linoleum is its durability. Made from natural materials like linseed oil, wood flour, and cork dust, linoleum is designed to withstand heavy foot traffic and daily wear and tear. It resists scratches and dents, ensuring your kitchen floor remains in great condition for years.
- Eco-Friendly: Linoleum is an environmentally friendly flooring option. It is biodegradable and made from renewable resources, which makes it a sustainable choice. Additionally, linoleum has low VOC emissions, contributing to better indoor air quality and a healthier home environment.
- Comfort Underfoot: Linoleum provides a comfortable surface to walk and stand on, which is particularly beneficial in the kitchen where you may spend a lot of time cooking and preparing meals. Its slight resilience reduces strain on your feet and joints, making it a practical choice for busy households.
- Easy Maintenance: Maintaining linoleum flooring is straightforward. Regular sweeping or vacuuming and occasional mopping with a mild cleaner are usually all that’s required to keep the floor looking its best. Linoleum’s resistance to stains and spills makes it ideal for kitchen use.
- Affordable: Compared to other flooring options, linoleum is relatively affordable. It offers a cost-effective way to achieve a stylish and durable kitchen floor without breaking the bank. Its long lifespan and minimal maintenance requirements further add to its value.

Popular Styles of Retro Linoleum Flooring
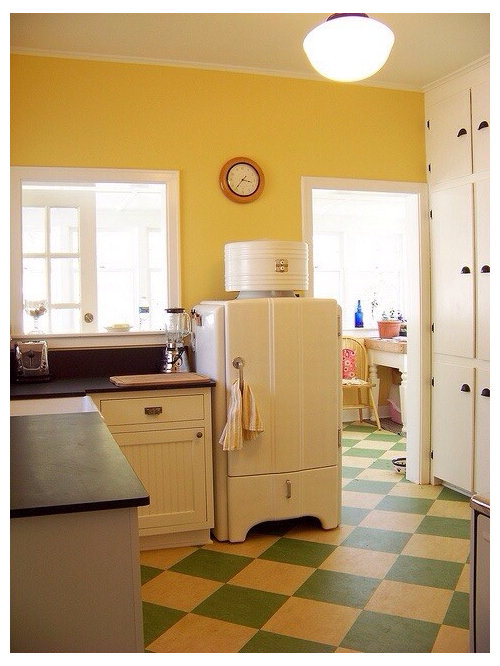
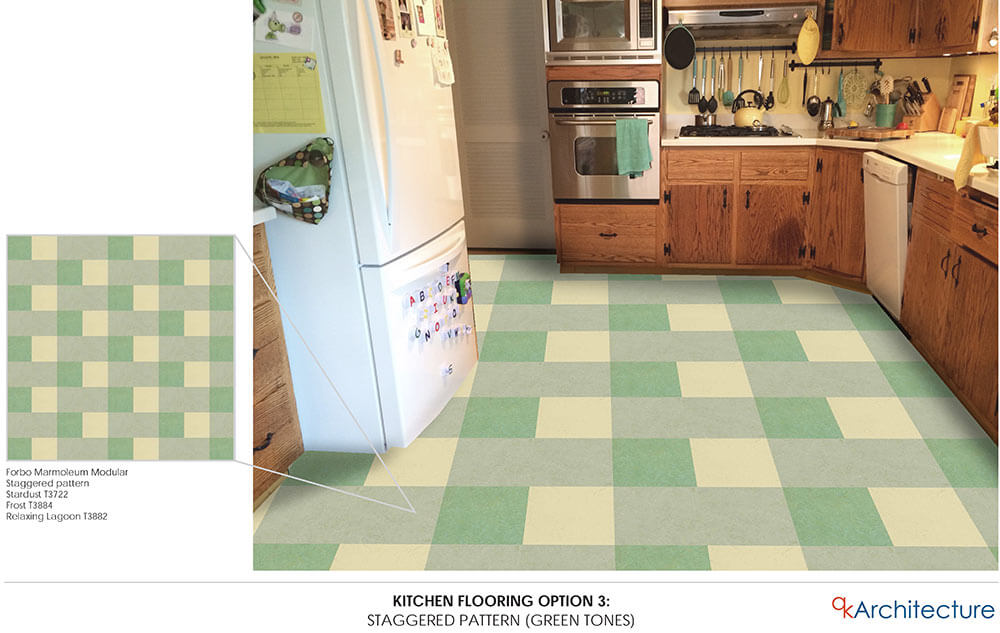
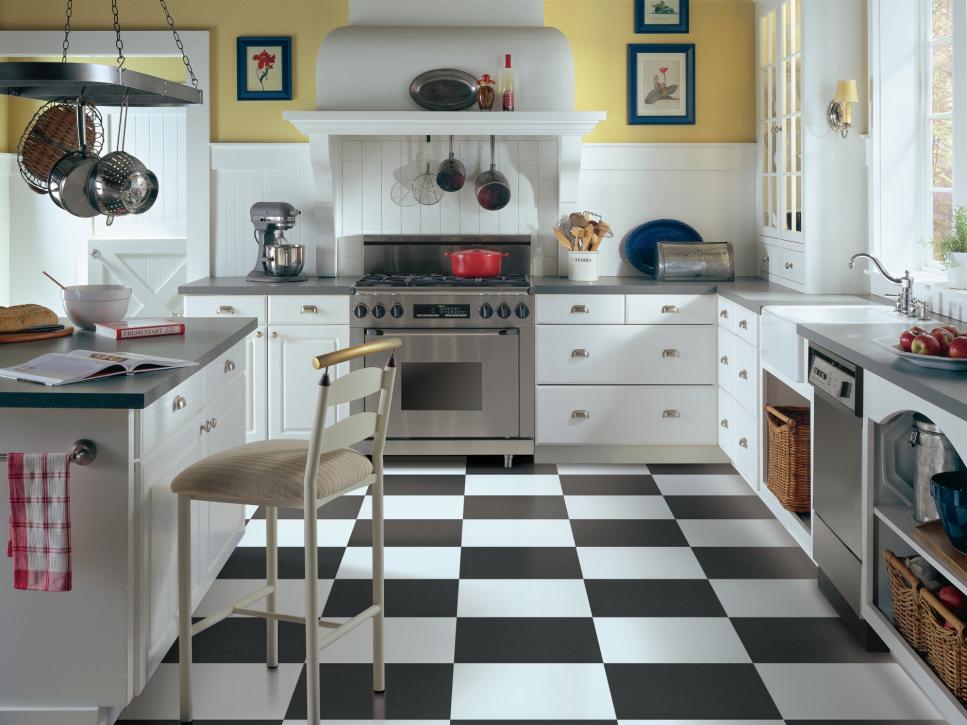
Checkerboard Patterns: Checkerboard patterns are a classic choice for retro kitchens. Black and white or red and white checkerboard linoleum floors can instantly evoke a 1950s diner vibe. This bold and timeless pattern adds a playful and nostalgic touch to any kitchen space.
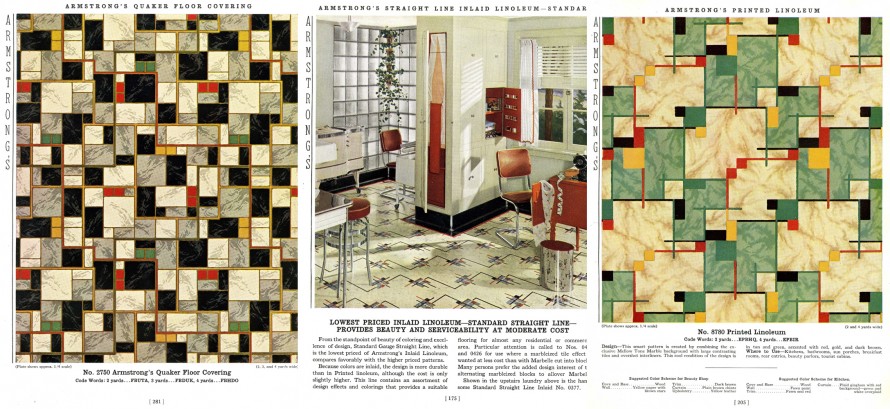
Geometric Designs: Geometric patterns are another popular option for retro linoleum flooring. Designs featuring bold shapes and vibrant colors, such as hexagons, triangles, and diamonds, can create a dynamic and eye-catching look. These patterns work well in both small and large kitchens, adding visual interest and depth.
Vintage Floral Prints: For a softer and more whimsical aesthetic, consider vintage floral prints. Linoleum with floral patterns in pastel colors can create a charming and cozy atmosphere reminiscent of mid-century kitchens. This style pairs well with vintage-inspired decor and accessories.
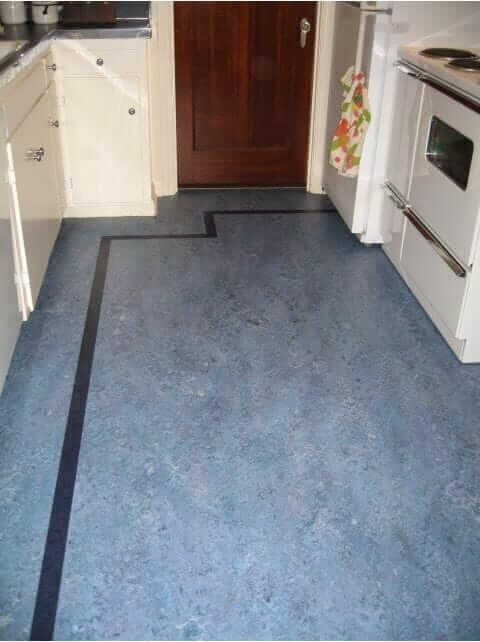
Solid Colors with Borders: Solid color linoleum with contrasting borders can create a clean and sophisticated retro look. Choose a base color that complements your kitchen’s color scheme and add a border in a contrasting shade for a polished and tailored appearance. This style offers a subtle nod to retro design without being overwhelming.
Faux Wood and Stone: Linoleum flooring that mimics the appearance of natural materials like wood and stone can add a touch of retro elegance to your kitchen. Faux wood and stone designs provide the look of high-end materials without the associated cost and maintenance. These styles can complement a variety of kitchen decor themes.

Installation Tips for Retro Linoleum Flooring
Preparing the Subfloor: Proper preparation of the subfloor is crucial for a successful linoleum installation. Ensure the subfloor is clean, dry, and level. Remove any existing flooring, debris, or adhesive residue. If necessary, use a leveling compound to smooth out uneven areas. A well-prepared subfloor ensures the linoleum adheres properly and remains stable over time.
Measuring and Cutting: Measure the dimensions of your kitchen to determine the amount of linoleum needed. Roll out the linoleum and let it acclimate to the room’s temperature for at least 24 hours before cutting. Use a utility knife or linoleum cutter to make precise cuts, allowing for any necessary adjustments around obstacles and edges.
Applying Adhesive: Apply a thin layer of linoleum adhesive to a small section of the subfloor using a notched trowel. Spread the adhesive evenly, ensuring full coverage. Carefully place the linoleum onto the adhesive, starting from one corner and working your way outwards. Press the linoleum firmly into place to ensure proper adhesion.
Smoothing Out Air Bubbles: Use a floor roller to smooth out any air bubbles or wrinkles in the linoleum. Roll the floor in all directions, applying even pressure to ensure the linoleum lies flat and adheres uniformly. Pay special attention to the edges and seams to prevent lifting or curling.
Sealing the Edges: Once the linoleum is fully adhered, use a seam sealer to seal the edges and seams. This helps prevent moisture from seeping underneath the linoleum and causing damage. Follow the manufacturer’s instructions for applying the seam sealer and allow it to dry completely before walking on the floor.

Maintenance Tips for Retro Linoleum Flooring
Regular Cleaning: To keep your retro linoleum flooring looking its best, establish a regular cleaning routine. Sweep or vacuum the floor daily to remove dust and debris. Mop the floor with a damp mop and a mild cleaner to maintain its shine. Avoid using excessive water or harsh chemicals that can damage the linoleum.
Stain Removal: In case of spills or stains, it’s important to address them promptly. Wipe up any spills immediately using a clean cloth or paper towel. For stubborn stains, use a linoleum floor cleaner or a mixture of baking soda and water. Gently scrub the stained area with a soft brush and rinse thoroughly.
Protective Measures: To prevent scratches and scuffs, place mats or rugs in high-traffic areas and under heavy furniture. Use furniture pads or coasters under furniture legs to prevent damage when moving items. Avoid dragging heavy objects across the floor to reduce the risk of scratches.
Periodic Inspections: Regularly inspect the linoleum flooring for any signs of wear, damage, or lifting edges. Address any issues promptly to prevent further damage and maintain the integrity of the floor. Periodic inspections will help you identify potential problems before they become more significant issues.
Polishing and Sealing: To maintain the linoleum’s shine and protect it from wear, consider applying a linoleum polish or sealer. Follow the manufacturer’s recommendations for polishing frequency and use a high-quality product. This helps prolong the life of the flooring and keeps it looking fresh and vibrant.

Design Ideas for Retro Linoleum Kitchen Flooring
Retro Diner Theme: Create a retro diner-themed kitchen with black and white checkerboard linoleum flooring. Pair the floor with bright red or turquoise cabinets, chrome accents, and vintage-inspired decor. Add a retro diner table and chairs to complete the nostalgic look.
Mid-Century Modern: For a mid-century modern aesthetic, choose geometric patterned linoleum flooring in bold colors. Pair the floor with sleek, minimalist furniture and retro-inspired light fixtures. Incorporate natural wood elements and vibrant artwork to enhance the mid-century vibe.
Cozy Cottage Style: Achieve a cozy cottage look with vintage floral print linoleum flooring. Pair the floor with soft pastel-colored cabinets, open shelving, and farmhouse-style accessories. Add vintage kitchenware and fresh flowers to create a charming and inviting space.
Classic Elegance: For a classic and elegant design, opt for solid color linoleum flooring with contrasting borders. Choose neutral shades like cream or gray for the base color and add a black or navy border for a sophisticated touch. Pair the floor with traditional cabinetry and marble countertops for a timeless look.
Eclectic Mix: Embrace an eclectic design by combining different retro elements. Choose linoleum flooring that mimics the appearance of wood or stone and pair it with a mix of vintage and modern decor. Use bold colors, unique patterns, and quirky accessories to create a lively and personalized kitchen space.

Need RETRO linoleum floor for kitchen
Retro Kitchens That Spice Up Your Home Tile countertops kitchen

Companies that make flooring – cork, linoleum and vinyl
The Best Flooring Choices for Old-House Kitchens

Linoleum Lives On Cooper Hewitt, Smithsonian Design Museum
kitchen floor tile pattern mockups
Get down with 70 groovy vintage vinyl floors

Vinyl Flooring in the Kitchen
Related articles: