The wood floor treatment specialist will evaluate your floors to determine just what's needed subsequently completely clean and wax the floors restoring them to the beauty, shine and natural warmth associated with wood floors. This particular blend gives us a durable floor material that is able to withstand particularly heavy human traffic. To start with you've to choose which method you'd like.
Images Related to Engineered Wood Flooring Floating
Engineered Wood Flooring Floating
/what-is-a-floating-floor-1821740-hero-00e6b7fe102e4fafa8ba3f926944bcb7.jpg)
These woods often provide superior qualities from wood which grew gradually and is generally far more dense than faster grown wood. We have talked about that strong floors are usually the very best, with laminate flooring surfaces following, and also engineered wood floors run (with respect to quality. What this means is not much substance ends up as waste in landfills, which which does remains eco-friendly.
All About Floating Wood Floors
Tile flooring or natural stone was reserved just for the financially elite, large companies, or government buildings because of cost. The amount of sustainable forest management makes it easy for us to harvest wood without having really serious influence on the environment of ours. Engineered wood flooring is available in a variety of styles. It is not difficult when you know how. You will find no anti scratch warranties in the wood flooring business.
Floating Wood Floor: Install One in 8 Steps – This Old House
/cdn.vox-cdn.com/uploads/chorus_asset/file/19493650/0405_flooring_illo.jpg)
How to Install an Engineered Hardwood Floating Floor with Finishing Tips

Glueless Click Installation for Floating Hardwood Floors

Floating Vs. Glue-Down Wood Flooring: Installation, Pros and Cons

Floating Vs. Glue-Down Wood Flooring [Pros u0026 Cons]

Floating Vs. Glue-Down Wood Flooring [Pros u0026 Cons]

All About Floating Wood Floors

Floating Vs. Glue-Down Wood Flooring [Pros u0026 Cons]

Floating vs. Glue-Down Engineered Hardwood

Flooring Fixing Methods: Floating Floors Direct Wood Flooring Blog

Glueless Click Installation for Floating Hardwood Floors

Floating Vs. Glue-Down Wood Flooring [Pros u0026 Cons]

Related articles:
- Black Walnut Wood Flooring
- Wood Flooring Designs
- Wood Flooring Options For Kitchens
- Contemporary Wood Flooring Ideas
- Dark Wood Floor Bedroom Ideas
- Real Wood Flooring For Kitchens
- Natural Wood Floor Stain
- Oak Wood Flooring
- Birch Wood Flooring Reviews
- Wood Floor Damage Repair
Engineered Wood Flooring Floating: A Comprehensive Guide
Introduction
Engineered wood flooring floating has gained significant popularity in recent years due to its durability, cost-effectiveness, and easy installation process. This type of flooring offers a practical and attractive solution for homeowners who desire the natural beauty of hardwood without the drawbacks associated with traditional solid wood flooring. In this article, we will delve into the details of engineered wood flooring floating, exploring its features, benefits, installation process, maintenance requirements, and frequently asked questions.
I. What is Engineered Wood Flooring Floating?
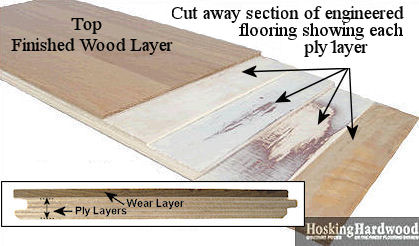
Engineered wood flooring floating is a type of floor covering that consists of multiple layers of wood veneers glued together in a cross-grain construction. Unlike traditional hardwood floors that are nailed or glued down, engineered wood planks are designed to “float” over the subfloor without any fasteners or adhesives. The planks interlock with each other using a tongue-and-groove system, providing stability and ease of installation.
Benefits of Engineered Wood Flooring Floating
1. Durability: Engineered wood flooring floating is highly durable due to its multi-layered construction. The top layer, or wear layer, is made of real hardwood veneer, providing the authentic look and feel of solid wood. Beneath the wear layer are several layers of high-density fiberboard (HDF) or plywood, which add strength and stability to the flooring.
2. Cost-effectiveness: Compared to solid hardwood floors, engineered wood flooring floating is more budget-friendly. The manufacturing process allows for efficient use of hardwood veneers, reducing the overall cost of materials. Additionally, the installation process is relatively straightforward and can be done by homeowners themselves, eliminating the need for professional installation expenses.
3. Easy installation: One of the main advantages of engineered wood flooring floating is its simple installation process. The planks are designed to fit together seamlessly, creating a tight and secure bond without the need for nails or adhesive. This floating installation method allows for quicker and hassle-free installation, saving both time and effort.
4. Versatility: Engineered wood flooring floating can be installed in various areas of the home, including living rooms, bedrooms, kitchens, and even basements. Its construction makes it more resistant to moisture and temperature fluctuations compared to solid wood, making it suitable for environments where traditional hardwood may not be recommended.
5. Aesthetics: With a wide range of wood species, finishes, and textures available, engineered wood flooring floating offers endless design possibilities. Whether you prefer the warm hues of oak or the rich tones of maple, there is a style to suit every taste and interior décor.
II. Installation Process
1. Preparation: Before installing engineered wood flooring floating, it is crucial to prepare the subfloor properly. The subfloor should be clean, dry, level, and free from any debris or imperfections. If necessary, a moisture barrier may need to be installed to prevent moisture from seeping into the flooring.
2. Acclimation: It is essential to acclimate the engineered wood planks to the room’s temperature and humidity levels before installation. This process allows the planks to adjust and minimize expansion or contraction after installation. Planks are typically left in the room for at least 48 hours before installation.
3. Underlayment: To enhance sound insulation and provide a cushioning effect, an underlayment is often used between the subfloor and the engineered wood planks. Common underlayment materials include foam or Cork. The underlayment helps to reduce noise transmission and provides added comfort underfoot.
4. Installation: The floating installation method involves connecting the engineered wood planks together without using nails or adhesive. The planks typically have a tongue-and-groove system that allows them to fit snugly together. They are laid down over the underlayment, starting from one corner of the room and working towards the opposite wall. Spacers are used to maintain a consistent expansion gap around the perimeter of the room.
5. Finishing touches: Once all the planks are installed, any necessary trim or molding can be added to cover the expansion gap and create a finished look. The flooring can then be cleaned and maintained according to the manufacturer’s instructions.
Overall, engineered wood flooring floating offers durability, cost-effectiveness, easy installation, versatility, and aesthetic appeal. Following the proper installation process ensures a successful and long-lasting result. Engineered wood flooring floating has become a popular choice for homeowners due to its many advantages. It offers durability, cost-effectiveness, easy installation, versatility, and aesthetic appeal. The installation process involves several steps to ensure a successful and long-lasting result.
Before installing engineered wood flooring floating, it is important to properly prepare the subfloor. This includes ensuring that the subfloor is clean, dry, level, and free from any debris or imperfections. If necessary, a moisture barrier may need to be installed to prevent moisture from seeping into the flooring.
Acclimation is another crucial step in the installation process. The engineered wood planks should be acclimated to the room’s temperature and humidity levels before installation. This allows the planks to adjust and minimize expansion or contraction after installation. Planks are typically left in the room for at least 48 hours before installation.
To enhance sound insulation and provide a cushioning effect, an underlayment is often used between the subfloor and the engineered wood planks. Common underlayment materials include foam or cork. The underlayment helps reduce noise transmission and provides added comfort underfoot.
The floating installation method involves connecting the engineered wood planks together without using nails or adhesive. The planks typically have a tongue-and-groove system that allows them to fit snugly together. They are laid down over the underlayment, starting from one corner of the room and working towards the opposite wall. Spacers are used to maintain a consistent expansion gap around the perimeter of the room.
Once all the planks are installed, any necessary trim or molding can be added to cover the expansion gap and create a finished look. The flooring can then be cleaned and maintained according to the manufacturer’s instructions.
In summary, engineered wood flooring floating offers numerous benefits and can be installed in various areas of the home. Following the proper installation process ensures a successful and long-lasting result. Overall, the process of installing engineered wood flooring floating involves several steps. These include preparing the subfloor, acclimating the planks, using an underlayment for sound insulation and comfort, connecting the planks together using a tongue-and-groove system, adding trim or molding to cover the expansion gap, and cleaning and maintaining the flooring according to the manufacturer’s instructions. By following these steps, homeowners can enjoy the many advantages of engineered wood flooring floating in their homes.