Vinyl Kitchen flooring is definitely the ideal solution for children. This too requires motivation and time more to put in. A lot of people prefer to focus the money of theirs on paintings or perhaps furniture to upgrade the look in the home of theirs. But, when installation isn't produced by professionals, the errors below may possibly occur. Vinyl floors installation in reality requires the skills of an authority.

Armstrong Vinyl Flooring Installation Guide

Vinyl flooring comes in both low end in addition to high-end types. Stay away from products which can harm the finishing including acetone, solvent as well as ammonia. There is nothing cheap about it – except the price of its. In the world of floors, vinyl has always been considered to be one of the most resilient, flexible and economical options in the market. There's actually vinyl available which could fool anyone upon first glance that it's a wood floor.
Luxury Vinyl Tile Installation

You are able to choose wood-look-alike luxury vinyl flooring or maybe for floor the likeness of natural stone or perhaps floor with contemporary complicated abstract look. It's hardly any seams, too. It is critical to wait for five times for the adhesive to set in before going in heavy items. For a high quality floor it really can be that costly to purchase. Printed vinyl floor is ideal for low traffic areas like individual bedroom.
Vinyl Tile Installation

Luxury Vinyl Tile Installation

Vinyl Tile Installation

Armstrong Vinyl Flooring – Wet Room Installation and Maintenance

Rigid Core Flooring Installation

Armstrong Flooring A3262851 Terraza Grand 1-piece 18-in x 18-in
How To Install Luxury Vinyl Tile

How to Lay a Vinyl Tile Floor – This Old House
/cdn.vox-cdn.com/uploads/chorus_asset/file/19493864/howto_vinylfloor_05.jpg)
Peel and Stick Vinyl Floor Tile Ultimate Guide: Pros u0026 Cons, Cost

Rigid Core Flooring Installation

Armstrong Premium Excelon Raffia 12 in. x 24 in. Snowdrift
How to Install Vinyl Plank Flooring Loweu0027s

Related articles:
- Vinyl Flooring Bathroom Tile
- Modern Vinyl Flooring
- Funky Vinyl Flooring
- Vinyl Flooring For Kitchen
- Vintage Look Vinyl Flooring
- Kitchen Vinyl Floor Tiles Ideas
- Vinyl Flooring With Wood Look
- Waterproof Vinyl Flooring
- Vinyl Flooring For Cheap
- How To Remove Vinyl Flooring
If you’re looking for a durable, low-maintenance flooring option, Armstrong vinyl flooring is an excellent choice. With its simple installation, easy maintenance, and wide variety of styles, Armstrong vinyl flooring is perfect for any room in your home. This guide will provide step-by-step instructions on how to install Armstrong vinyl flooring.
Step 1: Measure the Room
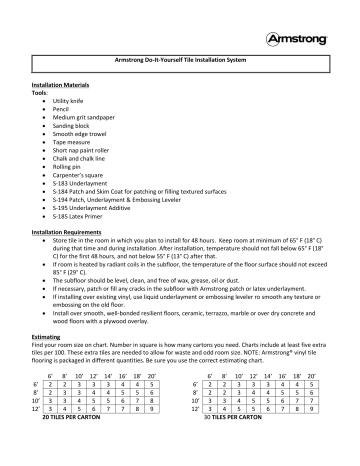
The first step in installing Armstrong vinyl flooring is to measure the room where you will be installing it. Be sure to measure the entire area that you plan to cover, including along the walls and any other obstructions. Once you have your measurements, add 10% more material than the total area of your space. This will give you some extra material in case of any errors or miscalculations during installation.
Step 2: Prepare the Subfloor
The next step is to prepare the subfloor for installation. Armstrong vinyl flooring needs a flat and level subfloor in order to be installed properly. If your subfloor is not level or has any imperfections, you should use a self-leveling compound to even out the surface. You can also use a trowel or roller to flatten out any bumps or divots in the subfloor before installation.
Step 3: Install Underlayment
The third step is to install an underlayment before laying down the vinyl flooring. The underlayment acts as a cushion between the subfloor and the Armstrong vinyl flooring, providing a smoother surface for walking and increasing its durability. Be sure to lay down a continuous layer of underlayment throughout the entire area where you will be installing your Armstrong vinyl flooring.
Step 4: Lay Down the Vinyl Flooring
Once you have prepared the subfloor and installed the underlayment, you are ready to lay down the Armstrong vinyl flooring. Start by laying down one edge of the flooring along one wall of your room. Place a piece of wood trim along this edge so that it fits snugly against the wall. Use a rubber mallet or hammer to lightly tap the pieces into place. Continue laying down pieces of Armstrong vinyl flooring until your entire space is covered. Be sure to leave a small gap between each piece and use a jigsaw to cut any pieces that need to fit around corners or other obstructions.
Step 5: Apply Adhesive
Once all of your Armstrong vinyl flooring pieces are laid down, apply adhesive to each piece in order to keep them securely in place. Using a notched trowel, spread adhesive onto each piece of vinyl flooring in small amounts so that it does not run off or drip onto other pieces. Once you have applied adhesive to all pieces, press down firmly with a rolling pin or rubber mallet to ensure that each piece is securely adhered to the subfloor.
Step 6: Install Moldings
The final step in installing Armstrong vinyl flooring is to install moldings around any doorways or other obstructions in your room. Measure and cut wood trim pieces for each doorway or obstruction and attach them using nails or glue. This will give your Armstrong vinyl flooring a clean, finished look and help protect it from damage in high traffic areas.
Common Questions & Answers
Q: How long does it take to install Armstrong Vinyl Flooring?
A: It depends on the size of your space, but typically it takes about 1-2 days for an average sized room (200-400 square feet).
Q: Is it hard to install Armstrong Vinyl Flooring?
A: No, it’s relatively easy if you follow the instructions above. With careful preparation and attention to detail, anyone can successfully install Armstrong Vinyl Flooring in their home!