The advantages of having the wood floor of yours oiled is that it will keep for longer and will additionally slow down the aging process so you are free to maintain the colour you originally purchased. Engineered wood flooring is built to be stable, and solid wood floors can just not participate in this area. Another advantage would be that the factory finishes are often much tougher than the polyurethane applied in the field.
Images Related to Wood Flooring With Underlayment Attached
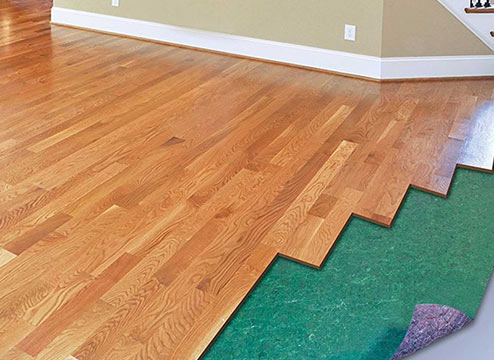
Wood Flooring With Underlayment Attached

Solid wood flooring is but one board with no glued up laminations; it is essentially wood board that is sized as well as profiled to a specific dimension. Exotic hardwoods and hardwoods with an all natural finish on them tend to be probably the most photosensitive. The cost of reclaimed wood flooring will change widely, depending on the type of wood you purchase, and the level of surface – the same as regular hard woods.
Laminate Flooring With Attached Padded Underlayment
/best-underlayment-laminate-flooring-4111149-hero-c971832e62864f6b922ca6efea4e93c3.jpg)
Many hardwoods darken and become bolder over time, but several woods as Santos Mahogany essentially get lighter from sunlight. The elegance, versatility and natural beauty of wood flooring renders it one of the most popular options for today's home owners and with great reason! Along with the visual trends, wood flooring decreases allergens, dust and other debris connected with carpets without the "cold" sense of tile.
Underlayment Buyeru0027s Guide
Choose the Best Underlayment for Laminate Flooring
/laminate-flooring-underlayment-1314969-hero-3894e0b403fb4e59a87a076e3da9914f.jpg)
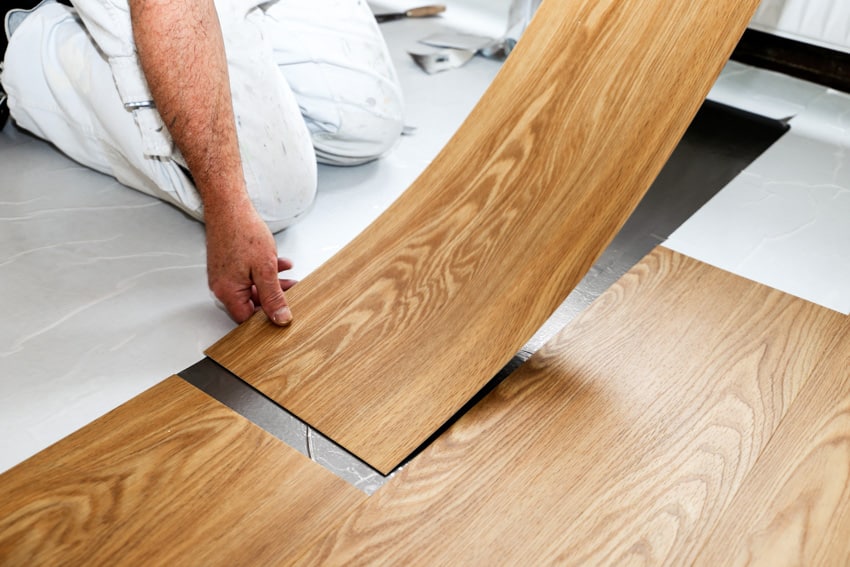
Laminate flooring with attached underlayment

Laminate flooring with attached pad shortens the laying process
Laminate Flooring With Attached Underlayment: Pros and Cons – MP

QuickStep Studio + Spill Repel Restoration Oak 10-mm Thick Water Resistant Wood Plank 7.48-in W x 47.24-in L Laminate Flooring (19.63-sq ft) Lowes.com

Laminate Flooring With Attached Underlayment – Designing Idea
Flooring News: Laminate Mills Get Attached To Backings – FloorBiz

Modin Rigid Vinyl Plank Flooring, Pre-Attached Underlayment, Click, 40 Mil Wear Layer, Ashford, 12u201d Cut Sample

Underlayments for Laminate Floors

Pergo – Installation Laminate Flooring – Sawdust Girl®
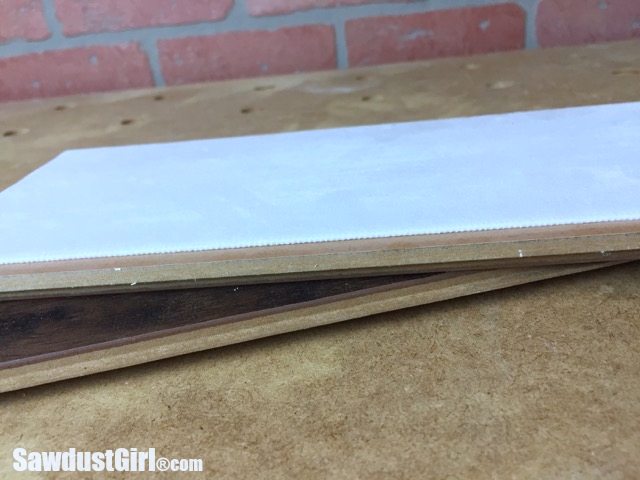
Laminate Underlayment – Installation Basics
/underlayment-for-laminate-flooring-1822245-hero-be0c4fb9077141af982ebdf260f16971.jpg)
Related articles:
- Black Walnut Wood Flooring
- Wood Flooring Designs
- Wood Flooring Options For Kitchens
- Contemporary Wood Flooring Ideas
- Dark Wood Floor Bedroom Ideas
- Real Wood Flooring For Kitchens
- Natural Wood Floor Stain
- Oak Wood Flooring
- Birch Wood Flooring Reviews
- Wood Floor Damage Repair
Wood Flooring With Underlayment Attached: Enhancing Durability and Comfort
Introduction:
Wood flooring is a timeless and elegant choice for homeowners looking to add warmth and beauty to their living spaces. While the selection of wood species, finishes, and plank sizes is important, another crucial factor to consider is the underlayment. Underlayment acts as a protective layer between the subfloor and the wood flooring, providing enhanced durability, noise reduction, moisture resistance, and overall comfort. In recent years, there has been a growing trend towards wood flooring with underlayment attached, which offers several benefits over traditional installations. This article delves into the details of this innovative flooring option, exploring its advantages, installation process, maintenance requirements, and frequently asked questions.
I. Understanding Wood Flooring with Underlayment Attached:
Wood flooring with underlayment attached refers to engineered hardwood planks that come pre-attached with an underlayment layer. This eliminates the need for a separate underlayment installation during the flooring process. The underlayment layer is usually made of materials such as foam or cork, which provide cushioning and sound absorption properties. This combination of wood flooring and attached underlayment offers a convenient solution for homeowners looking to streamline their installation process while enjoying the benefits of both components in one package.
Benefits of Wood Flooring with Underlayment Attached:
1. Enhanced Durability:
The inclusion of an underlayment layer in wood flooring helps to enhance its overall durability. The underlayment acts as a barrier between the subfloor and the wood planks, protecting against moisture infiltration and reducing the risk of damage caused by subfloor imperfections. It also helps to minimize wear and tear on the floor by absorbing impact and providing added support.
2. Improved Sound Insulation:
One major advantage of wood flooring with attached underlayment is its superior sound insulation properties. The additional layer of cushioning provided by the underlayment helps to reduce noise transmission, making it an ideal choice for multi-story homes or areas with high foot traffic. The underlayment absorbs sound vibrations, preventing them from traveling through the floor and creating a quieter and more peaceful environment.
3. Moisture Resistance:
Wood flooring is susceptible to moisture damage, which can cause warping, buckling, and mold growth. However, with underlayment attached, the risk of moisture-related issues is significantly reduced. The underlayment acts as a moisture barrier, preventing water vapor from seeping into the wood flooring and protecting it against potential damage. This makes wood flooring with attached underlayment an excellent choice for areas prone to spills or high humidity levels.
4. Easy Installation:
One of the primary advantages of wood flooring with underlayment attached is its simplified installation process. With traditional wood flooring installations, homeowners typically need to lay down a separate underlayment layer before installing the planks. This process can be time-consuming and may require additional tools and materials. However, with attached underlayment, this step is eliminated, saving both time and effort during the installation process.
5. Enhanced Comfort:
The inclusion of an underlayment layer in wood flooring provides enhanced comfort underfoot. The cushioning properties of the underlayment create a softer surface to walk on, reducing strain on joints and minimizing fatigue. This makes it an attractive option for homeowners seeking a comfortable flooring solution that prioritizes both aesthetics and comfort.
Installation Process:
The installation process for wood flooring with attached underlayment follows similar steps to traditional Wood flooring installation. Here is a basic outline of the process:
1. Prepare the subfloor: Ensure that the subfloor is clean, dry, and level. Remove any existing flooring materials and repair any imperfections in the subfloor.
2. Acclimate the flooring: Allow the wood flooring with attached underlayment to acclimate to the room’s temperature and humidity for at least 48 hours. This helps prevent issues such as warping or buckling after installation.
3. Lay down a moisture barrier: If necessary, install a moisture barrier over the subfloor to further protect against moisture infiltration.
4. Start the installation: Begin by laying the first row of wood flooring planks along one wall, leaving a small gap between the planks and the wall to allow for expansion. Use spacers to maintain consistent spacing between planks.
5. Continue with subsequent rows: Install additional rows of planks, interlocking them with the previous row using a tongue-and-groove system. Make sure to stagger the end joints for added stability and aesthetic appeal.
6. Cut and fit planks as needed: Use a saw or other cutting tool to trim planks as necessary to fit around corners, doorways, or other obstacles in the room.
7. Secure the planks: Use a nail gun or adhesive recommended by the manufacturer to secure the wood flooring planks to the subfloor. Follow the manufacturer’s instructions for proper installation techniques.
8. Complete the installation: Continue installing planks until you reach the final row. Trim any excess length from the last row of planks as needed.
9. Install baseboards and trim: Once all planks are installed, install baseboards or trim along the edges of the room to cover any gaps and provide a finished look.
10. Clean up and enjoy: Clean up any debris or dust from the installation process and allow the newly installed wood flooring with attached underlayment to settle for a few days before using the room as usual.
It’s important to note that specific installation instructions may vary depending on the manufacturer and type of wood flooring with attached underlayment. Always refer to the manufacturer’s guidelines for the most accurate and detailed instructions for your specific product. The installation process for wood flooring with attached underlayment is similar to traditional wood flooring installation. Here are the basic steps involved:
1. Prepare the subfloor: Make sure the subfloor is clean, dry, and level. Remove any existing flooring and repair any imperfections.
2. Acclimate the flooring: Allow the wood flooring with attached underlayment to acclimate to the room’s temperature and humidity for at least 48 hours to prevent warping or buckling.
3. Lay down a moisture barrier: If necessary, install a moisture barrier over the subfloor to protect against moisture infiltration.
4. Start the installation: Begin by laying the first row of wood flooring planks along one wall, leaving a small gap between the planks and the wall for expansion. Use spacers to maintain consistent spacing.
5. Continue with subsequent rows: Install additional rows of planks, interlocking them with the previous row using a tongue-and-groove system. Stagger the end joints for stability and aesthetics.
6. Cut and fit planks as needed: Use a saw or cutting tool to trim planks to fit around corners, doorways, or obstacles in the room.
7. Secure the planks: Use a nail gun or adhesive recommended by the manufacturer to secure the planks to the subfloor, following specific installation techniques provided by the manufacturer.
8. Complete the installation: Keep installing planks until you reach the final row. Trim any excess length from the last row of planks if necessary.
9. Install baseboards and trim: Once all planks are installed, install baseboards or trim along the edges of the room to cover gaps and provide a finished look.
10. Clean up and enjoy: Clean up debris or dust from the installation process and allow the flooring to settle for a few days before using the room as usual.
Remember that specific installation instructions may vary depending on the manufacturer and type of wood flooring with attached underlayment. Always refer to the manufacturer’s guidelines for accurate instructions for your specific product.