Water problems in your home can be extremely demanding since they are able to damage the development of the structure and they can also affect your overall health. However, if the dampness is a continuous issue, it is simply a question of time before it begins to bloom underneath the carpet.
Here are Images about Resurfacing Concrete Basement Floor
Resurfacing Concrete Basement Floor
Also when it's damp, your polyurea garage or maybe basement floor won't be slick, nor will moisture sink straight into the flooring. Carpeting the basement is often an unsuitable choice as the threat of water damage can damage the carpet in a single leak. A few and minor issues that you will overlook might turn up to be the largest blunder of the life of yours to haunt you indefinitely.
Basement Flooring: Repair, Staining, Sealing u0026 Epoxy Coatings

Some are actually colors which are strong and some have specks inserted in them, that would provide a nice look to basement flooring. Cork flooring is one such alternative and there are numerous obstacles faced regardless of what you've settled for. Purposeful items are enough as long as it is able to withstand tear and wear.
Images Related to Resurfacing Concrete Basement Floor
Concrete Coatings Epoxy Flooring – Concrete Resurfacing Systems
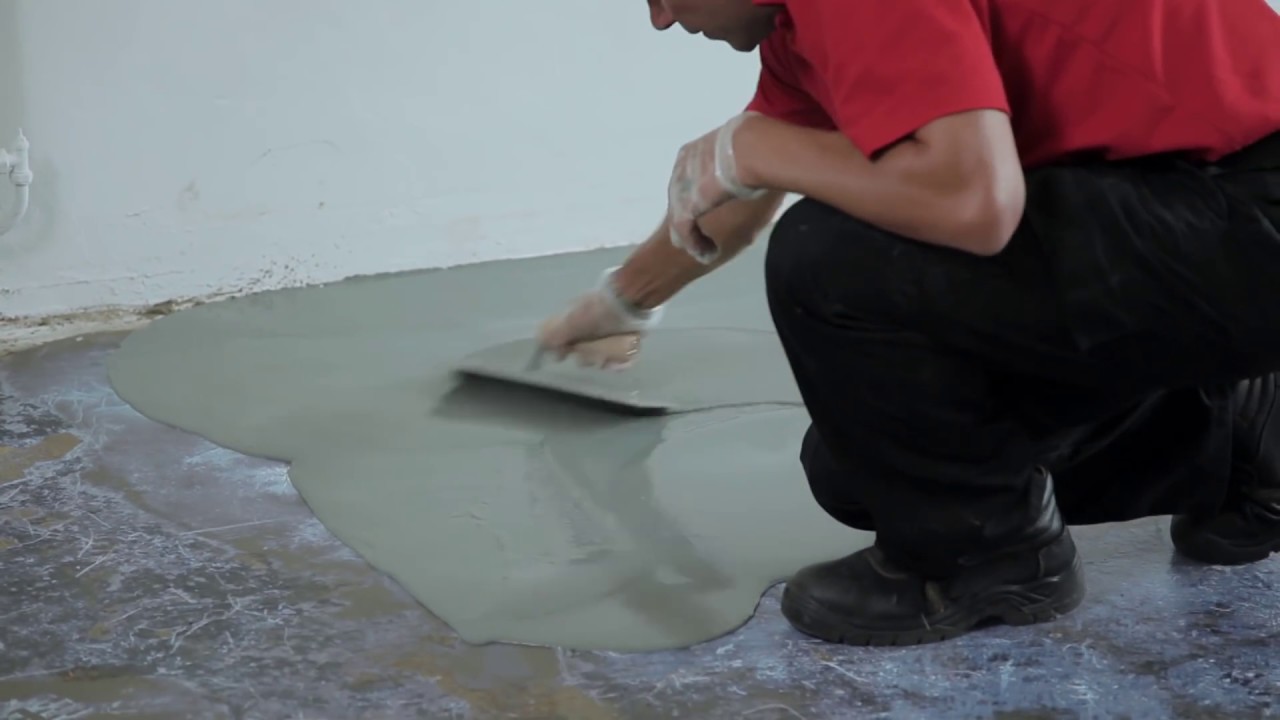
How to easily resurface a concrete floor Watco
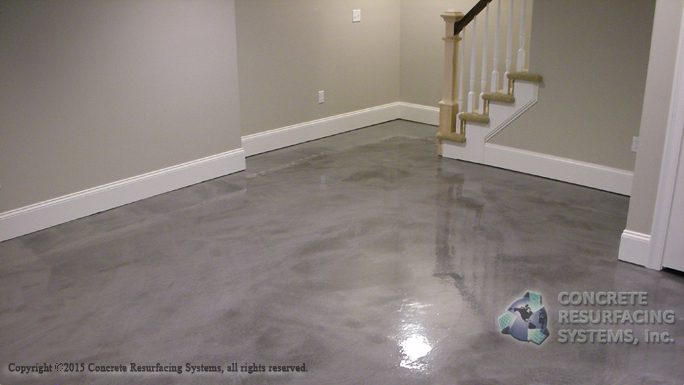
Resurfaced Concrete Basements Concrete Craft

Concrete Resurfacing – Hudson Valley Epoxy Flooring

Resurfaced Concrete Basements Concrete Craft
Concrete Resurfacing Professional Concrete Resurfacing Contractors

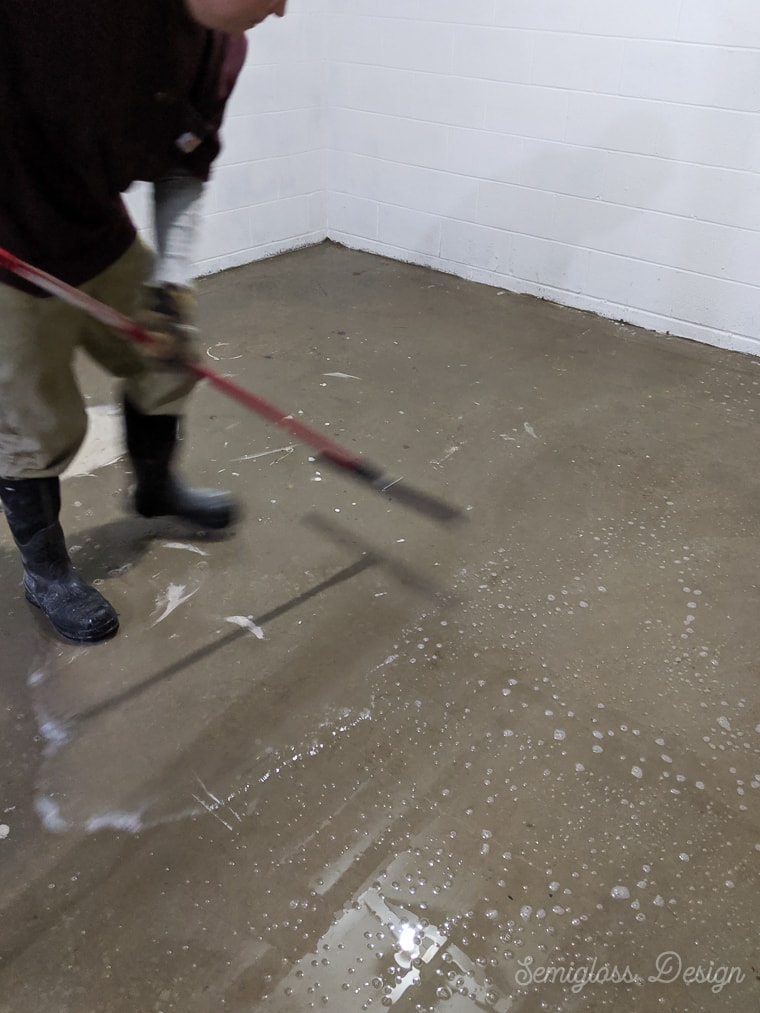
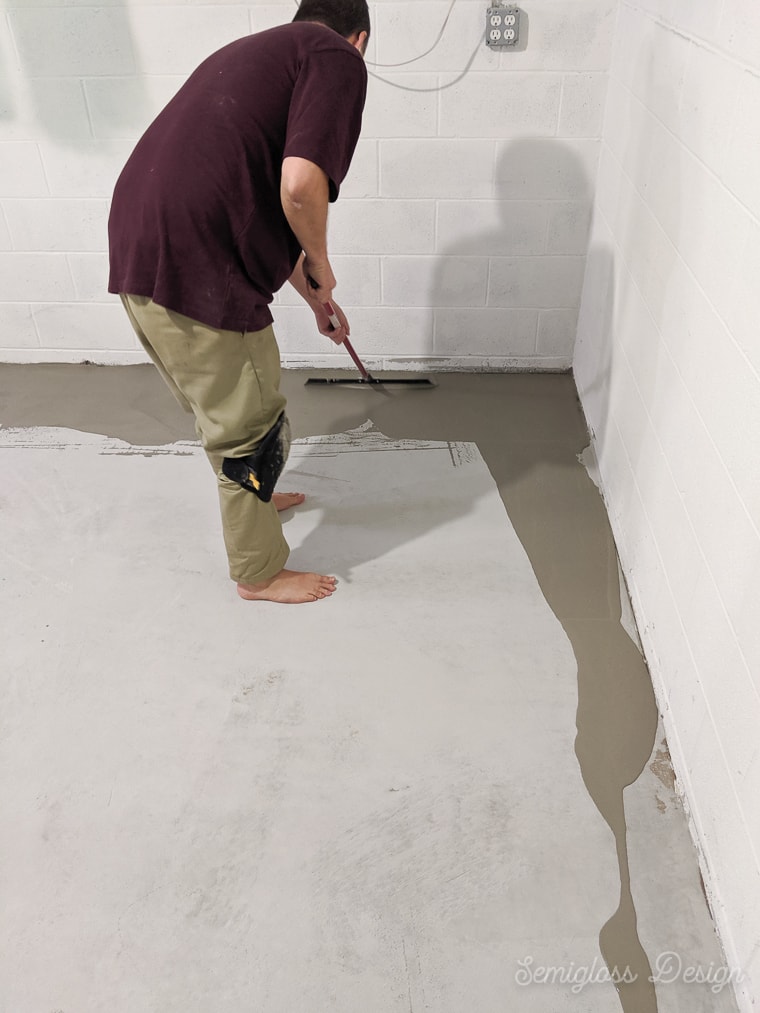
How to Refinish Concrete Floors in a Basement – Semigloss Design
Concrete Floor Resurfacing Services Concrete Resurfacing Contractors

Basement Floor Epoxy Coating in Syracuse CNY Creative Coatings
Basement Flooring Epoxy Basement Flooring Contractors
Leveling and resurfacing garage floor (DIY project update) : r

Basement Floor concrete resurfacing first coat of cement,over wire lath. Philadelphia
Related articles:
- Stained Concrete Basement Floor
- Finishing Basement Floor
- Refinish Concrete Basement Floor
- Best Flooring For Basement
- Basement Gym Flooring Ideas
- Laminate Flooring In Basement
- Basement Concrete Floor Sweating
- Basement Floor Finishing Ideas
- Painting Unfinished Basement Floor
- Unique Basement Flooring
Resurfacing Concrete Basement Floor: An Effective Solution for a Durable and Stylish Space
Introduction:
A concrete basement floor plays a crucial role in providing a solid foundation for your home. However, over time, it may start to wear out due to heavy usage, moisture, or simply age. This can lead to an unattractive and damaged floor that not only affects the aesthetics of your basement but also poses potential risks. Fortunately, resurfacing the concrete basement floor offers an excellent solution to restore its beauty, durability, and functionality. In this article, we will explore the benefits of resurfacing your basement floor and provide you with a step-by-step guide on how to achieve a successful renovation.
Benefits of Resurfacing Concrete Basement Floors:
1. Enhanced Durability:
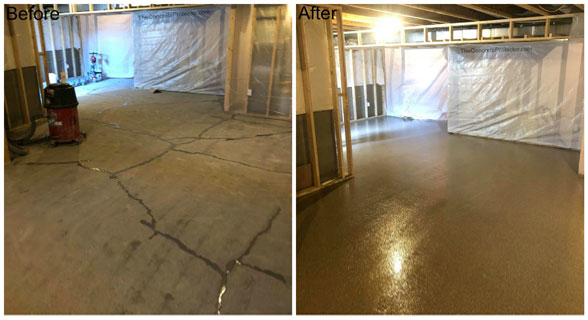
One of the primary reasons for resurfacing a concrete basement floor is to improve its durability. Over time, concrete may develop cracks or chips, making it susceptible to further damage. Resurfacing involves applying a new layer of concrete or a specialized overlay on top of the existing floor, strengthening its structure and protecting it from future wear and tear. This process ensures that your basement floor can withstand heavy foot traffic, furniture movement, and other activities without compromising its integrity.
2. Improved Aesthetics:
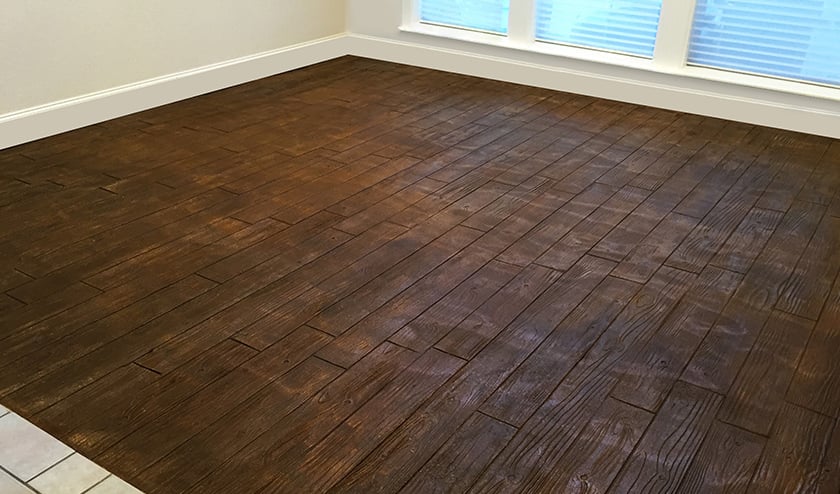
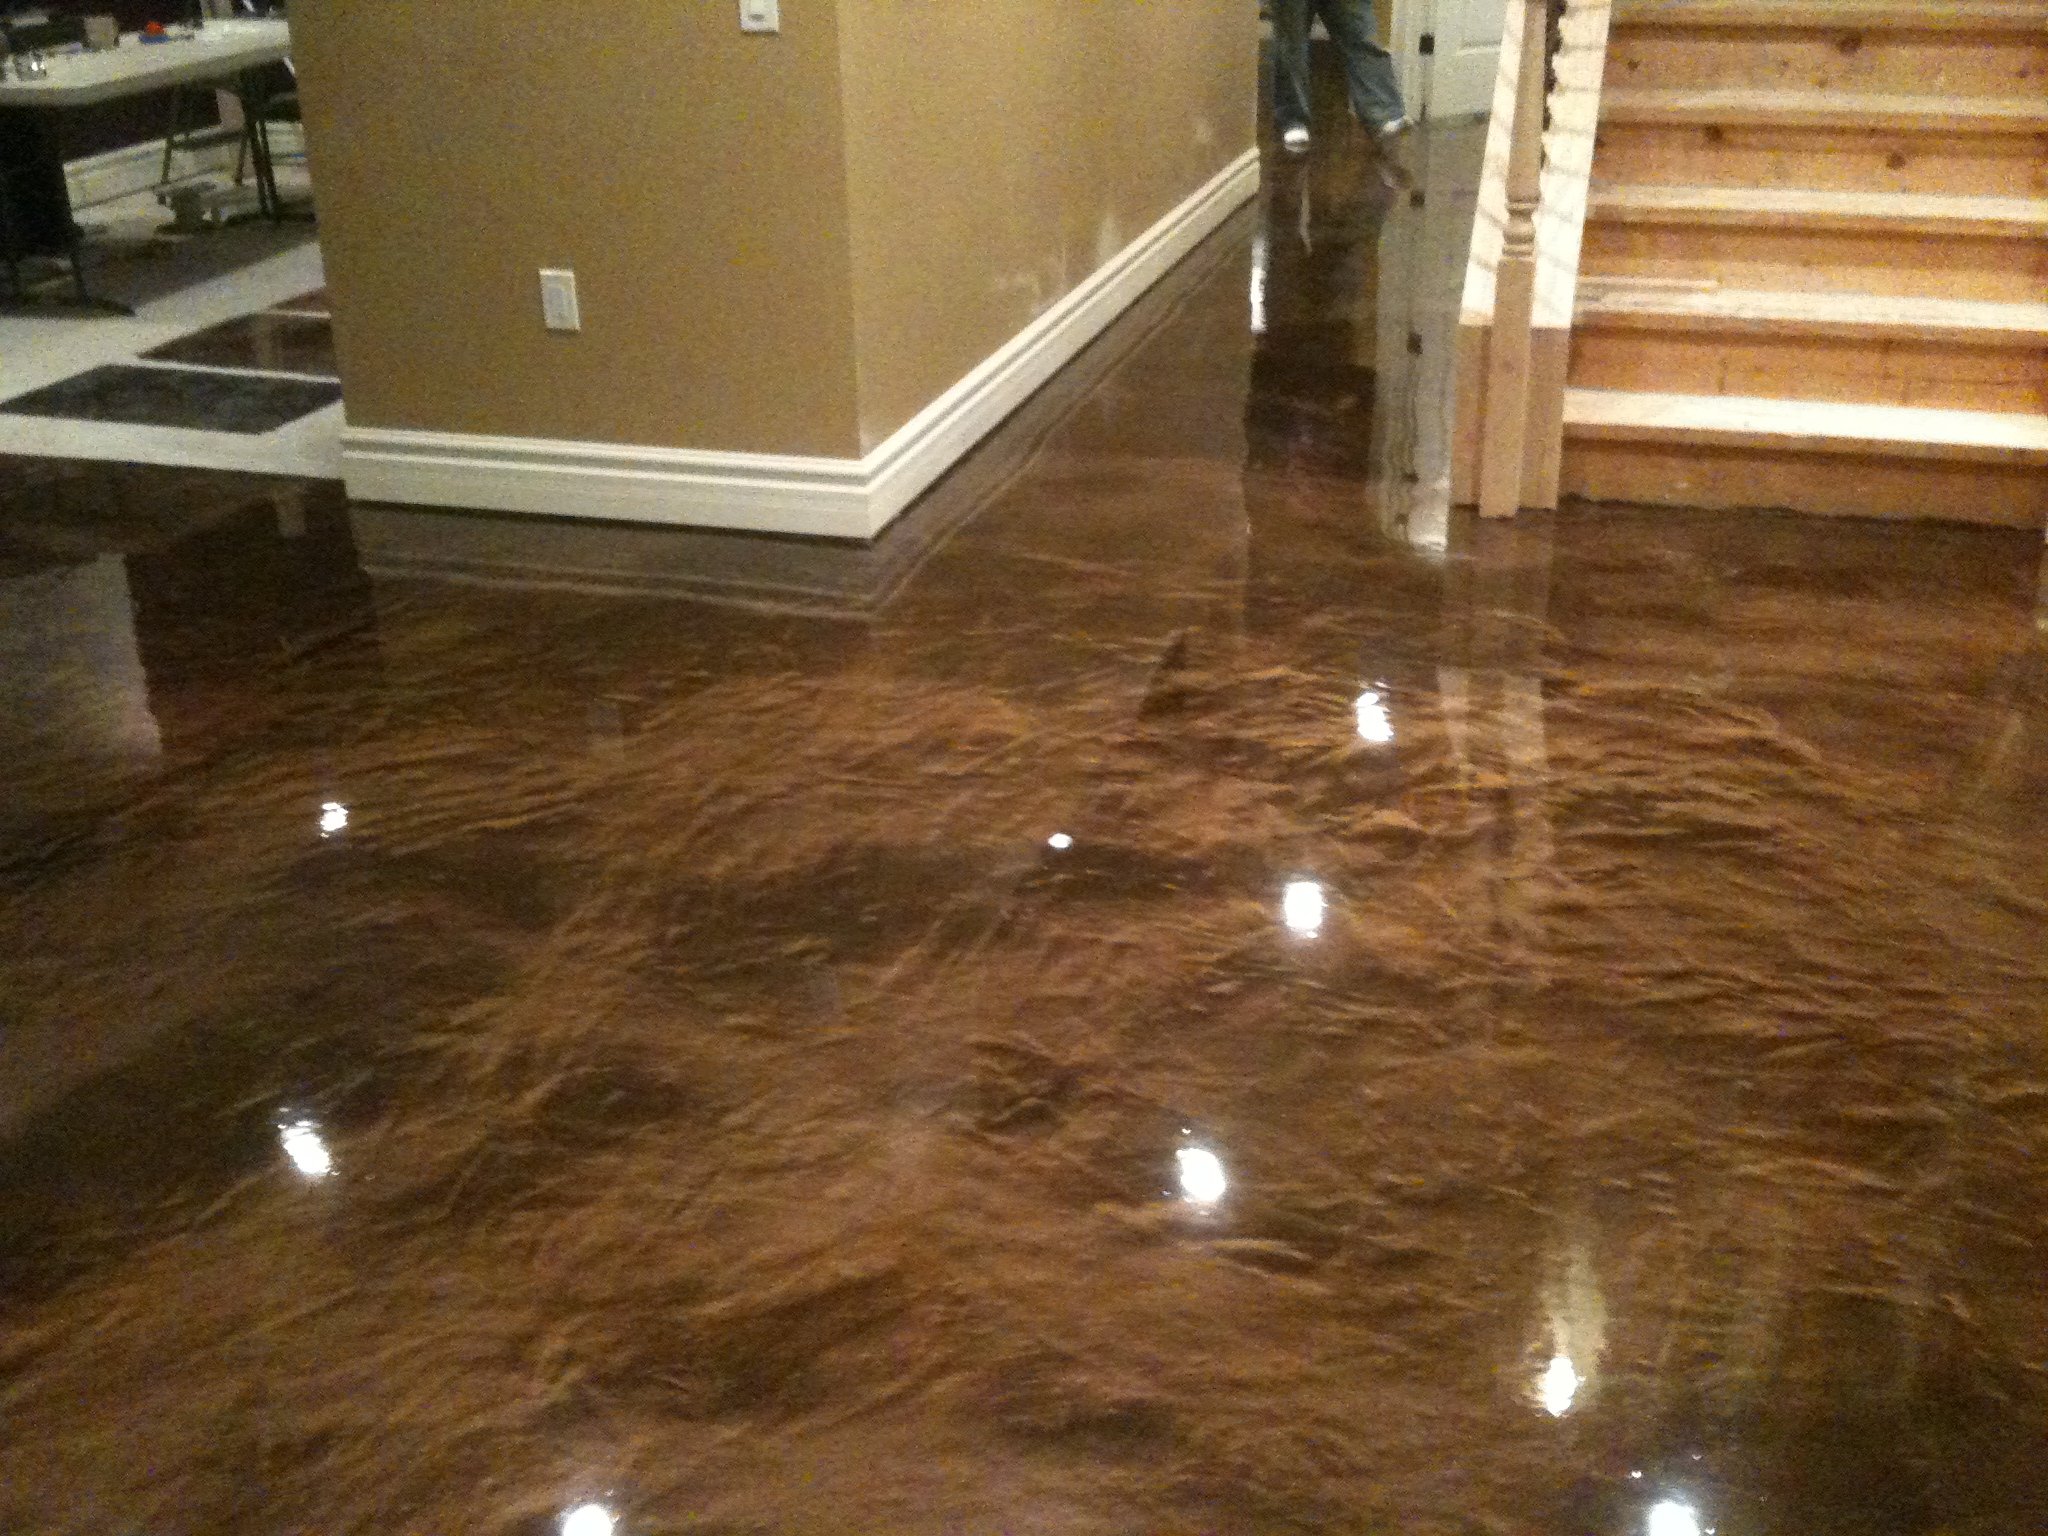
Resurfacing your concrete basement floor not only restores its functionality but also enhances its overall appearance. With a wide range of decorative options available, you can transform your dull and uninspiring basement into a stylish and inviting space. Whether you prefer a sleek polished look or want to add color and patterns to your floor, resurfacing allows you to customize the design according to your personal taste.
3. Moisture Resistance:
Basements are prone to moisture-related issues such as dampness or even flooding. Resurfacing the concrete floor with waterproofing materials creates a barrier that prevents water from seeping through the surface. This is especially important if you plan to use your basement as a living space, storage area, or recreational room. By addressing moisture concerns, resurfacing helps maintain a dry and healthy environment in your basement.
4. Cost-Effective Solution:
Compared to other flooring options, resurfacing a concrete basement floor is a cost-effective solution. Instead of completely removing and replacing the existing floor, resurfacing allows you to save both time and money. Additionally, the materials used for resurfacing are generally more affordable compared to alternative flooring materials such as hardwood or tile. By choosing to resurface your basement floor, you can achieve a high-quality result without breaking the bank.
5. Easy Maintenance:
Resurfaced concrete basement floors are relatively low maintenance compared to other flooring options. The smooth surface makes cleaning a breeze, requiring only regular sweeping and occasional mopping with mild detergent. Furthermore, the protective sealers applied during the resurfacing process help repel stains, making it easier to keep your basement floor looking clean and fresh.
Step-by-Step Guide to Resurface Concrete Basement Floors:
1. Evaluate the existing floor:
Before starting the resurfacing process, it is essential to evaluate the current condition of your concrete basement floor. Look for any cracks, chips, or uneven surfaces that may need repair before proceeding further. It is crucial to address these issues to ensure a smooth and long-lasting resurfacing project.
FAQ: Can I resurface my basement floor if it has extensive damage?
If your basement floor has extensive damage such as deep cracks or major structural issues, it May not be suitable for resurfacing. In such cases, it may be necessary to consult a professional to assess the condition of the floor and determine the best course of action. They may recommend fully replacing the floor instead of resurfacing it.
2. Clean the floor:
Before applying any resurfacing materials, thoroughly clean the concrete basement floor to remove any dirt, dust, or debris. Use a broom, vacuum, or pressure washer to ensure a clean and smooth surface for the resurfacing process.
3. Repair any cracks or damage:
If you identified any cracks or damage during the evaluation step, it is important to repair them before proceeding further. Use a concrete filler or patching compound to fill in cracks and smooth out any uneven surfaces. Follow the manufacturer’s instructions for proper application and drying time.
4. Apply a bonding agent:
To ensure proper adhesion between the existing concrete floor and the resurfacing material, apply a bonding agent. This will help create a strong bond and improve the durability of the resurfaced floor. Follow the manufacturer’s instructions for applying the bonding agent and allow it to dry completely.
5. Mix and apply the resurfacing material:
Prepare the resurfacing material according to the manufacturer’s instructions. This may involve mixing different components together or adding water to a premixed product. Once the mixture is ready, use a trowel or squeegee to apply it evenly over the entire basement floor. Work in small sections to ensure thorough coverage.
6. Smooth and level the surface:
After applying the resurfacing material, use a long-handled squeegee or trowel to smooth and level out the surface. Pay attention to any areas that may require additional material or smoothing to achieve an even finish.
7. Allow for proper curing time:
Once you have finished applying and smoothing the resurfacing material, allow it to cure according to the manufacturer’s instructions. This usually involves letting it dry for a specific period of time before allowing any foot traffic or placing heavy objects on the floor.
8. Apply a protective sealer:
To enhance the durability and longevity of your resurfaced basement floor, apply a protective sealer. This will help prevent stains, moisture penetration, and damage from regular use. Follow the manufacturer’s instructions for applying the sealer and allow it to dry completely before using the basement.
By following these steps and taking proper care of your resurfaced concrete basement floor, you can enjoy its improved aesthetics, moisture resistance, cost-effectiveness, and easy maintenance for years to come. Resurfacing a concrete basement floor can be a great way to improve the appearance and functionality of your space. By following these steps, you can ensure a successful resurfacing process:
1. Evaluate the condition of the floor:
– Check for any cracks, uneven areas, or damage that may need to be repaired before resurfacing.
– Consider whether the floor is suitable for resurfacing or if it would be better to replace it entirely.
2. Clean the floor:
– Before applying any resurfacing materials, thoroughly clean the concrete basement floor to remove dirt, dust, and debris.
– Use a broom, vacuum, or pressure washer to ensure a clean and smooth surface for the resurfacing process.
3. Repair any cracks or damage:
– If you identified any cracks or damage during the evaluation step, it is important to repair them before proceeding further.
– Use a concrete filler or patching compound to fill in cracks and smooth out any uneven surfaces.
– Follow the manufacturer’s instructions for proper application and drying time.
4. Apply a bonding agent:
– To ensure proper adhesion between the existing concrete floor and the resurfacing material, apply a bonding agent.
– This will help create a strong bond and improve the durability of the resurfaced floor.
– Follow the manufacturer’s instructions for applying the bonding agent and allow it to dry completely.
5. Mix and apply the resurfacing material:
– Prepare the resurfacing material according to the manufacturer’s instructions.
– This may involve mixing different components together or adding water to a premixed product.
– Once the mixture is ready, use a trowel or squeegee to apply it evenly over the entire basement floor.
– Work in small sections to ensure thorough coverage.
6. Smooth and level the surface:
– After applying the resurfacing material, use a long-handled squeegee or trowel to smooth and level out the surface.
– Pay attention to any areas that may require additional material or smoothing to achieve an even finish.
7. Allow for proper curing time:
– Once you have finished applying and smoothing the resurfacing material, allow it to cure according to the manufacturer’s instructions.
– This usually involves letting it dry for a specific period of time before allowing any foot traffic or placing heavy objects on the floor.
8. Apply a protective sealer:
– To enhance the durability and longevity of your resurfaced basement floor, apply a protective sealer.
– This will help prevent stains, moisture penetration, and damage from regular use.
– Follow the manufacturer’s instructions for applying the sealer and allow it to dry completely before using the basement.
By following these steps and taking proper care of your resurfaced concrete basement floor, you can enjoy its improved aesthetics, moisture resistance, cost-effectiveness, and easy maintenance for years to come.