For example, a Victorian style bathroom can be tiled using pale pink or green or beige colored tiles with delicate floral and artistic prints. You are able to not only select the top look for the bath room of yours, though you can in addition create modified tiles by selecting two patterns which are different and affixing them in an alternating layout.
Here are Images about Floor Warmers For Bathrooms
Floor Warmers For Bathrooms
/cdn.vox-cdn.com/uploads/chorus_image/image/65889761/K0DFK3.7.jpg)
You are able to refurbish and replace these tiles without lots of hassle. Choose from various choices like marble, limestone, as well as travertine. In the event that opt for cork, a flooring content overloaded with great qualities, as it's sound insulation and hot underfoot, in addition to being non-slip and rot-proof even when wet. First, none of these flooring options are tough enough, barring hardwood.
Radiant Floor Heating in Bathrooms — Is It Worth It?

This is an excellent solution that has been used since time immemorial by residence owners across the world. Bathroom vinyl tiles are available in shades that are different & textures. You can also experiment with colored grout. These tiles could be arranged to create themes and patterns. You are able to find pages of popular paintings or perhaps scenarist or even plain geometric patterns.
Images Related to Floor Warmers For Bathrooms
Underfloor Heating Home Floor Heating nVent

Heated Bathroom Floor Bathroom Thermostat Warmup USA
Warm Up Your Bathroom With Heated Floors
ThermoSoft Electric Heating Systems
Electric Floor Heating Radiant Heated Floors WarmlyYours
Radiant Floor Heating Mat Kits 40 sq Flooring Heating System by

heated travertine floor Floor heating systems, Flooring

The Pros and Cons of Heated Bathroom Floors

How to Install In-Floor Radiant Heat
Remodeling A Bathroom Part 10 [Electric Radiant Floor Heat]
Heated Floors Provide Extra Warmth and Comfort in a Home

Comfort Heat Australia – How to install In-screed electric floor heating in a bathroom

Related articles:
- Vintage Bathroom Floor Tile Patterns
- Bathroom Floor Tile DIY
- Limestone Bathroom Floor Tiles
- Bathroom Floor Porcelain Tile
- Concrete Bathroom Floor Ideas
- White Bathroom Ceramic Tiles
- Bathroom Floor Baseboard
- Rustic Bathroom Flooring Ideas
- Bathroom Flooring Options
- Bamboo Bathroom Flooring Ideas
Floor Warmers For Bathrooms: Adding Comfort and Luxury to Your Space
Introduction:
Bathrooms are often the coldest rooms in our homes, especially during the winter months. Stepping onto a cold floor after a warm shower can be quite an unpleasant experience. However, with the introduction of floor warmers for bathrooms, you can now enjoy the ultimate comfort and luxury in this space. In this article, we will explore the benefits, types, installation process, and frequently asked questions about floor warmers for bathrooms.
Benefits of Floor Warmers for Bathrooms:
1. Enhanced Comfort: The primary benefit of installing floor warmers in your bathroom is the enhanced comfort they provide. Imagine stepping onto a warm, cozy floor after a relaxing shower or bath. It instantly elevates your bathroom experience and makes it more enjoyable.
2. Energy Efficiency: Contrary to popular belief, floor warmers are energy-efficient. They use radiant heat to warm up the floor, which is known to be more efficient than traditional heating methods. Additionally, since they heat the entire floor evenly, you don’t need to rely on central heating systems that may consume more energy.
3. Health Benefits: Cold floors can have adverse effects on your health, especially if you suffer from conditions like arthritis or poor circulation. By keeping your bathroom floor warm, you can alleviate discomfort and promote better blood flow.
4. Quick Drying: Another advantage of installing floor warmers is that they help in drying wet surfaces faster. This prevents the growth of mold and mildew while also reducing the risk of slips and falls in your bathroom.
Types of Floor Warmers:
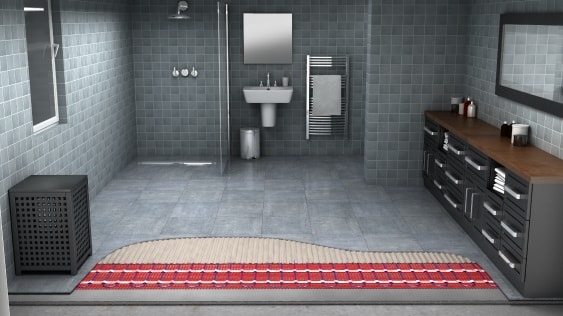
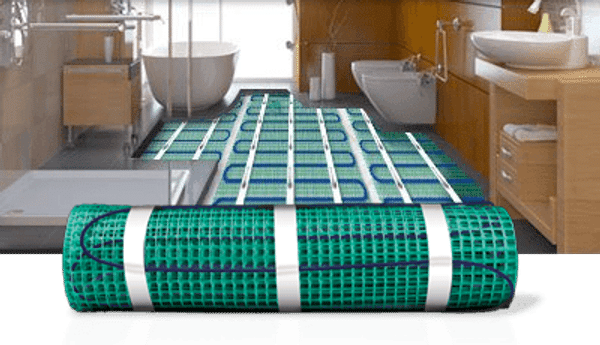
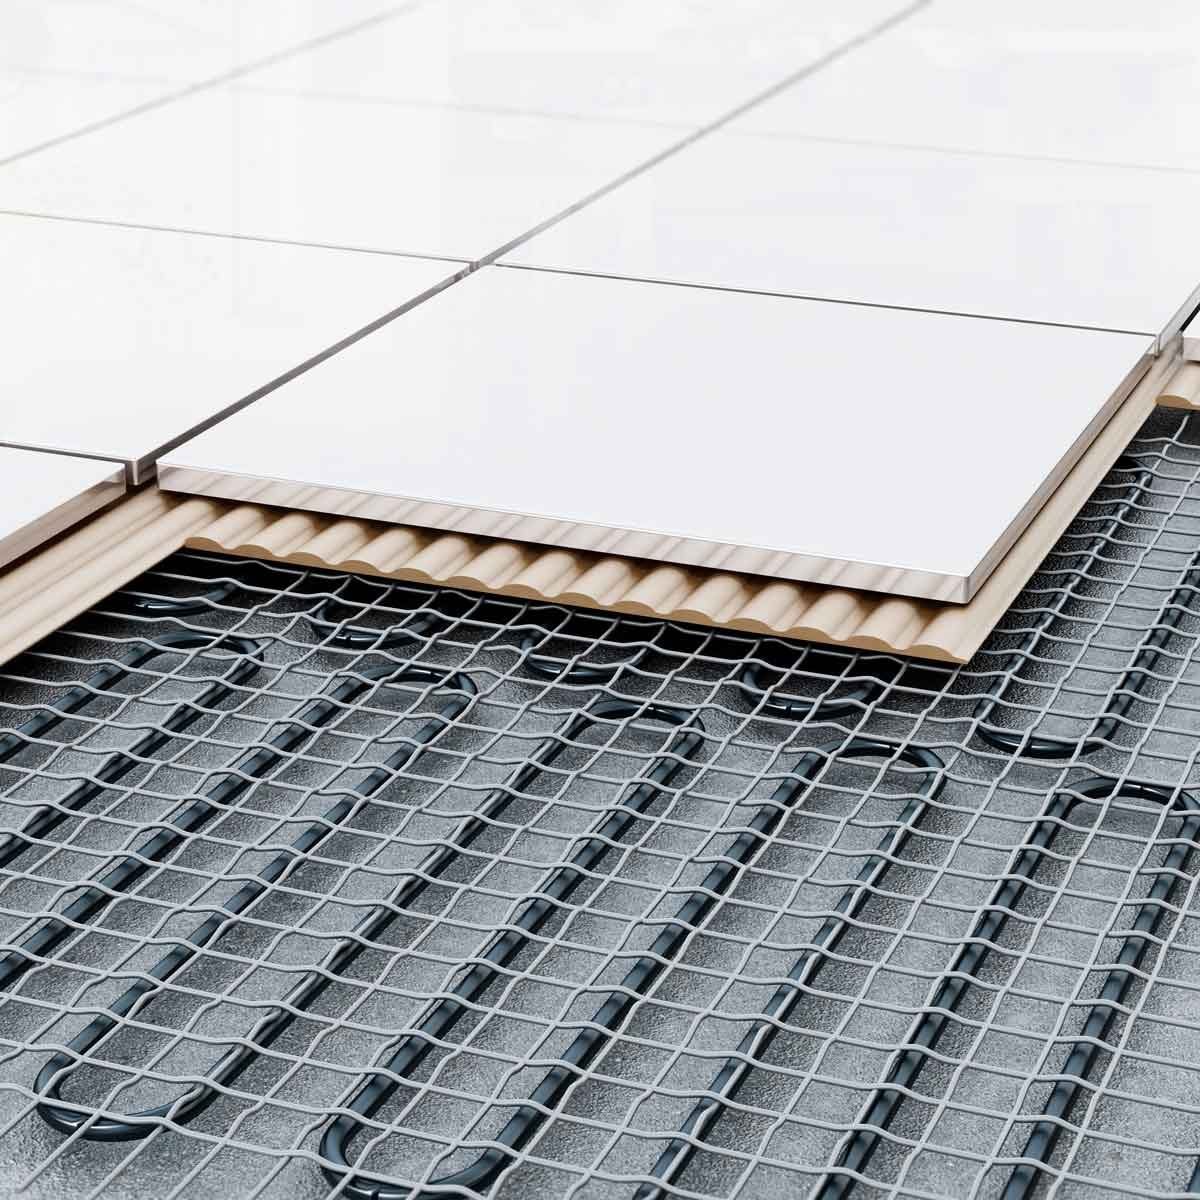
1. Electric Floor Warmers: Electric floor warmers are the most common type available in the market. They consist of thin electric cables or mats that are installed beneath your bathroom tiles or flooring material. These cables heat up when electricity passes through them, providing warmth to the entire bathroom floor.
2. Hydronic Floor Warmers: Hydronic floor warmers use heated water to warm the bathroom floor. They are connected to your home’s hot water supply and utilize a series of pipes installed beneath the flooring. A pump circulates hot water through these pipes, creating a cozy temperature for your bathroom.
3. Radiant Heat Panels: Radiant heat panels are an innovative option for floor warming in bathrooms. These panels are made up of carbon fiber materials that generate infrared heat when powered on. They can be easily installed in your bathroom, either on the walls or ceiling, providing a gentle and efficient warmth to the entire space.
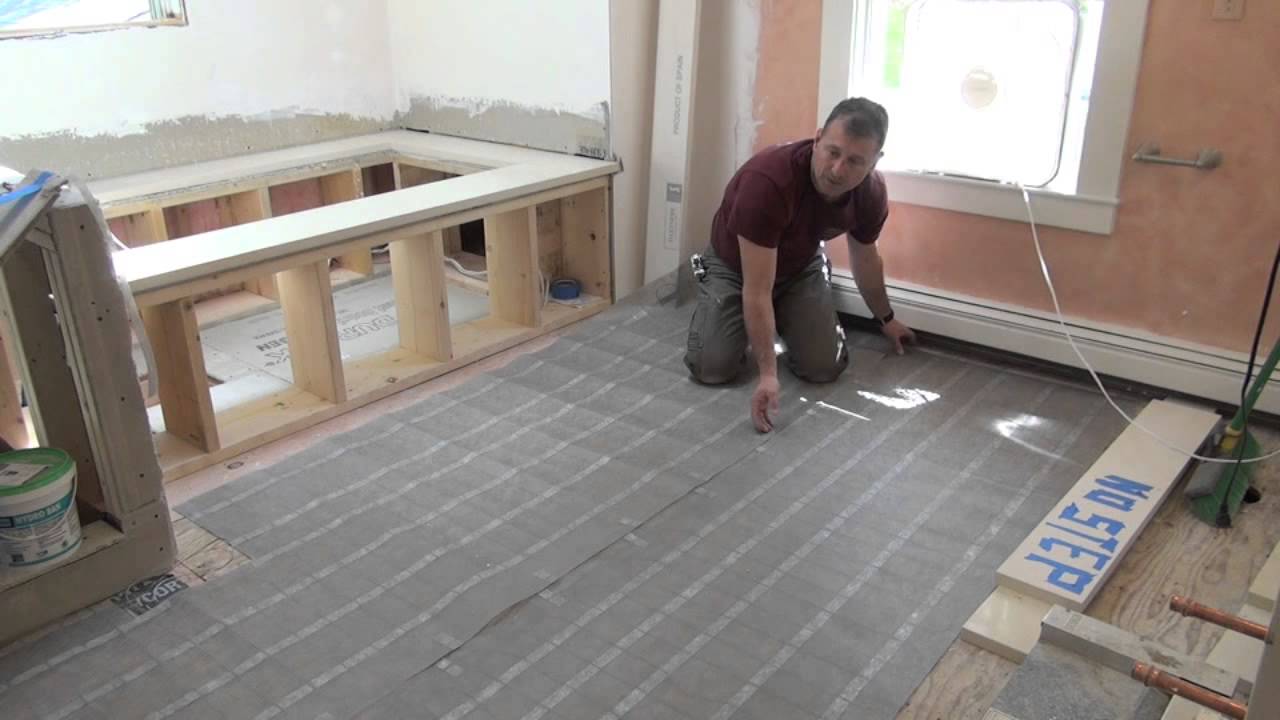
Installation Process:
1. Assess Your Bathroom: Before installation, assess your bathroom’s size and layout to determine the best placement for the floor warmers. Consider factors like electrical outlets, plumbing lines, and fixtures that may affect the installation process.
2. Prepare the Subfloor: Ensure that your bathroom subfloor is clean, dry, and level before installing the floor warmers. Remove any debris or loose materials and fix any unevenness in the subflooring to ensure a smooth installation process.
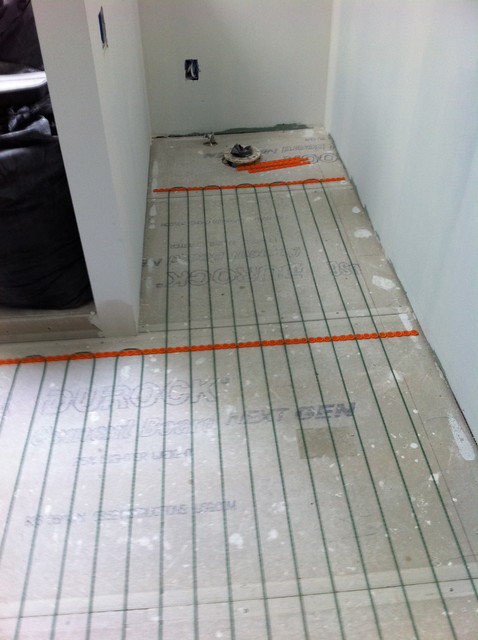
3. Lay Insulation Boards: To maximize the efficiency of your floor warming system, it is recommended to install insulation boards over the subfloor. These boards prevent heat loss by reflecting it back into the room, ensuring that the warmth remains in your bathroom.
4. Install Floor Warmers: Depending on the type of floor warmers you choose, follow the manufacturer’s instructions for installation. Electric floor warmers usually require embedding cables or mats into The thinset mortar or adhesive that is used to secure the tiles or flooring material. Hydronic floor warmers require the installation of pipes beneath the subfloor, which are then connected to the hot water supply. Radiant heat panels can be mounted on walls or ceilings using brackets or adhesive.
5. Connect to Power Supply: For electric floor warmers, connect the cables or mats to a power supply according to the manufacturer’s instructions. This may involve connecting them to a thermostat or control panel for temperature regulation. Hydronic floor warmers will need to be connected to the hot water supply and controlled by a thermostat or valve.
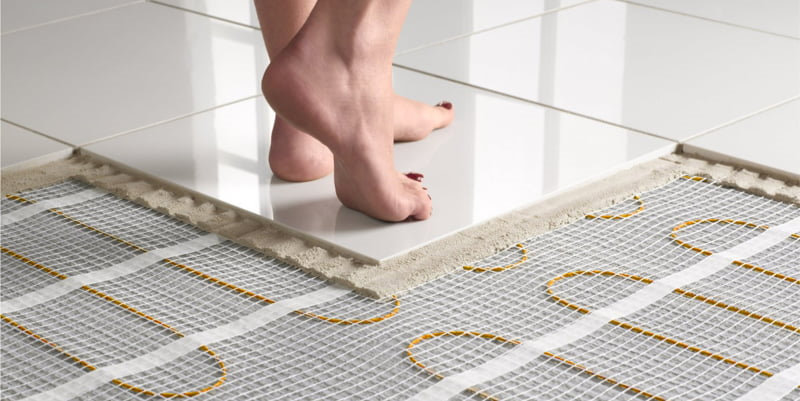
6. Install Tiles or Flooring Material: Once the floor warmers are in place and connected, you can proceed with installing your tiles or flooring material over them. Make sure to follow proper installation techniques and allow sufficient time for the adhesive or mortar to dry before using the bathroom.
7. Test and Adjust: After installation, test your floor warming system to ensure that it is functioning properly. Adjust the thermostat or control panel as needed to achieve your desired level of warmth.
8. Regular Maintenance: To keep your floor warmers in good condition, perform regular maintenance such as cleaning the surface and checking for any signs of damage. Follow any specific maintenance instructions provided by the manufacturer.
Overall, installing floor warmers in your bathroom can provide numerous benefits, including improved comfort, energy efficiency, health benefits, and quicker drying of wet surfaces. By following the proper installation process and maintaining your floor warming system, you can enjoy a cozy and inviting bathroom all year round. The best placement for floor warmers in a bathroom will depend on the specific layout and design of the space. However, there are a few general guidelines to consider when determining the placement:
1. Avoid placing floor warmers directly under fixtures or large furniture pieces that may obstruct the heat distribution. This includes toilets, sinks, bathtubs, and vanities.
2. Take into account the location of electrical outlets and plumbing lines. These may limit where you can install floor warmers or require additional planning for installation.
3. Consider the size of the bathroom and the desired coverage area for the floor warmers. Smaller bathrooms may only require warming in specific areas, while larger bathrooms may benefit from more extensive coverage.
4. If using electric floor warmers, ensure that there is easy access to power supply connections and thermostats or control panels for temperature regulation.
5. For hydronic floor warmers, plan for the installation of pipes beneath the subfloor and connection to a hot water supply. This may require coordination with plumbing lines and access to a suitable water source.
6. Take note of any unique architectural features or obstacles in the bathroom that may affect installation, such as alcoves, built-in shelving, or angled walls.
By considering these factors and consulting with a professional if needed, you can determine the best placement for floor warmers in your bathroom to maximize comfort and efficiency. Installing floor warmers in a bathroom can provide numerous benefits, including improved comfort, energy efficiency, health benefits, and quicker drying of wet surfaces. To ensure a successful installation, it’s important to follow the proper process and consider the best placement for the floor warmers. Here are some guidelines to keep in mind:
1. Avoid placing floor warmers directly under fixtures or large furniture pieces that may obstruct heat distribution. This includes toilets, sinks, bathtubs, and vanities. It’s important to leave enough space around these fixtures for proper airflow.
2. Take into account the location of electrical outlets and plumbing lines. These may limit where you can install floor warmers or require additional planning for installation. It’s important to avoid damaging any existing electrical or plumbing infrastructure.
3. Consider the size of the bathroom and the desired coverage area for the floor warmers. Smaller bathrooms may only require warming in specific areas, while larger bathrooms may benefit from more extensive coverage. Plan accordingly to ensure even heat distribution throughout the space.
4. If using electric floor warmers, ensure that there is easy access to power supply connections and thermostats or control panels for temperature regulation. This will allow for convenient adjustments and maintenance.
5. For hydronic floor warmers, plan for the installation of pipes beneath the subfloor and connection to a hot water supply. This may require coordination with plumbing lines and access to a suitable water source. Professional assistance may be necessary for this type of installation.
6. Take note of any unique architectural features or obstacles in the bathroom that may affect installation, such as alcoves, built-in shelving, or angled walls. These factors may require adjustments in placement or additional planning.
By considering these factors and consulting with a professional if needed, you can determine the best placement for floor warmers in your bathroom to maximize comfort and efficiency. Regular maintenance and following manufacturer instructions will also help keep your floor warmers in good condition.