Using mosaic floors tiles or stone tiles is additionally one of the more innovative bath room floor tiles ideas. In case you select ceramic tiles for the bathroom of yours, think about using a tile that features a slip-resistant surface for bathroom security, that is one of the very best bath room tile ideas. However, there are specific reasons for that.
Here are Images about Bathroom Floor Plans 8 X 12
Bathroom Floor Plans 8 X 12

colors that are Warm like peach and yellowish are fun, they can make the bathroom feel cozier and they also go best with an even more country looking bathroom decor. You will find scores of styles and designs to check out on the market. Ceramic tiles are most likely the most typical kind of flooring option for your bathroom's floor layout.
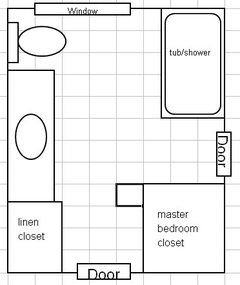
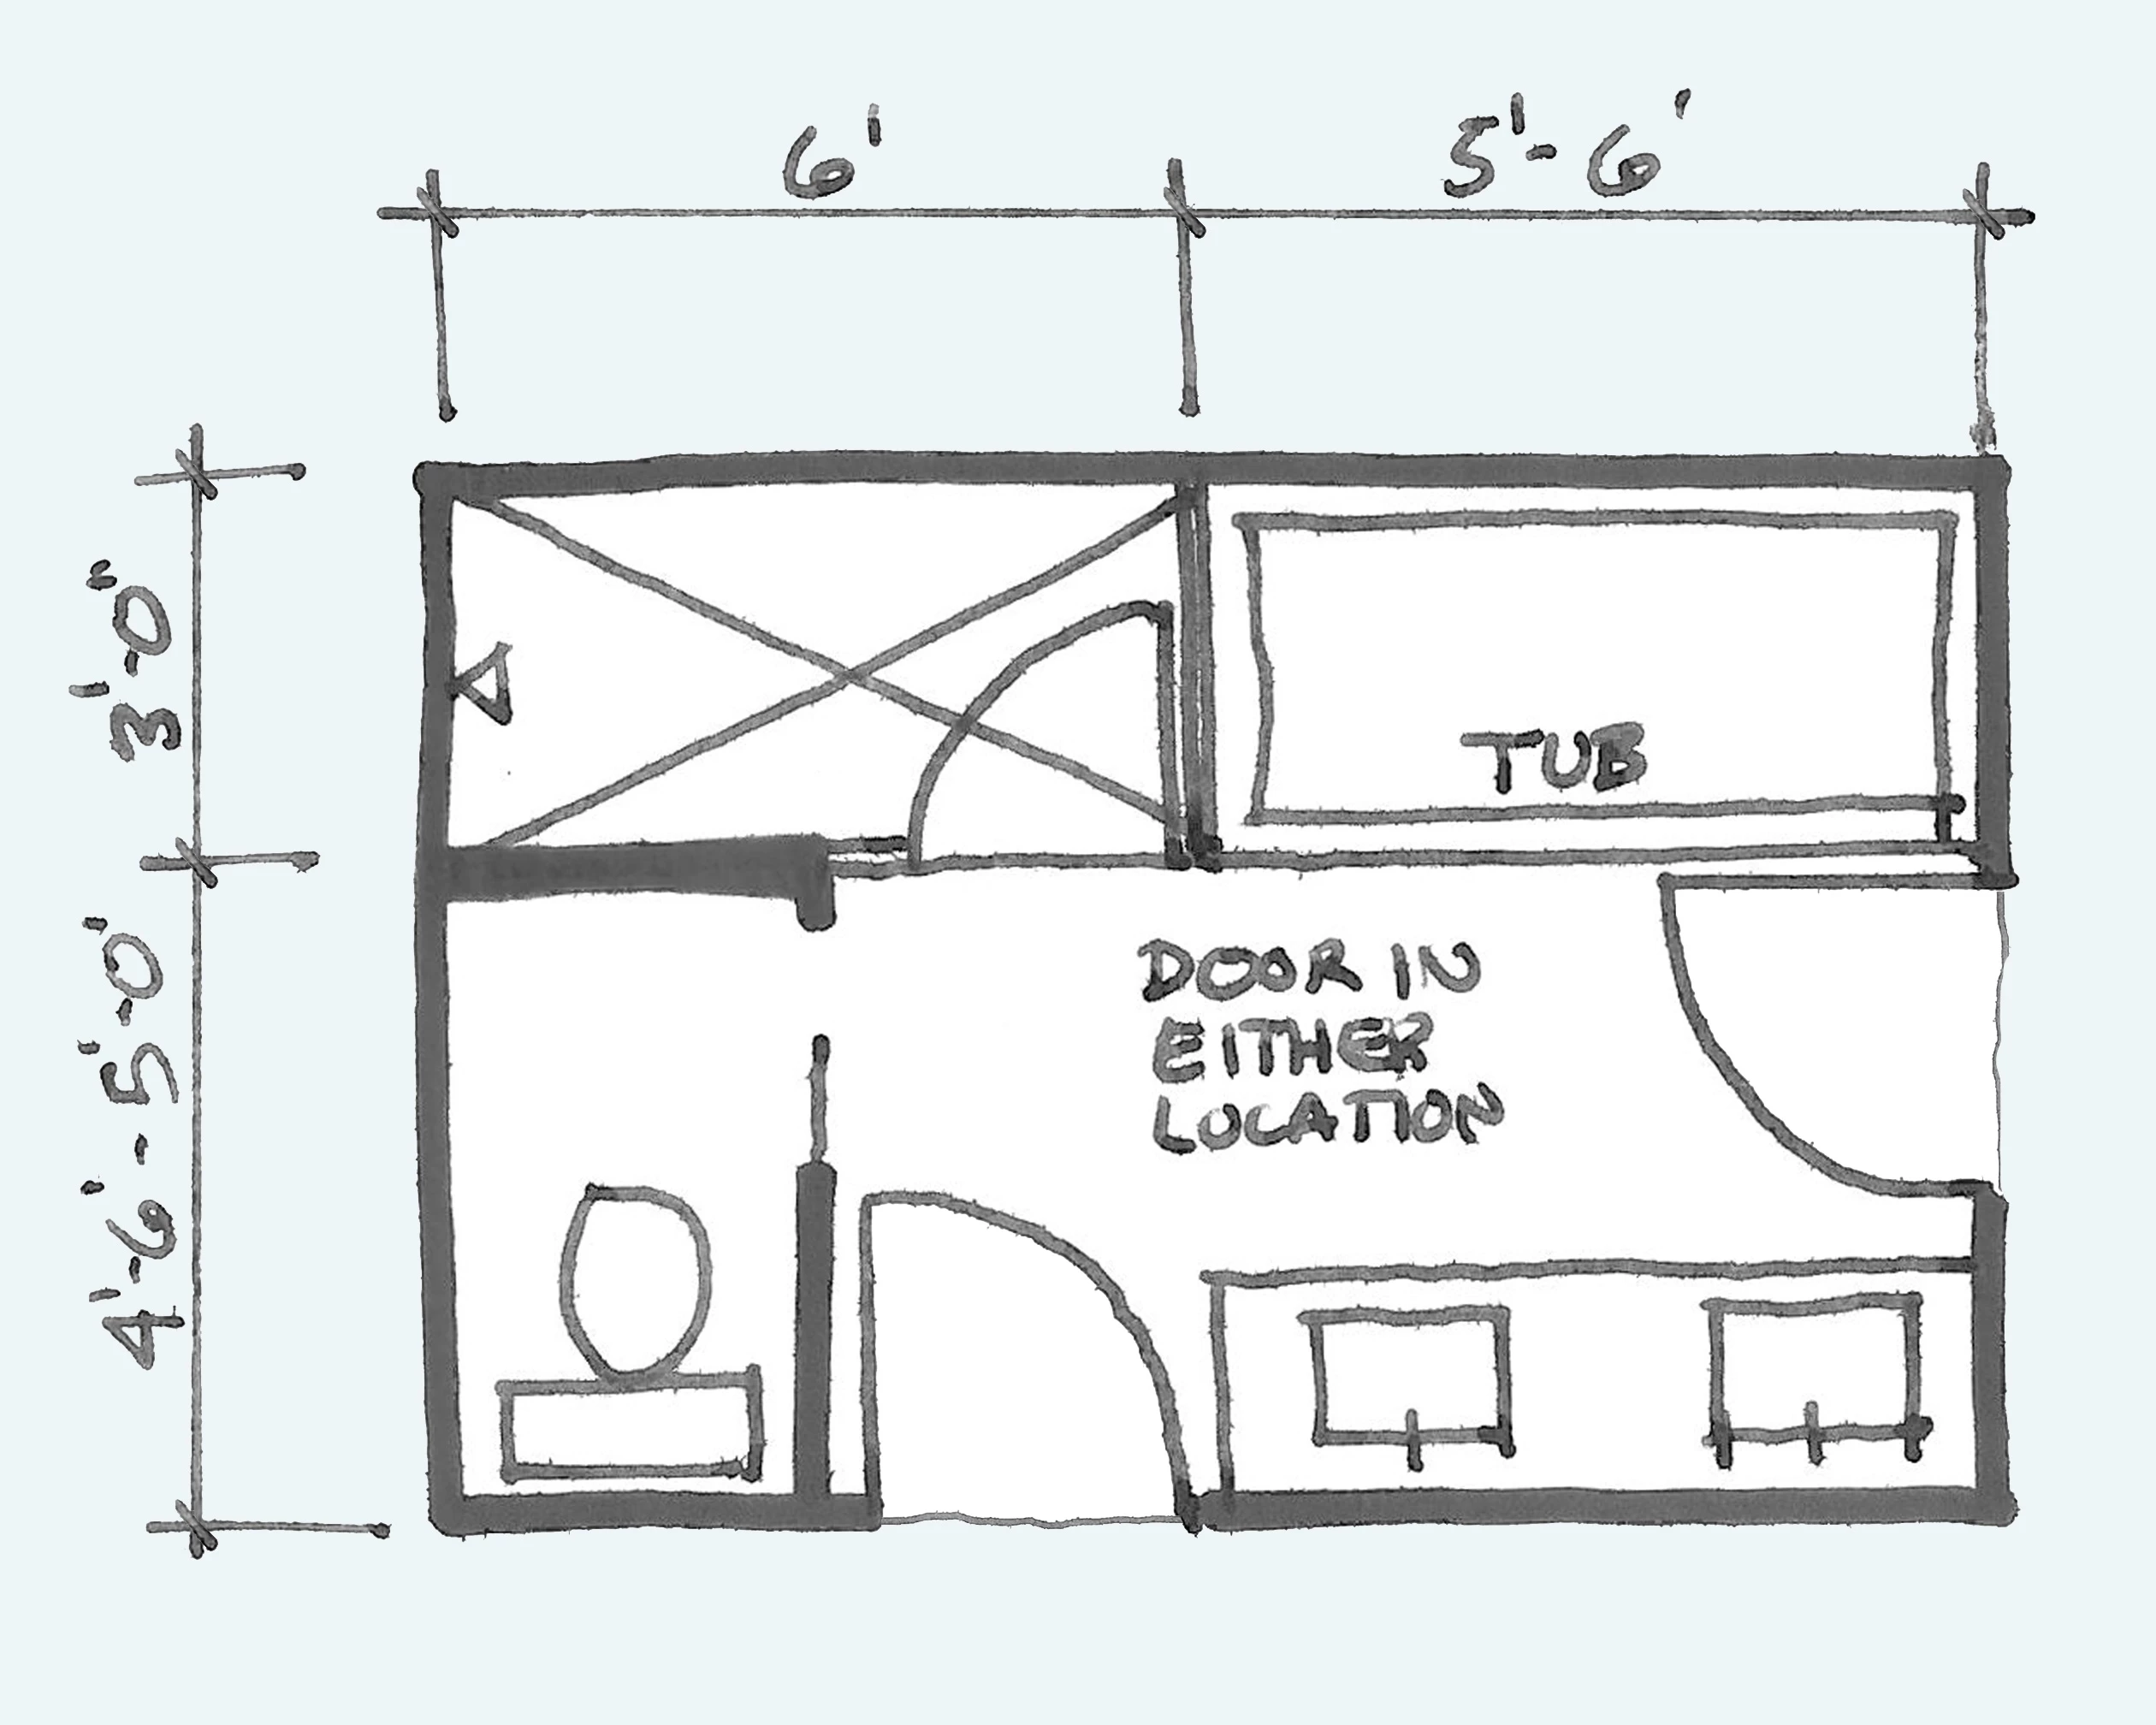
8 x 12 master bath layout DILEMMA
These supplies are available in a broad range of designs plus patterns which implies you will certainly be equipped to locate one which fits the tastes of yours. If perhaps you want the normal white or cream, try using colored grout so that your bathroom gets a splash of color. The greatest part about bath room floor vinyl tiles is you are able to change theme easily and with no professional help.
Images Related to Bathroom Floor Plans 8 X 12
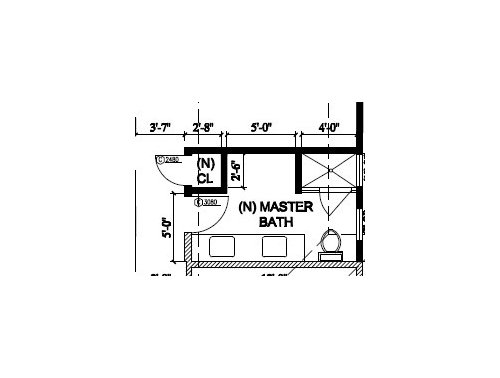
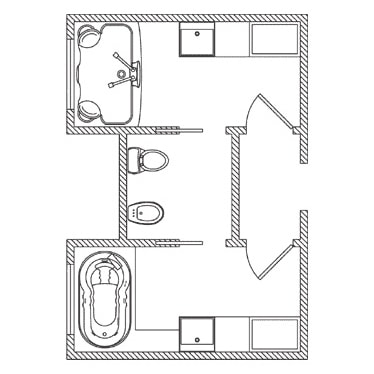
Our master bedroom Master bath layout, Bathroom floor plans

8 x 12 master bath layout DILEMMA
Need help with the layout of our 8u0027 x 12u0027 bathroom
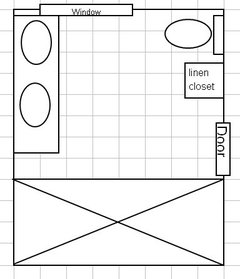
Common Bathroom Floor Plans: Rules of Thumb for Layout u2013 Board
A DIY Attic Master Bath Retreat Small bathroom floor plans

Common Bathroom Floor Plans: Rules of Thumb for Layout u2013 Board
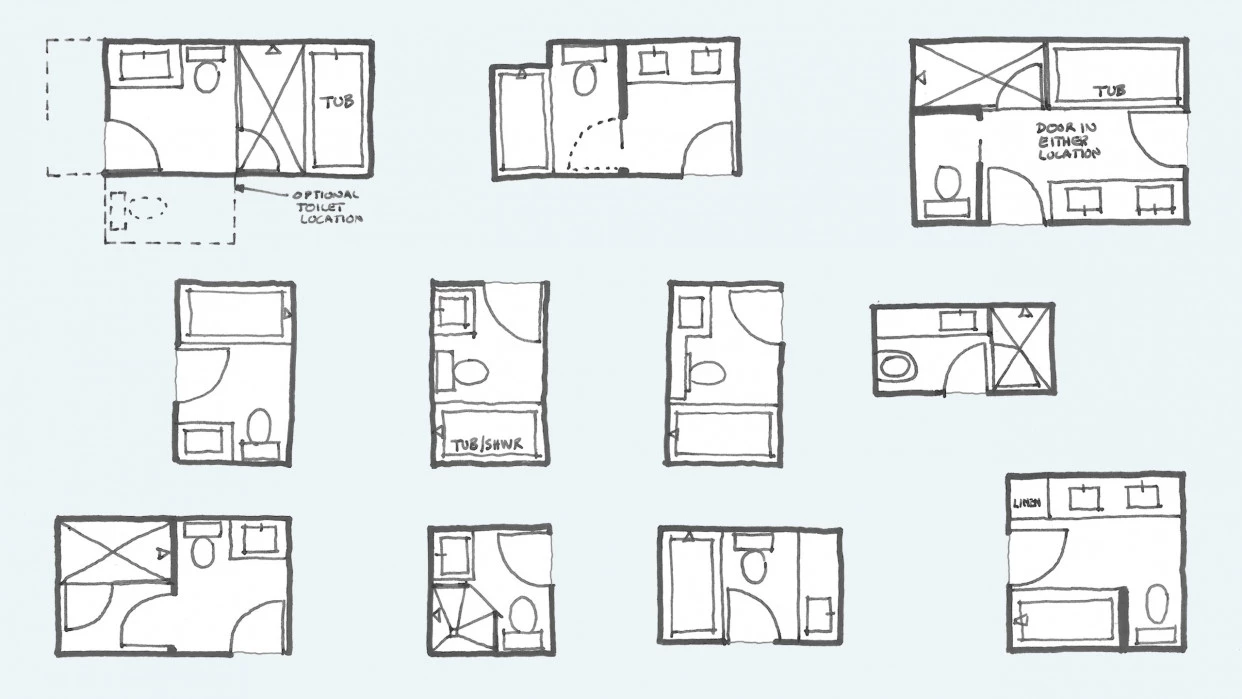
21 Bathroom Floor Plans for Better Layout
21 Bathroom Floor Plans for Better Layout
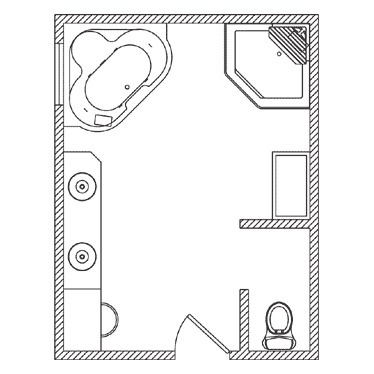
21 Bathroom Floor Plans for Better Layout
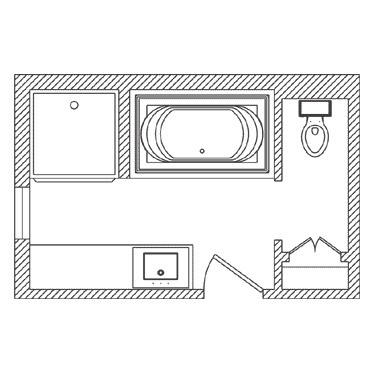
7 12×8 bathroom ideas bathrooms remodel, bathroom design, small

Bathroom Plans, Bathroom Layouts for 60 to 100 square feet

Pin by Amanda Morris on Letu0027s add on to our house! Bathroom

Related articles:
- Vintage Bathroom Floor Tile Patterns
- Bathroom Floor Tile DIY
- Limestone Bathroom Floor Tiles
- Bathroom Floor Porcelain Tile
- Concrete Bathroom Floor Ideas
- White Bathroom Ceramic Tiles
- Bathroom Floor Baseboard
- Rustic Bathroom Flooring Ideas
- Bathroom Flooring Options
- Bamboo Bathroom Flooring Ideas
Bathroom Floor Plans 8 X 12: Maximizing Space and Functionality
When it comes to designing or renovating a bathroom, one of the key elements to consider is the floor plan. A well-designed bathroom floor plan not only maximizes space but also ensures functionality and practicality. In this article, we will explore in detail the concept of bathroom floor plans with dimensions of 8 x 12 feet. We will discuss various sub-headings such as layout options, fixtures placement, storage solutions, and frequently asked questions (FAQs) to provide you with a comprehensive understanding of creating an efficient and aesthetically pleasing bathroom space.
I. Layout Options for a Bathroom Floor Plan 8 X 12:
In order to make the most of the limited space available in an 8 x 12-foot bathroom, it is essential to carefully consider different layout options. Here are some popular choices:
1. Single-Wall Layout:
The single-wall layout is ideal for smaller bathrooms where space is at a premium. This layout features all fixtures aligned on a single wall, typically with the vanity sink situated between the shower and toilet. While this design may appear simple, it can still provide all necessary amenities within a compact space.
2. L-Shaped Layout:
The L-shaped layout utilizes two adjacent walls to create an efficient bathroom design. In this configuration, the vanity sink is positioned against one wall, while the shower and toilet are placed along the other wall, forming an L-shape. This layout allows for easy movement and offers more countertop space compared to a single-wall arrangement.
3. U-Shaped Layout:
The U-shaped layout maximizes every inch of available space by utilizing three walls of the bathroom. With this design, the vanity sink is positioned on one wall, while the shower and toilet are placed opposite each other on the adjacent walls, forming a U-shape. This layout provides ample storage opportunities and can accommodate additional fixtures like a bathtub if desired.
II. Optimizing Fixture Placement:
In a compact 8 x 12-foot bathroom, strategic fixture placement is crucial for efficient use of space. Here are some tips for optimizing the placement of bathroom fixtures:
1. Vanity Sink:
When it comes to placing the vanity sink, consider positioning it near the entrance or adjacent to the shower area. This allows for easy access and minimizes the need to cross the entire bathroom to wash hands or brush teeth. Opt for a wall-mounted or pedestal sink to save floor space and create an illusion of more room.
2. Shower:
To maximize space in an 8 x 12-foot bathroom, a walk-in shower is often the preferred choice over a traditional bathtub-shower combination. Position the shower against one wall, preferably near the plumbing connections to minimize installation costs. Consider installing a glass enclosure or using a curbless design to visually expand the space.
3. Toilet:
The toilet should ideally be placed away from the entrance and any direct line of sight from the main door. This ensures privacy and minimizes its visual impact on the overall bathroom design. Place it against a wall opposite the vanity sink or adjacent to the shower area, depending on your layout preference.
4. Additional Fixtures:
If space permits, you may consider incorporating additional fixtures such as a bathtub or bidet into your 8 x 12-foot bathroom floor plan. A freestanding bathtub can be positioned against one wall, while a bidet can be placed next to the toilet for added convenience. Overall, the key to optimizing fixture placement in a compact bathroom is to prioritize functionality and create a layout that allows for easy movement and efficient use of space. By following these tips and utilizing the different layout options mentioned above, you can create a functional and visually appealing bathroom design in a compact space. Remember to consider your personal preferences and needs when planning the placement of fixtures. Some additional considerations for optimizing fixture placement in a compact bathroom include:
5. Storage: Incorporate storage solutions such as wall-mounted cabinets, shelving, or recessed niches to maximize vertical space and keep the bathroom clutter-free. Utilize the area above the toilet or vanity for storing towels, toiletries, and other essentials.
6. Lighting: Proper lighting is essential in a small bathroom to create a sense of openness and enhance functionality. Consider installing task lighting above the vanity sink and shower area, along with ambient lighting to brighten the entire space. Use mirrors strategically to reflect light and make the bathroom appear larger.
7. Ventilation: Adequate ventilation is important in a compact bathroom to prevent moisture buildup and mold growth. Install a vent fan or window to ensure proper air circulation and reduce humidity levels.
8. Accessibility: If you have specific accessibility needs, such as wheelchair access or grab bars, plan the placement of fixtures accordingly. Ensure there is enough clearance around the toilet and shower area for easy maneuverability.
9. Finishes and Materials: Choose finishes and materials that are durable, moisture-resistant, and easy to clean. Opt for light-colored tiles or paint on walls to create an illusion of spaciousness.
10. Personalization: Customize your bathroom design based on your personal preferences and style. Add decorative touches like artwork, plants, or accessories that complement the overall design while maintaining functionality.
Remember to consult with a professional contractor or designer when planning your bathroom layout and fixture placement to ensure all building codes and regulations are met.