Laminated flooring is produced- Positive Many Meanings – from synthetic materials coupled with healthy ingredients and decorated with applique. It is typically used as a substitute to solid wood or perhaps stone flooring which it can replicate effectively and easily. Nonetheless, the glueless laminate floor surfaces and also the glued laminate floors require numerous tools in case you want to carry out the job properly.
Images Related to Laminate Flooring Edges Fitting
Laminate Flooring Edges Fitting
You additionally do not need to worry about your children slipping on their wood laminate flooring; they knows that safety is a premier concern in any home, thus they have designed their floors to be slip-resistant. Setting up a faulty laminate will simply decrease its lifespan and it might require regular servicing in the future. Though it doesn't commonly happen, still be careful from gapping.
How to Install Laminate Flooring
/how-to-lay-laminate-flooring-1822250-09-15b00e370b304baf934b1734fa2420be.jpg)
Skeptics may perhaps argue that if Westhollow timber laminates are produced- Positive Many Meanings – from ninety % wood, then it would always adhere to that Westhollow's floors will suffer from the common affliction of wood flooring surfaces: fading. The best layer is a protective sheet that prevents damage, hence your floors always look a novice. Just before you choose laminate for your project we'd love to supply you with some critical info.
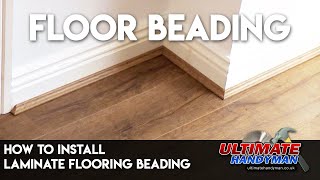
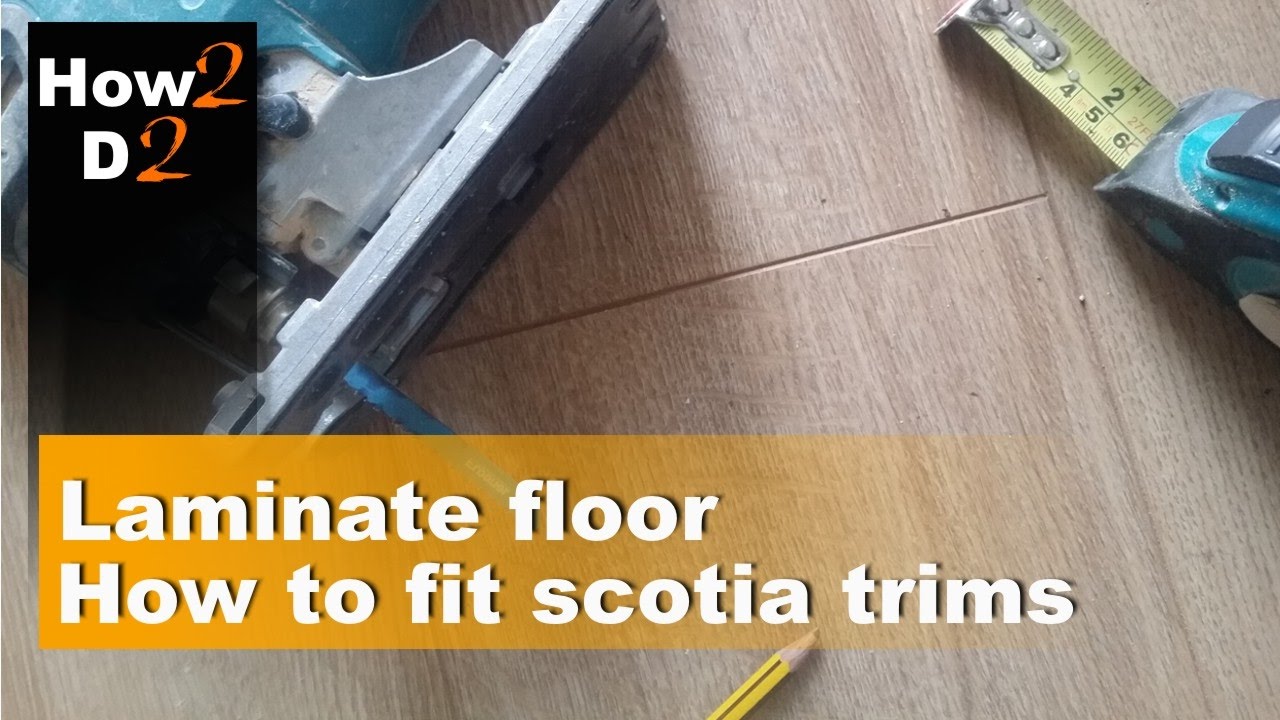
How to fit scotia trims in laminate flooring Edging corners laminate floor
Installing Laminate Flooring : Finishing Trim and Choosing
Julian Cassellu0027s DIY Blog » Blog Archive Laying wood and laminate

Guide to Installing Laminate Flooring (DIY) Family Handyman
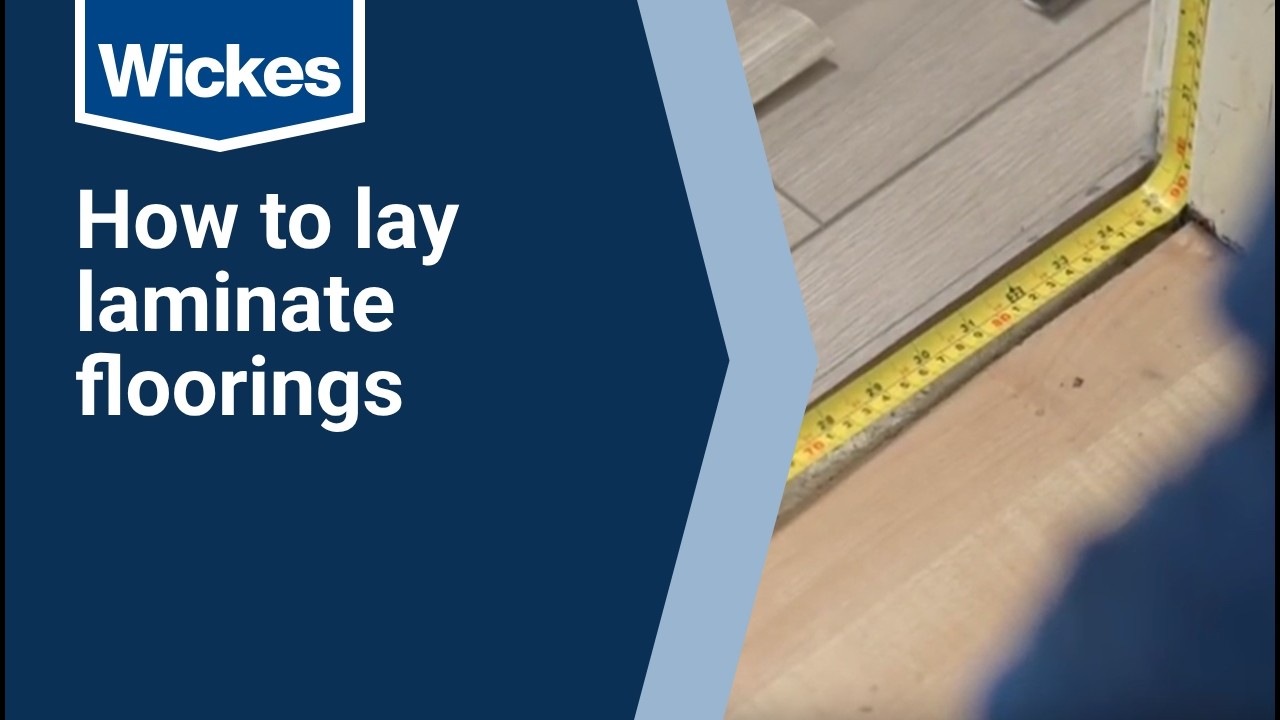
Wickes How To Lay Laminate Flooring
Cutting Laminate Around Corners, DIY tips
How To Remove Laminate Flooring – Bob Vila

How to Lay Laminate Flooring? – Fit Laminate Floor Direct Wood

8 Essential Tools for Laminate Flooring Installations The Family
How to Lay Laminate Flooring? – Fit Laminate Floor Direct Wood

What size expansion gap should be left when installing laminate

How to lay laminate in a doorway for perfect flooring transitions

Related articles:
- Coastal Laminate Flooring
- Commercial Laminate Flooring
- Slate Laminate Flooring
- Laminate Flooring Types
- Laminate Flooring Design
- Commercial Quality Laminate Flooring
- Black Laminate Flooring
- Tigerwood Laminate Flooring
- Royal Cherry Laminate Flooring
- Laminate Flooring Thickness For Basement
Laminate Flooring Edges Fitting: A Comprehensive Guide
When it comes to installing laminate flooring, one crucial aspect that often requires careful attention is the fitting of the edges. Properly fitting the edges ensures a seamless and professional-looking finish, enhancing the overall aesthetic of your flooring. In this comprehensive guide, we will explore various techniques and tips for achieving flawless laminate flooring edges fitting.
1. Understanding Laminate Flooring Edges
Laminate flooring typically features four different types of edges: square, beveled, micro-beveled, and pressed beveled. Each edge type serves a distinct purpose and offers a unique appearance.
– Square Edges: This edge type creates a smooth and seamless connection between planks, resulting in a sleek and uniform look.
– Beveled Edges: Beveled edges feature a V-shaped groove between each plank, adding depth and definition to the flooring. They create a more rustic or vintage appearance.
– Micro-Beveled Edges: Similar to beveled edges, micro-beveled edges also have a groove between planks but are narrower in size. They provide a subtle accentuation without compromising the smoothness of the overall surface.
– Pressed Beveled Edges: Pressed beveled edges are created by pressing grooves into the planks during manufacturing. They offer an authentic hardwood look and feel.
2. Tools Required for Laminate Flooring Edges Fitting
To ensure successful installation of laminate flooring edges, you will need a few essential tools:
– Laminate Cutter or Miter Saw: A laminate cutter or miter saw allows you to make precise cuts on the planks for fitting along the edges.
– Tapping Block: A tapping block is used to gently tap the planks into place without causing any damage or deformities.
– Pull Bar: A pull bar helps in fitting planks tightly against each other during installation.
– Chisel and Hammer: These tools can be used to trim excess material or adjust the shape of planks for a perfect fit.
– Measuring Tape: A measuring tape is crucial for accurately measuring and marking the dimensions of the floor space.
Now that we have covered the basic tools required, let’s delve into the step-by-step process of fitting laminate flooring edges.
3. Step-by-Step Guide for Fitting Laminate Flooring Edges
Before you begin fitting the edges of your laminate flooring, ensure that you have prepared the subfloor properly and have all the necessary tools at hand. Once you have completed these preliminary steps, follow these detailed instructions:
Step 1: Measure and Prepare
Measure the width and length of the room where you will be installing the laminate flooring. It is essential to leave a small gap (usually around 1/4 inch) along all edges to account for expansion. Remove any baseboards or moldings that may obstruct the installation process.
FAQ: Should I remove existing flooring before installing laminate flooring?
Answer: In most cases, it is recommended to remove existing flooring before installing laminate. This allows for a smoother and more even surface, ensuring better results. However, if the existing floor is in good condition, clean, and level, you can install laminate directly over it after proper preparation.
Step 2: Install Underlayment
Lay down an underlayment over the subfloor to provide cushioning, absorb sound, and prevent moisture from seeping into the laminate. Trim any excess underlayment along the edges using a utility knife.
FAQ: Can I Install laminate flooring without underlayment?
Answer: While it is not mandatory to use underlayment, it is highly recommended. Underlayment helps with sound absorption, moisture protection, and provides cushioning for a more comfortable walking surface. It also helps to smooth out any minor imperfections in the subfloor.
Step 3: Start Installing the First Row
Begin by laying the first row of planks along the longest wall of the room, with the groove side facing the wall. Leave a small gap (usually around 1/4 inch) between the planks and the wall to allow for expansion. Use spacers to maintain this gap throughout the installation process.
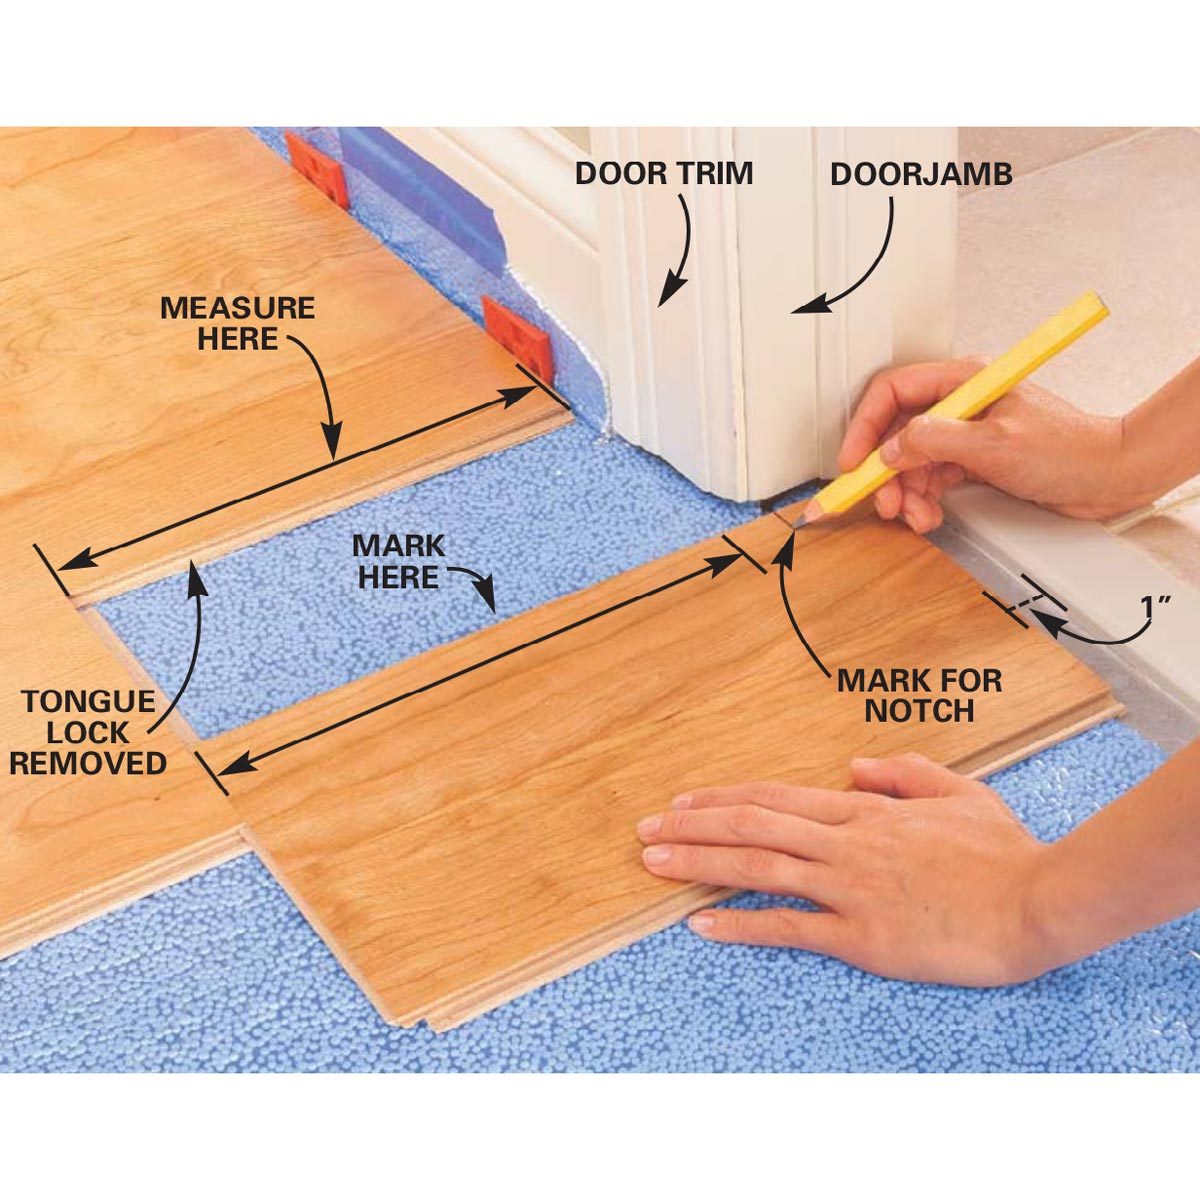
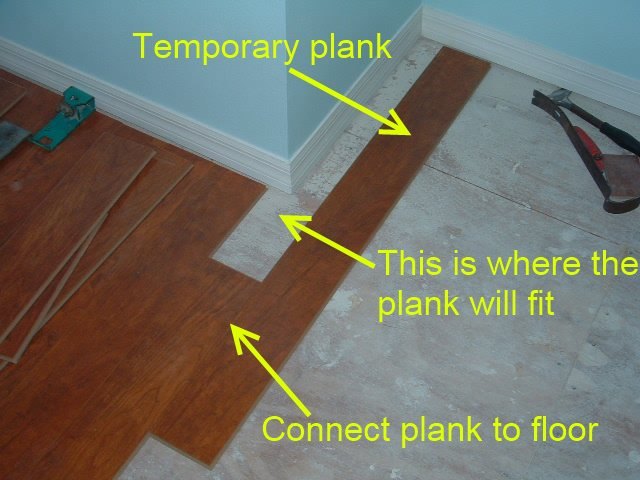
Step 4: Cut and Fit Planks for Edges
Measure and cut planks to fit along the edges of the room using a laminate cutter or miter saw. Make sure to leave the necessary gap for expansion. Use a tapping block and hammer or a pull bar to fit these planks tightly against each other and the existing rows.
Step 5: Repeat for Subsequent Rows
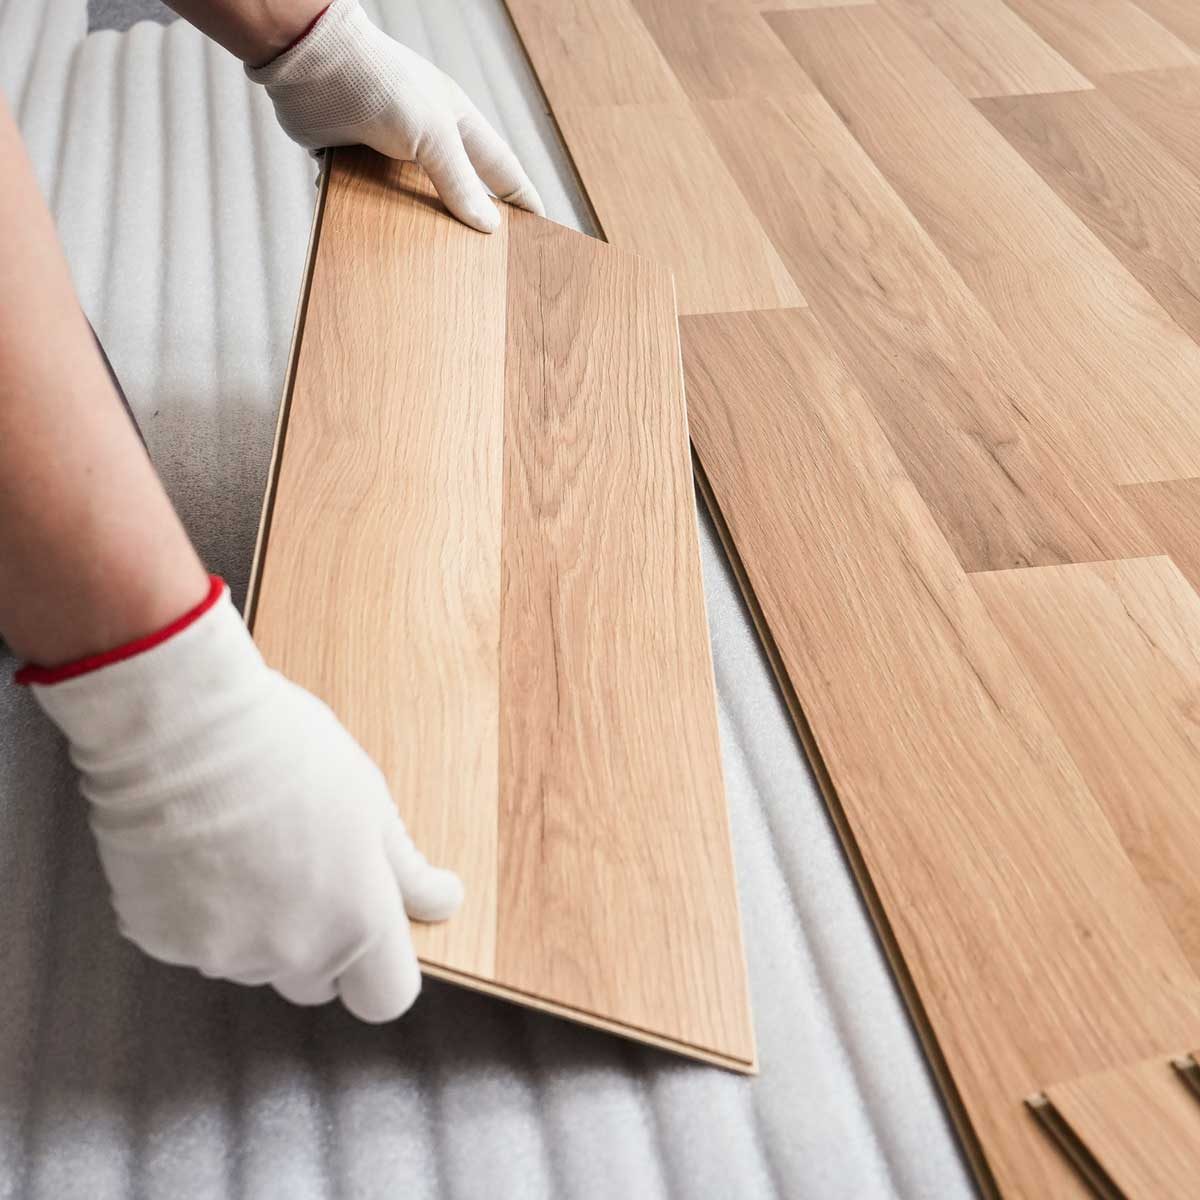
Continue installing subsequent rows by clicking them into place along the long edge and then tapping them gently into place with a tapping block or pull bar. Remember to stagger the planks for a more natural look.
Step 6: Trim Excess Material
Once all the planks are installed, use a chisel and hammer to trim any excess material along the edges of the room. This will provide a clean and finished look.
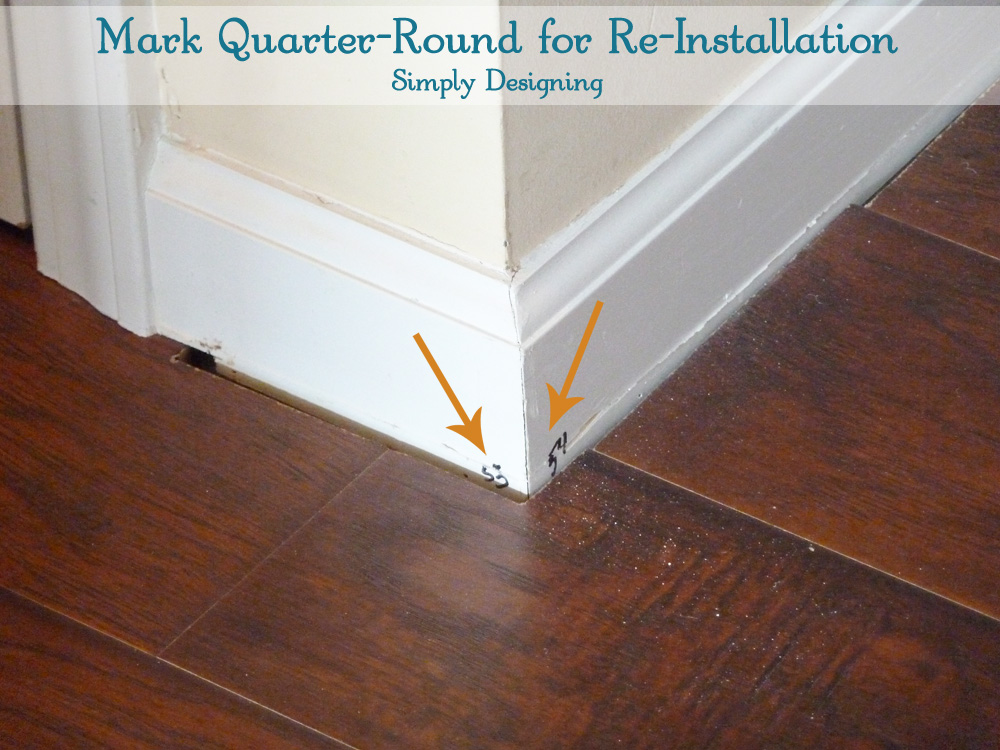
Step 7: Reinstall Baseboards or Moldings
After completing the installation of laminate flooring edges, reinstall baseboards or moldings to cover the expansion gap and give a polished appearance.
Step 8: Clean and Maintain
Clean the laminate flooring edges thoroughly with a damp mop or cloth, following the manufacturer’s instructions. Regularly maintain the floor by sweeping or vacuuming to remove dirt and debris. Avoid using excessive water or harsh cleaning agents.
By following these step-by-step instructions, you can successfully fit the edges of your laminate flooring and achieve a professional-looking result. Remember to take proper measurements, use the necessary tools, and follow all safety precautions during the installation process. Installing laminate flooring without underlayment is possible, but it is highly recommended to use underlayment for various reasons. Underlayment helps with sound absorption, protects against moisture, provides cushioning for a more comfortable walking surface, and smooths out minor imperfections in the subfloor.
To install laminate flooring without underlayment, follow these steps:
1. Prepare the subfloor: Ensure that the subfloor is clean, dry, and level. Remove any existing flooring and repair any damage or imperfections.
2. Install a vapor barrier: Lay down a moisture barrier or vapor barrier on the subfloor to prevent moisture from seeping into the laminate.
3. Begin installing the first row: Lay the first row of planks along the longest wall of the room, with the groove side facing the wall. Leave a small gap (usually around 1/4 inch) between the planks and the wall for expansion. Use spacers to maintain this gap throughout the installation process.
4. Cut and fit planks for edges: Measure and cut planks to fit along the edges of the room using a laminate cutter or miter saw. Make sure to leave the necessary gap for expansion. Use a tapping block and hammer or a pull bar to fit these planks tightly against each other and the existing rows.
5. Repeat for subsequent rows: Continue installing subsequent rows by clicking them into place along the long edge and then tapping them gently into place with a tapping block or pull bar. Remember to stagger the planks for a more natural look.
6. Trim excess material: Once all the planks are installed, use a chisel and hammer to trim any excess material along the edges of the room for a clean and finished look.
7. Reinstall baseboards or moldings: After completing the installation of laminate flooring edges, reinstall baseboards or moldings to cover the expansion gap and give a polished appearance.
8. Clean and maintain: Clean the laminate flooring edges thoroughly with a damp mop or cloth, following the manufacturer’s instructions. Regularly maintain the floor by sweeping or vacuuming to remove dirt and debris. Avoid using excessive water or harsh cleaning agents.
By following these steps, you can successfully install laminate flooring without underlayment and achieve a professional-looking result.