If you are shopping for hardwood for damp places such as kitchen as well as bathroom, strong hardwood would not be a perfect choice as it cannot accompany the home of yours for a longer period of time because of the moisture. On the flip side, those bubbles give the floor a much softer atmosphere than a well fastened hardwood floor.
Here are Images about How To Install Engineered Hardwood Flooring On Concrete Slab
How To Install Engineered Hardwood Flooring On Concrete Slab
When you've a hardwood floor, the rewards are obvious each day, and there are always local professionals readily available to allow you to re imagine the blueprint of yours, tweak some imperfections, or repair damages. Although the bamboo as well as laminate types are a lot easier to install, nothing beats the durability as well as natural attractiveness of hardwood floors. Superior quality contractors do have devices that will lessen the dust from sanding process.
Can I Install Hardwood Floors On A Slab Floors By The Shore

Does it mean that you should clear the laminate flooring daily with water? First you need to check out whether the floor is quite old and has got scraping and appears to be getting dull each day, don't utilize water at all. Before you purchase hardwood flooring, look for information that you can make use of to learn about hardwood floors. And, each bubble you step on is going to have a creaky sound.
Images Related to How To Install Engineered Hardwood Flooring On Concrete Slab
How to Lay Engineered Wood Floors – This Old House
/cdn.vox-cdn.com/uploads/chorus_asset/file/19494392/floor_5.jpg)
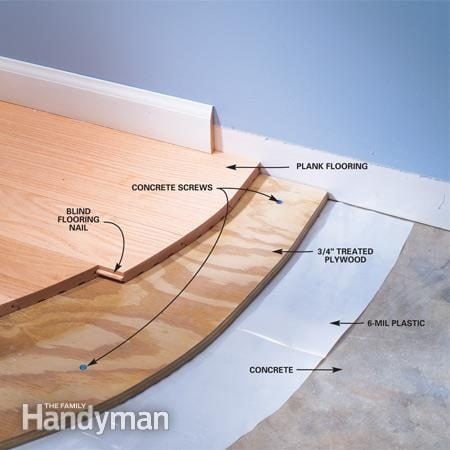
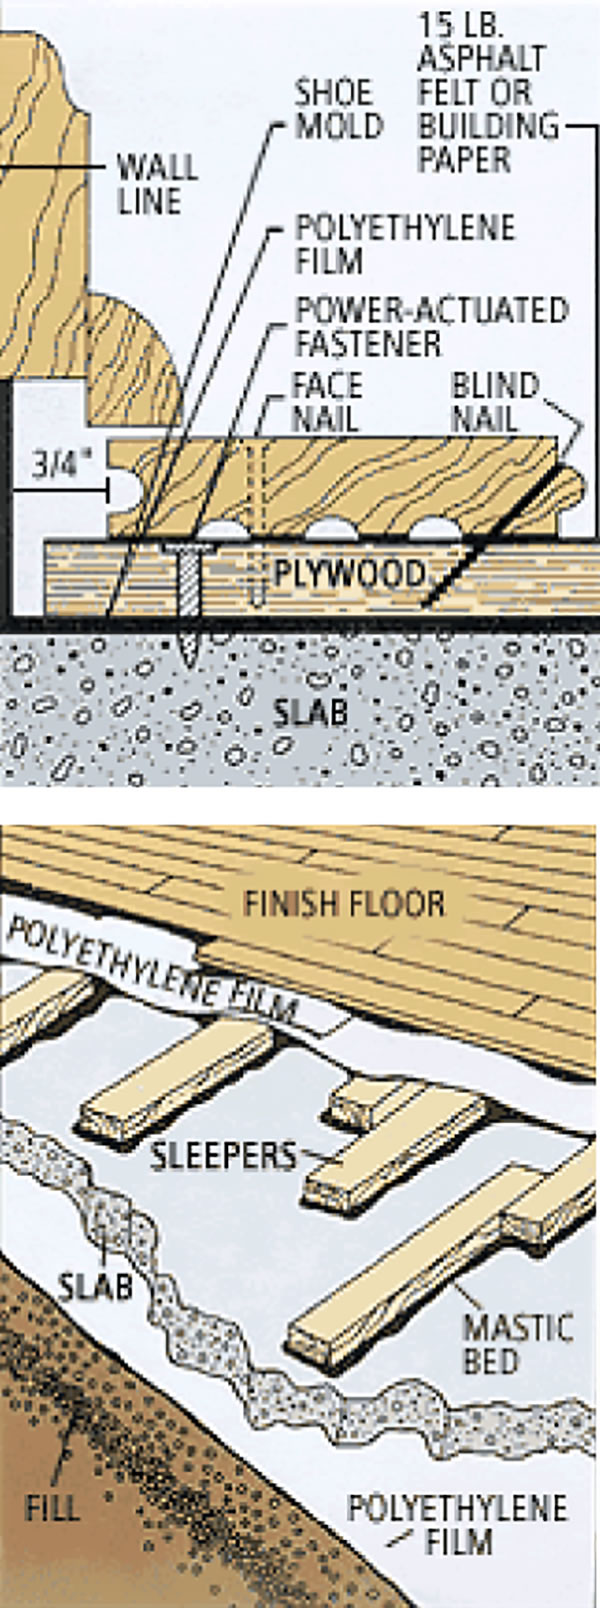
Installing a Hardwood Floor Over a Concrete Slab – American
Installing Hardwood Floors over Concrete

Installing Engineered Hardwood Floors u2013 Ultimate Guide

Installing Engineered Flooring on a Concrete Slab – Fine Homebuilding

Prepping Concrete Slabs for Hardwood Floor Installation City

How to Install an Engineered Hardwood Floor
Installing a Hardwood Floor Over a Concrete Slab – American
Installing Engineered Hardwood on Concrete – Twenty u0026 Oak

How to install hardwood floors on concrete: the detailed instructions
How To Install Click Lock Engineered Hardwood Flooring
Which Method Should I Use to Install My Engineered Wood Floor

Related articles:
- Hardwood Floor Finish Brands
- Hand Scraped Hardwood Flooring
- Home Hardwood Floor
- Hardwood Floor Deep Cleaner
- Engineered Hardwood Floor
- Cherry Hardwood Flooring Reviews
- Hardwood Floor Cleaning And Refinishing
- Wide Plank Pine Hardwood Flooring
- Hardwood Flooring Designs Photos
- Hardwood Floor Selection Guide
How To Install Engineered Hardwood Flooring On Concrete Slab
Installing engineered hardwood flooring on a concrete slab can be a challenging task, but with the right tools and techniques, it is definitely achievable. Engineered hardwood is an excellent choice for concrete slabs as it offers the beauty and durability of solid hardwood, with added stability to withstand the moisture typically found in concrete.
In this article, we will guide you through the step-by-step process of installing engineered hardwood flooring on a concrete slab. From preparing the surface to laying down the planks and finishing touches, we’ve got you covered.
1. Prepare the Concrete Slab:
Before you can start installing your engineered hardwood flooring, it is crucial to prepare the concrete slab properly. Here’s what you need to do:
a) Clean the surface: Remove any debris or dirt from the concrete slab using a broom or vacuum cleaner. Make sure to remove any loose particles that could interfere with the installation process.
b) Test for moisture: Concrete slabs are prone to moisture, which can cause damage to your hardwood flooring over time. Conduct a moisture test by taping a plastic sheet onto various areas of the slab and leave it for 24 hours. If condensation appears on the underside of the plastic sheet, you may need to take additional measures to mitigate moisture before proceeding with installation.
c) Address moisture issues: If excessive moisture is detected, consider applying a waterproofing sealer or installing a vapor barrier to prevent moisture from reaching your hardwood flooring. Consult with a professional if you are unsure about how to best address moisture concerns in your specific situation.
2. Acclimate the Flooring:
Engineered hardwood flooring needs time to acclimate to its environment before installation. This allows it to adjust and minimize potential expansion or contraction after installation. Follow these steps:
a) Unbox the planks: Remove all planks from their packaging and stack them in the room where they will be installed. Keep the planks off the ground and allow air to circulate around them.
b) Let them sit: Leave the planks to acclimate for at least 48 hours, but consult the manufacturer’s guidelines for specific recommendations. This step is essential as it ensures that your flooring will adapt to the humidity and temperature of the room, reducing the risk of warping or buckling after installation.
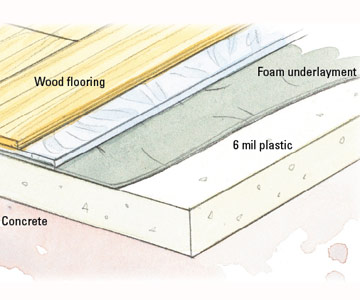
3. Install an Underlayment:
Installing an underlayment over the concrete slab provides additional insulation, soundproofing, and moisture protection. Follow these instructions:
a) Choose the right underlayment: There are various types of underlayment available, such as foam, cork, or rubber. Select one that suits your needs and meets the manufacturer’s recommendations for use with engineered hardwood flooring.
b) Lay down the underlayment: Roll out the underlayment perpendicular to the direction you plan to install the flooring. Trim any excess material and secure it in place using adhesive or nails, following the manufacturer’s instructions.
4. Start Installing the Engineered Hardwood Flooring:
Now that your concrete slab is prepped and the underlayment is in place, it’s time to lay down your engineered hardwood flooring. Follow these steps:
a) Plan your layout: Determine which direction you want your hardwood planks to run. Consider natural light sources, room dimensions, and existing architectural features when deciding on a layout.
b) Start with a reference line: Measure and mark a reference line on the concrete slab using a chalk line or straightedge To ensure that your first row of flooring is straight and aligned properly.
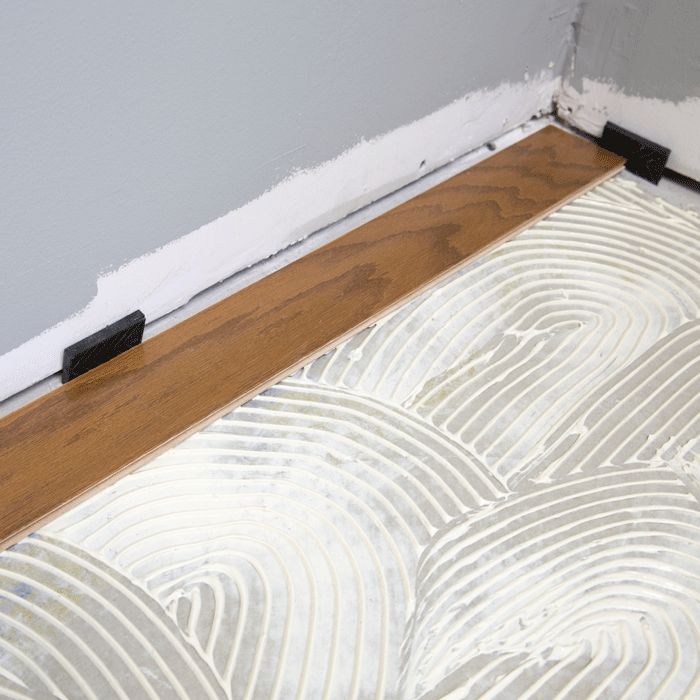
c) Apply adhesive: Depending on the type of engineered hardwood flooring you have, you may need to apply adhesive to the back of each plank or directly onto the concrete slab. Follow the manufacturer’s instructions for proper adhesive application.
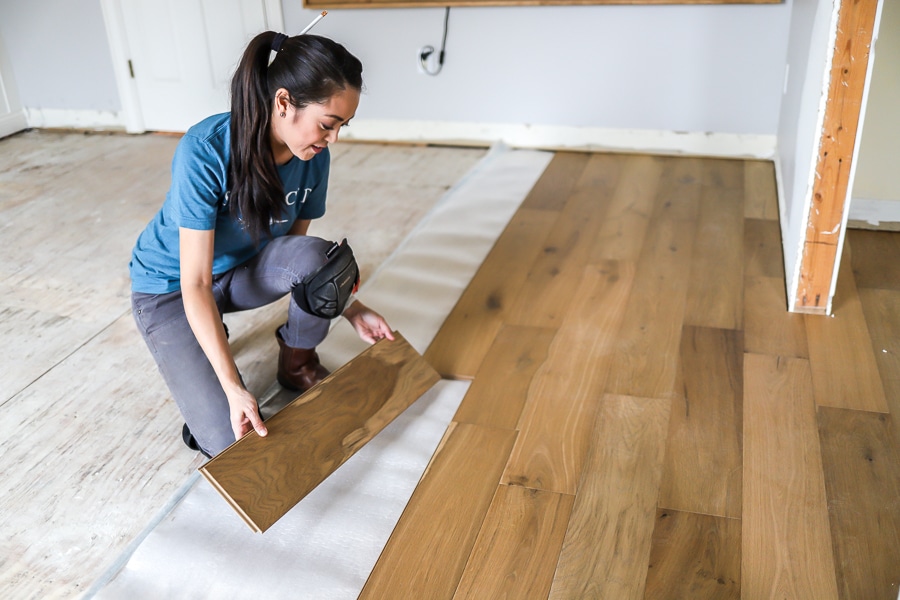
d) Lay down the first row: Begin laying down the first row of flooring along the reference line. Make sure each plank is snugly fit against the previous one, and use a rubber mallet or tapping block to ensure a tight connection.
e) Continue with subsequent rows: Lay down subsequent rows of flooring, ensuring that each plank is properly aligned and connected to the previous row. Use a combination of adhesive and interlocking mechanisms, if applicable, to secure the planks in place.
f) Cut and trim as necessary: Use a saw or other cutting tool to trim planks as needed to fit into corners, around obstacles, or at the ends of rows. Make sure to leave a small gap around the edges of the room for expansion.
g) Install transition pieces: If transitioning between rooms or different types of flooring, install transition pieces such as thresholds or T-molding to create a seamless transition between surfaces.
h) Allow for proper curing time: Once all the flooring is installed, allow it to cure and set according to the manufacturer’s recommendations before placing heavy objects on it or allowing regular foot traffic.
5. Maintain and care for your engineered hardwood flooring:
To keep your engineered hardwood flooring looking its best and prolong its lifespan, follow these maintenance tips:
a) Regular cleaning: Sweep or vacuum your flooring regularly to remove dirt, dust, and debris. Use a damp mop or hardwood floor cleaner as recommended by the manufacturer for deeper cleaning.
b) Avoid excessive moisture: Wipe up spills immediately to prevent water damage, and use mats or rugs in high-moisture areas like entryways or kitchens.
c) Protect from scratches: Place felt pads on the bottom of furniture legs to prevent scratching, and avoid dragging heavy objects across the floor.
d) Control humidity levels: Maintain a consistent humidity level in your home to prevent the flooring from expanding or contracting excessively. Use a humidifier in dry conditions and a dehumidifier in humid conditions if necessary.
e) Schedule regular inspections: Periodically check for any signs of damage, such as warping, buckling, or loose planks. Address any issues promptly to prevent further damage.
By following these steps and properly maintaining your engineered hardwood flooring, you can enjoy its beauty and durability for many years to come. Installing and maintaining engineered hardwood flooring requires attention to detail and proper care. Here are the steps to install and maintain your flooring:
Installation:
1. Prepare the subfloor: Ensure that the subfloor is clean, level, and dry. Remove any existing flooring and repair any damage or unevenness.
2. Acclimate the flooring: Allow the engineered hardwood planks to acclimate to the room’s temperature and humidity for at least 48 hours before installation.
3. Lay down an underlayment: Install a suitable underlayment to provide moisture protection and noise reduction, if required by the manufacturer.
4. Start with the first row: Begin installation against a straight wall, leaving a small gap between the wall and the planks for expansion. Connect each plank snugly against the previous one using a rubber mallet or tapping block.
5. Continue with subsequent rows: Lay down subsequent rows of flooring, ensuring proper alignment and connection with the previous row. Use adhesive and interlocking mechanisms, if applicable, to secure the planks in place.
6. Cut and trim as necessary: Use a saw or cutting tool to trim planks to fit into corners, around obstacles, or at the ends of rows. Leave a small gap around room edges for expansion.
7. Install transition pieces: If transitioning between rooms or different types of flooring, install transition pieces such as thresholds or T-molding for a seamless transition.
8. Allow for proper curing time: Once all flooring is installed, follow manufacturer recommendations for curing time before placing heavy objects or allowing regular foot traffic.
Maintenance:
1. Regular cleaning: Sweep or vacuum your flooring regularly to remove dirt, dust, and debris. Use a damp mop or recommended hardwood floor cleaner for deeper cleaning.
2. Avoid excessive moisture: Wipe up spills immediately to prevent water damage, and use mats or rugs in high-moisture areas like entryways or kitchens.
3. Protect from scratches: Place felt pads on furniture legs to prevent scratching, and avoid dragging heavy objects across the floor.
4. Control humidity levels: Maintain consistent humidity levels in your home to prevent excessive expansion or contraction of the flooring. Use humidifiers in dry conditions and dehumidifiers in humid conditions if necessary.
5. Schedule regular inspections: Periodically check for signs of damage such as warping, buckling, or loose planks. Address any issues promptly to prevent further damage.
By following these installation and maintenance steps, you can ensure that your engineered hardwood flooring remains beautiful and durable for many years.