Actually concrete floors are not new stuff, any way they were constantly around. Among the reasons concrete polishing floors are going up in need is because they eliminate additional costs that can occur with a new build. Below are some of the positives to creating your new home with floors of polished concrete or even exposing the concrete floor of your existing house.
Here are Images about Floating A Concrete Floor
Floating A Concrete Floor

Applying concrete floors coating to your floor appears to be as quick as painting wall space, but just like painting, it entails an experienced telephone call. Stained concrete for the flooring is offering abundant options options for interiors which includes virtually unlimited designs as well as health benefits.
Manufactureru0027s Roundtable: Installing Floating Floors 2017-10-09

Some people cover their concrete floor with carpets but one can't argue with spotless potential as well as the durability of concrete. Water based paints are typically not a good idea with regards to concrete flooring, as they usually do not adhere to the surface area really well.
Images Related to Floating A Concrete Floor
What Is Floating Slab Floating Slab Construction How to Build a

Final concrete layer of the floating floor. Download Scientific

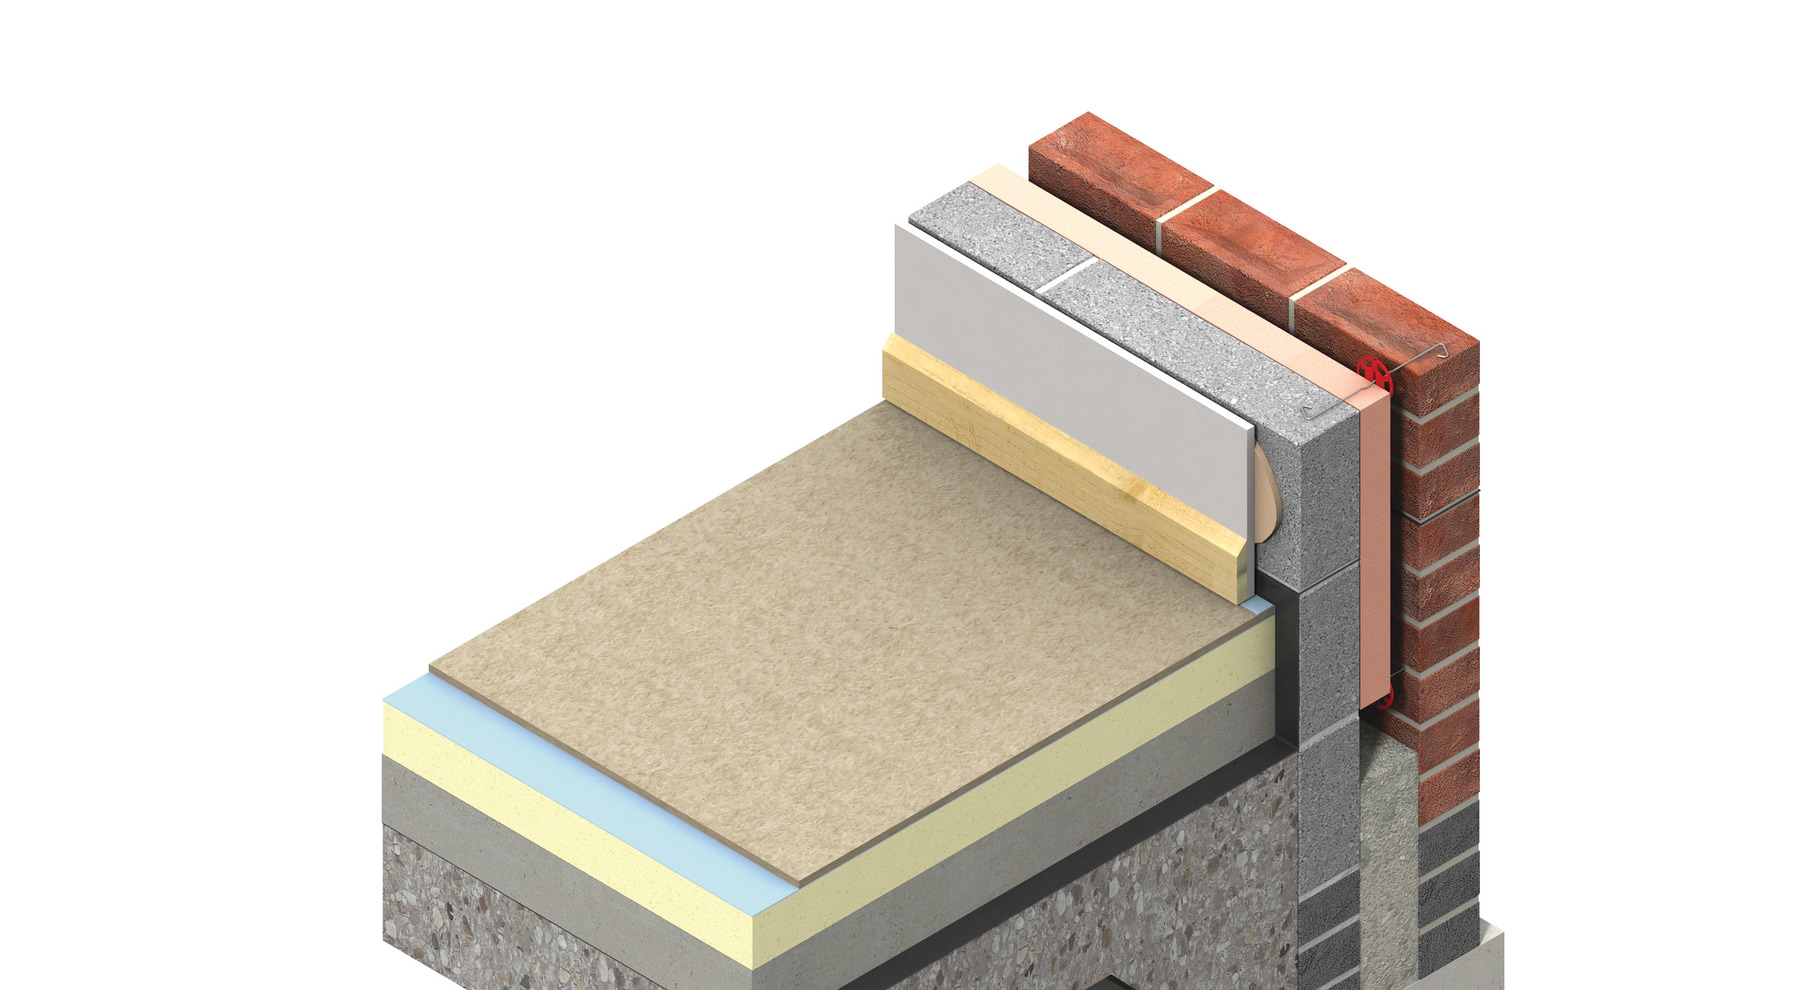
How to construct a floating floor Insulation Kingspan Great
Floors

PU-D20 Concrete System u0026 DLP Floating Floor (A60) Sound

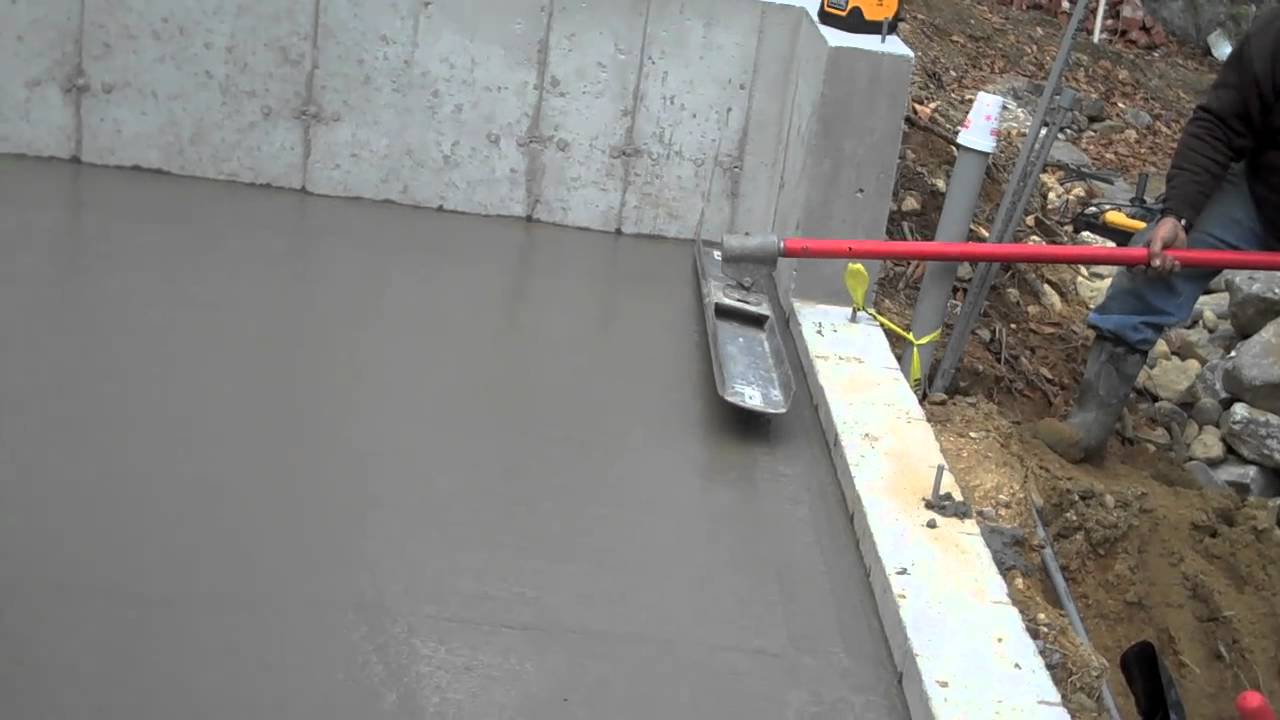
Bull Float
How to Pour a Concrete Slab (DIY) Family Handyman

Concrete Floating Floor System for Cinemas Cinema Acoustic Solutions

What Is Floating Slab Floating Slab Construction How to Build a

Floating Floor layout prior to concrete pour – Mason UK

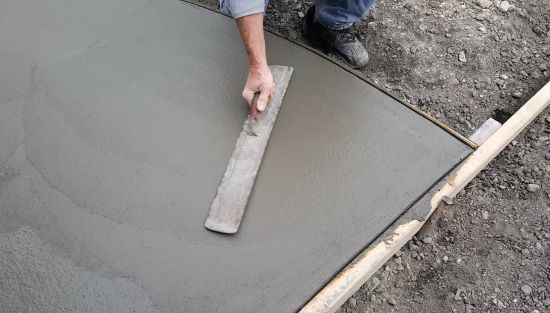
How To Finish Concrete Smooth By Using A Steel Trowel – Tips u0026 Tricks
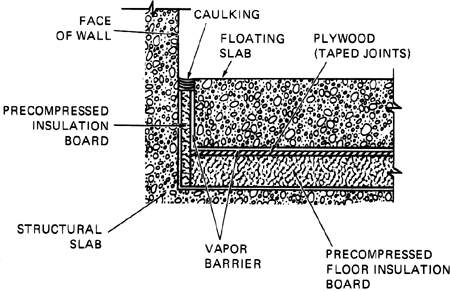
Floating floor Article about floating floor by The Free Dictionary
Related articles:
- Stained Concrete Floors Design
- Decorative Concrete Floors
- Acid Stained Concrete Floors
- Polished Concrete Floor In Bathroom
- Concrete Floor Stain And Polish
- White Mold On Concrete Floor
- Polished Concrete Floor
- Polished Concrete Floor Cleaning
- Staining Concrete Floors Indoors Yourself
- Flooring Options For Concrete Floors
Floating a Concrete Floor: A Comprehensive Guide
Introduction:
When it comes to constructing or renovating a building, one crucial aspect that requires careful consideration is the flooring. Among various flooring options available, concrete floors have gained significant popularity due to their durability and versatility. However, to ensure a smooth and level surface, floating a concrete floor becomes essential. In this comprehensive guide, we will delve into the process of floating a concrete floor, exploring the steps involved, materials required, potential challenges, and frequently asked questions.
I. Understanding Floating Concrete Floors:
A floating concrete floor refers to a method where the concrete is poured over an existing subfloor or subbase without attaching it directly to the substrate. This technique allows for flexibility and helps compensate for any inconsistencies in the underlying surface. By floating the concrete floor, you can achieve a level and stable foundation for various types of flooring finishes such as tiles, hardwood, or carpet.
II. Preparing for Floating a Concrete Floor:
1. Assessing the Substrate:
Before proceeding with floating a concrete floor, it is crucial to assess the condition of the substrate or subfloor. Ensure that it is structurally sound, free from moisture issues, and clean of any debris or contaminants. Any cracks or unevenness should be addressed before moving forward.
FAQ: How can I determine if my subfloor is suitable for floating a concrete floor?
Answer: To determine suitability, tap on the subfloor with a hammer; if it sounds hollow or produces a dull noise, there may be voids underneath that need addressing. Additionally, check for any signs of moisture or damage on the surface.
2. Moisture Mitigation:
Moisture can deteriorate the quality of a concrete floor over time and lead to issues such as mold growth or flooring failures. Therefore, it is vital to address any moisture-related concerns before proceeding with floating the concrete floor.
FAQ: How can I mitigate moisture issues before floating a concrete floor?
Answer: Various methods can be employed, such as applying a moisture barrier or using vapor retarders. Before proceeding, it is advisable to consult with a professional contractor who can conduct tests to determine the moisture levels in your subfloor.
III. Floating a Concrete Floor: Step-by-Step Process
1. Gather the Necessary Materials:
To float a concrete floor successfully, you will need the following materials:
– Concrete mix
– Reinforcement materials (rebar or wire mesh)
– Plastic sheeting or vapor retarder
– Shuttering or formwork material
– Screed board
– Trowel
– Concrete float
– Leveling compound (if required)
– Finishing tools (optional)
2. Install Formwork:
The first step in floating a concrete floor is to install formwork or shuttering along the perimeter of the area. This formwork acts as a guide for pouring and leveling the concrete. Ensure it is securely fastened and level.
FAQ: What should I use as formwork material?
Answer: Commonly used materials include timber, plywood, or even PVC boards. The choice depends on personal preference, budget, and the specific requirements of your project.
3. Prepare the Subfloor:
Clean the subfloor thoroughly and apply a layer of plastic sheeting or vapor retarder to prevent moisture from seeping into the concrete. This step is crucial to ensure the longevity and integrity of your floating concrete floor.
4. Reinforce with Rebar or Wire Mesh:
To enhance strength and minimize cracking, reinforce the Concrete floor by installing rebar or wire mesh. This reinforcement helps distribute the load and provides structural integrity to the floating concrete floor.
5. Mix and Pour the Concrete:
Prepare the concrete mix according to the manufacturer’s instructions. Pour the concrete into the formwork, making sure it is evenly distributed. Use a screed board to level the concrete and remove any excess material.
6. Finish and Cure the Concrete:
Once the concrete is poured and leveled, use a trowel or concrete float to smooth out the surface and create a finished look. Allow the concrete to cure for the recommended time, which is typically around 28 days, before subjecting it to heavy loads or applying any finishing treatments.
7. Optional: Apply a Leveling Compound or Finishing Treatment:
If necessary, apply a leveling compound to address any unevenness in the concrete surface. This will ensure a smooth and level floating concrete floor. Additionally, you can apply various finishing treatments such as staining, polishing, or sealing to enhance the appearance and durability of the floor.
8. Regular Maintenance:
To maintain the quality and longevity of your floating concrete floor, regularly clean it using appropriate methods and products. Avoid using harsh chemicals or abrasive materials that could damage the surface. Additionally, address any issues such as cracks or moisture immediately to prevent further damage.
It is important to note that floating a concrete floor requires careful planning, proper preparation, and adherence to safety guidelines. If you are unsure about any step in this process, it is recommended to consult with a professional contractor or engineer who can provide guidance based on your specific project requirements. Floating a concrete floor is a complex process that requires careful planning and execution. Here are the steps involved in floating a concrete floor:
1. Determine the Project Requirements: Before starting, determine the specific requirements of your project, such as the desired thickness and strength of the concrete floor.
2. Choose Formwork Material: Commonly used formwork materials include timber, plywood, or PVC boards. The choice depends on personal preference, budget, and project requirements.
3. Prepare the Subfloor: Clean the subfloor thoroughly and apply a layer of plastic sheeting or vapor retarder to prevent moisture from seeping into the concrete. This step is crucial for the longevity and integrity of the floating concrete floor.
4. Reinforce with Rebar or Wire Mesh: To enhance strength and minimize cracking, reinforce the concrete floor by installing rebar or wire mesh. This reinforcement helps distribute the load and provides structural integrity to the floor.
5. Mix and Pour the Concrete: Prepare the concrete mix according to the manufacturer’s instructions. Pour the concrete into the formwork, ensuring even distribution. Use a screed board to level the concrete and remove any excess material.
6. Finish and Cure the Concrete: Once poured and leveled, use a trowel or concrete float to smooth out the surface and create a finished look. Allow the concrete to cure for around 28 days before subjecting it to heavy loads or applying finishing treatments.
7. Optional: Apply Leveling Compound or Finishing Treatment: If necessary, apply a leveling compound to address any unevenness in the surface. Additionally, you can apply staining, polishing, or sealing treatments to enhance appearance and durability.
8. Regular Maintenance: To maintain quality and longevity, regularly clean the floor using appropriate methods and products. Avoid harsh chemicals or abrasive materials that could damage the surface. Address any issues like cracks or moisture immediately to prevent further damage.
It’s important to note that floating a concrete floor requires careful planning, proper preparation, and adherence to safety guidelines. If you’re unsure about any step in the process, it’s recommended to consult with a professional contractor or engineer for guidance specific to your project.