The product has the natural characteristics belonging to the selected wood species as opposed to a photographic level. Hardwood floors have advantages that are a lot of , similar to the extra value to the house of yours, the straightforward care as well as cleaning, the good style coupled with durability as well as they're safe and natural for the earth.
Here are Images about Engineered Hardwood Flooring Installation Concrete
Engineered Hardwood Flooring Installation Concrete
/cdn.vox-cdn.com/uploads/chorus_asset/file/19494392/floor_5.jpg)
Some hardwood varieties come in healthy red or perhaps yellow, and you've got to look out for these. With good care and maintenance, our hardwood floors are going to retain their beauty for a quite a while. The latter has the benefit of possible cost negotiations and typically offering samples which are free. Do not try some renovation work on the flooring of yours in case you do not have the essential expertise and experience.
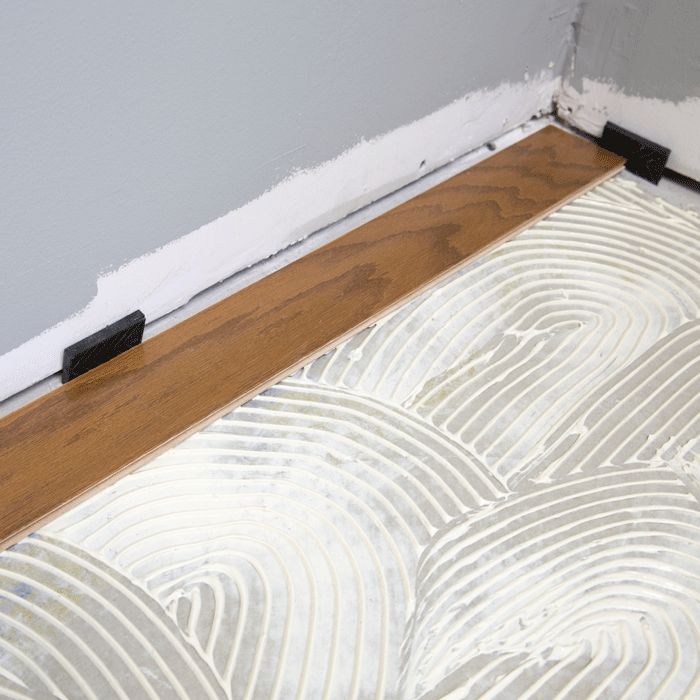
Installing Engineered Hardwood on Concrete – Twenty u0026 Oak

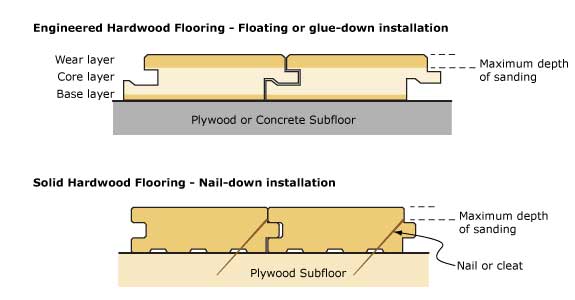
You are able to rent these devices, and it's a good plan to lease a buffer or maybe floor polisher at the very same time. One benefit of this flooring type is that it gives you an even more natural look to any house. Floorboard wholesalers offer hardwood flooring at more affordable rates and are much more dependable stocked. To date, you'll find two basic kinds of hardwood flooring, sturdy wood plus engineered wood.
Images Related to Engineered Hardwood Flooring Installation Concrete
Which Method Should I Use to Install My Engineered Wood Floor

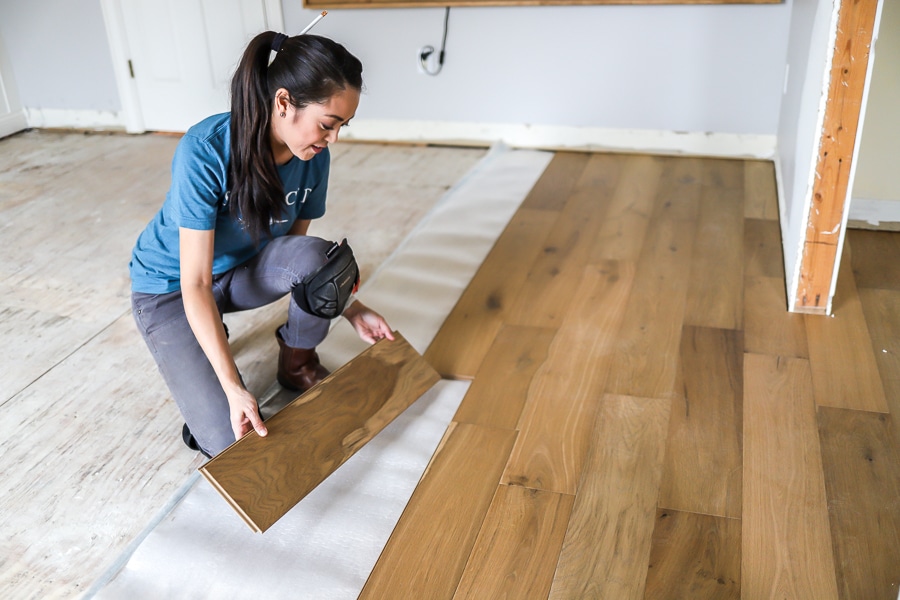
How to Install an Engineered Hardwood Floor
Installing Wood Floors On Concrete Slab Steller Floors

Installing Engineered Hardwood Floors u2013 Ultimate Guide

Installing Hardwood Floors over Concrete

How to Install an Engineered Hardwood Floor

How To Install Click Lock Engineered Hardwood Flooring
Installing Engineered Flooring on a Concrete Slab – Fine Homebuilding

How to install engineered hardwood flooring without professionals
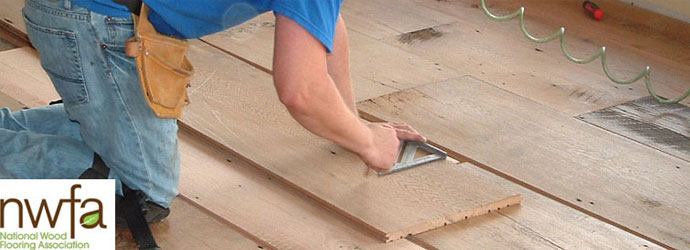
Prepping Concrete Slabs for Hardwood Floor Installation City

Guide: How to Install Engineered Hardwood Floors
How To Install Hardwood Floors On Concrete – unugtp

Related articles:
- Hardwood Floor Finish Brands
- Hand Scraped Hardwood Flooring
- Home Hardwood Floor
- Hardwood Floor Deep Cleaner
- Engineered Hardwood Floor
- Cherry Hardwood Flooring Reviews
- Hardwood Floor Cleaning And Refinishing
- Wide Plank Pine Hardwood Flooring
- Hardwood Flooring Designs Photos
- Hardwood Floor Selection Guide
Engineered Hardwood Flooring Installation on Concrete
Engineered hardwood flooring is a popular choice for homeowners who want the beauty of hardwood with added durability and stability. One of the key benefits of engineered hardwood is its ability to be installed on concrete surfaces, making it an excellent option for basements, apartments, and other areas where traditional solid wood flooring may not be suitable. In this article, we will explore the process of installing engineered hardwood flooring on concrete and provide detailed information to help you achieve a successful installation.
1. Preparing the Concrete Surface
Before you begin the installation process, it is crucial to ensure that the concrete surface is properly prepared. The following steps will help you create a clean and level foundation for your engineered hardwood flooring:
a) Clean the Concrete: Start by thoroughly cleaning the concrete surface. Remove any dirt, dust, or debris using a broom or vacuum cleaner. For stubborn stains or adhesive residue, you may need to use specialized cleaning products.
b) Test Moisture Levels: Concrete can retain moisture, which can lead to problems such as warping or buckling of the flooring. It is essential to test the moisture levels before proceeding with installation. You can use a moisture meter or perform a simple plastic sheet test by taping a plastic sheet to the concrete floor and observing for condensation after 24 hours.
c) Leveling the Floor: Uneven concrete surfaces can cause issues during installation and affect the final appearance of your engineered hardwood flooring. If you notice any significant unevenness, consider using a self-leveling compound to create a smooth and level base.
2. Acclimating the Engineered Hardwood Flooring
Acclimation is a critical step in ensuring that your engineered hardwood flooring adjusts to the temperature and humidity conditions of its installation environment. By allowing the planks to acclimate before installation, you minimize the risk of expansion or contraction after they are installed. Follow these guidelines for proper acclimation:
a) Unpack the Flooring: Remove the engineered hardwood flooring from its packaging and place it in the room where it will be installed. Leave it there for at least 48 hours to allow the planks to adjust to the temperature and humidity of the space.
b) Maintain Ideal Conditions: During the acclimation period, maintain the room’s temperature and humidity levels within the range recommended by the manufacturer. This will help ensure that the flooring adapts properly.
3. Installing Moisture Barrier and Underlayment
To protect your engineered hardwood flooring from moisture and provide additional cushioning, it is essential to install a moisture barrier and underlayment. The following steps outline this process:
a) Roll Out Moisture Barrier: Lay a moisture barrier, such as a plastic sheet or underlayment with a built-in vapor barrier, over the entire concrete floor. Ensure that the seams are overlapped and taped securely to create a continuous protective layer.
b) Install Underlayment: Place an underlayment material, such as foam or cork, on top of the moisture barrier. This provides cushioning, reduces noise, and helps smooth out minor imperfections in the concrete surface.
4. Glue-Down Installation Method
The glue-down method is a common technique used for installing engineered hardwood flooring on concrete surfaces. It involves applying adhesive directly to the concrete and securing the planks in place. Follow these steps for a successful glue-down installation:
a) Apply Adhesive: Using a trowel or recommended adhesive applicator, spread a thin Layer of flooring adhesive onto the concrete floor. Follow the manufacturer’s instructions for the proper application technique and coverage rate.
b) Lay the First Row: Start by laying the first row of engineered hardwood flooring along one wall, with the tongue side facing out. Leave a 1/2-inch expansion gap between the planks and the wall to allow for natural movement.
c) Apply Adhesive to Planks: Apply adhesive to the bottom groove of each plank using a small brush or applicator. Make sure to cover the entire length of the plank.
d) Install Planks: Place each plank into position, aligning the tongue and groove edges. Press down firmly to ensure a secure bond with the adhesive. Use a rubber mallet or tapping block to gently tap the planks together if necessary.
e) Continue Installation: Repeat steps c and d for each subsequent row, making sure to stagger the end joints for a more visually appealing installation.
f) Allow Adhesive to Cure: After completing the installation, allow the adhesive to cure according to the manufacturer’s instructions before allowing foot traffic or placing furniture on the newly installed floor.
5. Floating Installation Method
The floating installation method involves attaching engineered hardwood flooring planks together without using any adhesive or fasteners. Instead, the planks are locked together using a tongue-and-groove system. Follow these steps for a successful floating installation:
a) Lay Underlayment: Start by rolling out an underlayment material over the entire concrete floor. Trim it to fit and tape any seams together.
b) Lay the First Row: Begin by laying the first row of planks along one wall, with the groove side facing the wall. Leave a 1/2-inch expansion gap between the planks and the wall.
c) Connect Planks: Use the tongue-and-groove system to connect each plank together. Insert the tongue of one plank into the groove of another at a slight angle, then lower it down flat to lock it in place.
d) Continue Installation: Repeat step c for each subsequent row, making sure to stagger the end joints for a more visually appealing installation.
e) Trim Planks: If necessary, use a saw or miter saw to trim the last row of planks to fit against the opposite wall.
f) Allow Flooring to Settle: After completing the installation, allow the flooring to settle for at least 24 hours before adding any heavy furniture or allowing foot traffic on it.
Remember to follow all safety precautions and manufacturer’s instructions when installing engineered hardwood flooring on concrete. If you are unsure about any aspect of the installation process, it is recommended to consult a professional for assistance. Installing engineered hardwood flooring on concrete requires careful preparation and attention to detail. Here is a step-by-step guide for both the glue-down and floating installation methods:
Glue-Down Installation Method:
1. Prepare the Concrete: Ensure that the concrete subfloor is clean, dry, and level. Repair any cracks or imperfections in the concrete surface.
2. Install Moisture Barrier: Lay down a moisture barrier to protect the engineered hardwood from potential moisture damage. Secure it in place with tape.
3. Lay Underlayment: Roll out an underlayment material over the entire concrete floor. Trim it to fit and tape any seams together.
4. Lay the First Row: Start by laying the first row of planks along one wall, with the groove side facing away from the wall. Leave a 1/2-inch expansion gap between the planks and the wall.
5. Apply Adhesive: Apply a recommended adhesive to the concrete subfloor using a trowel or notched trowel. Make sure to cover the entire surface evenly.
6. Install Planks: Place each plank into position, aligning the tongue and groove edges. Press down firmly to ensure a secure bond with the adhesive. Use a rubber mallet or tapping block to gently tap the planks together if necessary.
7. Continue Installation: Repeat steps 5 and 6 for each subsequent row, making sure to stagger the end joints for a more visually appealing installation.
8. Allow Adhesive to Cure: After completing the installation, allow the adhesive to cure according to the manufacturer’s instructions before allowing foot traffic or placing furniture on the newly installed floor.
Floating Installation Method:
1. Lay Underlayment: Start by rolling out an underlayment material over the entire concrete floor. Trim it to fit and tape any seams together.
2. Lay the First Row: Begin by laying the first row of planks along one wall, with the groove side facing the wall. Leave a 1/2-inch expansion gap between the planks and the wall.
3. Connect Planks: Use the tongue-and-groove system to connect each plank together. Insert the tongue of one plank into the groove of another at a slight angle, then lower it down flat to lock it in place.
4. Continue Installation: Repeat step 3 for each subsequent row, making sure to stagger the end joints for a more visually appealing installation.
5. Trim Planks: If necessary, use a saw or miter saw to trim the last row of planks to fit against the opposite wall.
6. Allow Flooring to Settle: After completing the installation, allow the flooring to settle for at least 24 hours before adding any heavy furniture or allowing foot traffic on it.
Remember to follow all safety precautions and manufacturer’s instructions when installing engineered hardwood flooring on concrete. If you are unsure about any aspect of the installation process, it is recommended to consult a professional for assistance.