Introduction to Cork Flooring
Cork flooring, derived from the bark of the cork oak tree, is gaining popularity as a versatile and eco-friendly flooring option. It is particularly suitable for bathrooms, where moisture resistance and comfort are essential. This article will help you explore the benefits, installation process, maintenance, and considerations of cork flooring in bathrooms.

What is Cork Flooring?
Cork flooring is made from the bark of cork oak trees, primarily harvested in Portugal and Spain. The harvesting process is sustainable, as the bark regenerates, making cork an environmentally friendly material. Cork flooring comes in tiles or planks, and its cellular structure provides a natural cushion, offering a unique combination of comfort and durability.
Cork’s cellular structure traps air, making it a natural insulator. This feature not only keeps your bathroom warm but also reduces noise, a valuable attribute for a tranquil bathroom environment. Additionally, cork flooring is hypoallergenic and resistant to mold, mildew, and pests, contributing to a healthier indoor environment.
The natural resilience of cork makes it a comfortable surface to stand on for extended periods, reducing strain on joints. This characteristic is particularly beneficial in a bathroom setting, where comfort underfoot is crucial. Furthermore, the cork’s inherent warmth and softness create a cozy and inviting atmosphere.
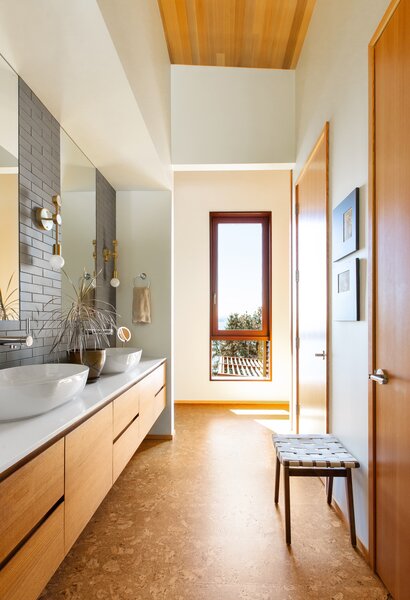
Cork flooring is available in a variety of colors, patterns, and finishes, allowing for creative design options. Its versatility makes it suitable for various bathroom styles, from modern to traditional. The aesthetic appeal of cork flooring can enhance the overall look and feel of your bathroom, providing a unique and attractive alternative to conventional flooring materials.
In addition to its aesthetic and functional benefits, cork flooring is relatively easy to install. DIY enthusiasts can often handle the installation process, which involves minimal tools and expertise. This ease of installation, combined with its environmental benefits and comfort, makes cork flooring an increasingly popular choice for bathrooms.

Benefits of Cork Flooring in Bathrooms
Cork flooring offers numerous advantages, particularly in the bathroom environment. Its unique properties make it an ideal choice for those looking to combine functionality with style.
Water Resistance: One of the primary concerns for bathroom flooring is water resistance. Cork flooring naturally repels water to some extent due to its cellular structure. However, to enhance its water resistance, cork flooring is usually coated with a polyurethane or wax finish, providing a protective barrier against moisture.
Comfort and Safety: The soft, cushioned feel of cork flooring makes it comfortable to walk on, reducing fatigue and providing a pleasant underfoot experience. Its natural traction helps prevent slips and falls, an essential safety feature in bathrooms where water can create slippery surfaces.
Thermal Insulation: Cork’s insulating properties help maintain a consistent temperature in the bathroom, adding warmth underfoot during colder months. This insulation not only enhances comfort but also contributes to energy efficiency by reducing the need for additional heating.
Noise Reduction: Cork’s cellular structure also acts as a sound insulator, dampening noise and creating a quieter bathroom environment. This feature is particularly beneficial in multi-story homes or apartments where noise can travel between floors.
Eco-Friendly: As a renewable resource, cork flooring is an environmentally friendly choice. The harvesting process does not harm the cork oak tree, allowing it to continue growing and absorbing carbon dioxide. Choosing cork flooring supports sustainable practices and reduces your carbon footprint.

Installation Process of Cork Flooring
Installing cork flooring in a bathroom involves several steps, each crucial to ensuring a durable and water-resistant finish. Whether you’re a DIY enthusiast or hiring a professional, understanding the installation process is essential.
Preparing the Subfloor
1. Cleaning: The subfloor must be clean, dry, and level. Remove any debris, old flooring materials, or adhesives. Sweep and vacuum the area thoroughly to ensure a clean surface for the cork flooring.
2. Leveling: Check for any uneven spots on the subfloor. Use a leveling compound to fill in low areas and sand down high spots. A level subfloor is critical for a smooth installation and prevents future issues with the cork flooring.
3. Moisture Barrier: In a bathroom, it’s essential to install a moisture barrier to protect the cork from potential water damage. This barrier can be a sheet of plastic or a specialized underlayment designed for moisture resistance. Lay the barrier across the entire subfloor, overlapping the edges by a few inches.
4. Acclimation: Allow the cork flooring to acclimate to the bathroom environment for at least 48 hours. This step ensures that the cork adjusts to the room’s temperature and humidity, preventing expansion or contraction after installation.
5. Layout Planning: Plan the layout of the cork tiles or planks before installation. Consider the direction of the planks and the placement of cuts to minimize waste and create a visually appealing pattern. Mark a centerline to use as a guide during installation.
Installing Cork Tiles or Planks
1. Adhesive Application: For glue-down cork tiles, apply the adhesive to a small section of the subfloor, following the manufacturer’s instructions. Use a notched trowel to spread the adhesive evenly, ensuring full coverage.
2. Laying Tiles/Planks: Begin laying the cork tiles or planks from the centerline, pressing each piece firmly into the adhesive. Use spacers to maintain a consistent gap between the tiles or planks, allowing for expansion.
3. Cutting: Measure and cut the tiles or planks as needed to fit around obstacles such as toilets, vanities, and doorways. Use a sharp utility knife or a saw designed for cutting cork to achieve precise cuts.
4. Rolling: Once the tiles or planks are in place, use a floor roller to press them firmly into the adhesive, ensuring a strong bond. This step helps eliminate air bubbles and ensures even adhesion across the entire surface.
5. Curing Time: Allow the adhesive to cure according to the manufacturer’s instructions, usually 24 to 48 hours. Avoid walking on the floor during this time to prevent shifting or damaging the newly installed cork flooring.
Finishing and Sealing
1. Sanding: If needed, lightly sand the cork flooring to create a smooth, even surface. This step is particularly important for unfinished cork tiles that require a final finish.
2. Sealing: Apply a water-resistant sealer, such as polyurethane or a specialized cork flooring finish, to protect the floor from moisture and wear. Follow the manufacturer’s instructions for application and drying times.
3. Multiple Coats: Apply multiple coats of the sealer, allowing each coat to dry completely before applying the next. This layering ensures maximum protection and durability for the bathroom environment.
4. Edge Sealing: Pay special attention to the edges and seams, applying extra sealer to these areas to prevent water from seeping underneath the tiles or planks.
5. Final Inspection: Once the final coat of sealer is dry, inspect the floor for any missed spots or imperfections. Touch up as needed to ensure a uniform and protective finish.
Post-Installation Care
1. Initial Cleaning: After the sealing process is complete, clean the floor with a damp mop to remove any dust or debris. Avoid using harsh chemicals or abrasive cleaning tools that could damage the new finish.
2. Furniture Placement: When moving furniture back into the bathroom, use felt pads or coasters to protect the cork flooring from scratches and dents. Lift heavy items instead of dragging them across the floor.
3. Regular Maintenance: Establish a routine cleaning schedule to maintain the cork flooring’s appearance and longevity. Use a damp mop with a mild cleaner designed for cork floors, and avoid excessive water.
4. Reapplying Sealer: Periodically reapply the sealer to maintain the floor’s water resistance and protect it from wear. The frequency of reapplication depends on the level of use and exposure to moisture.
5. Monitoring for Damage: Regularly inspect the floor for signs of damage or wear, particularly in high-traffic areas and near water sources. Promptly address any issues to prevent further damage and maintain the floor’s integrity.

DIY vs. Professional Installation
1. Skill Level: Assess your skill level and experience before deciding between DIY and professional installation. While cork flooring installation is relatively straightforward, it requires precision and attention to detail.
2. Time Commitment: Consider the time commitment involved in a DIY installation. Preparing the subfloor, laying the tiles or planks, and applying multiple coats of sealer can be time-consuming tasks that require patience and dedication.
3. Cost Considerations: Compare the costs of DIY installation versus hiring a professional. While DIY can save on labor costs, professional installation may ensure a higher quality finish and fewer potential issues down the line.
4. Tools and Materials: Ensure you have the necessary tools and materials for a successful installation. These may include a notched trowel, floor roller, utility knife, saw, adhesive, and sealer. Renting or purchasing these tools can add to the overall cost of the project.
5. Professional Expertise: A professional installer brings expertise and experience, potentially identifying and addressing issues that may arise during the installation process. Hiring a professional can provide peace of mind and ensure a long-lasting, high-quality finish.
Maintaining Cork Flooring in a Bathroom
Proper maintenance is essential to preserve the beauty and functionality of cork flooring in a bathroom. Regular care ensures the floor remains resilient and water-resistant, extending its lifespan.
Regular Cleaning
1. Sweeping: Sweep the floor regularly with a soft-bristle broom to remove dust and debris. This prevents dirt from scratching the surface and keeps the floor looking clean and polished.
2. Mopping: Use a damp mop with a mild, pH-neutral cleaner specifically designed for cork flooring. Avoid excessive water, as standing water can damage the floor. Wring out the mop thoroughly before use to prevent water accumulation.
3. Spot Cleaning: For spills and stains, wipe up immediately with a soft cloth or sponge. Use a mild cleaner if necessary, but avoid harsh chemicals and abrasive scrubbers that can damage the finish.
4. Avoiding Harsh Cleaners: Do not use ammonia, bleach, or other harsh chemicals on cork flooring. These substances can strip the finish and cause discoloration or damage to the cork.
5. Drying: After mopping or spot cleaning, ensure the floor is thoroughly dried. Use a dry cloth or mop to remove any remaining moisture, particularly in seams and edges where water can seep in.
Preventing Water Damage
1. Sealing: Regularly inspect the sealer and reapply as needed to maintain the floor’s water resistance. Focus on high-traffic areas and spots near water sources that may require more frequent attention.
2. Mats and Rugs: Place mats or rugs near the bathtub, shower, and sink to catch water spills and reduce direct moisture exposure. Choose rugs with non-slip backings that won’t trap moisture underneath.
3. Quick Cleanup: Promptly clean up any water spills to prevent seepage into the seams and edges. Use a dry cloth to soak up excess water and ensure the floor remains dry.
4. Ventilation: Maintain good ventilation in the bathroom to reduce humidity levels. Use exhaust fans or open windows to allow moisture to escape and prevent it from settling on the floor.
5. Humidity Control: Monitor the bathroom’s humidity levels, particularly in humid climates. Use a dehumidifier if necessary to maintain optimal moisture levels and protect the cork flooring from warping or swelling.
Protecting the Finish
1. Furniture Pads: Use felt pads or coasters under bathroom furniture to prevent scratches and dents. Regularly check and replace the pads to ensure they remain effective.
2. Avoiding Sharp Objects: Keep sharp objects and high heels off the cork flooring to avoid punctures and scratches. Use a cutting board or protective mat when handling sharp tools or items.
3. Maintenance Products: Use maintenance products specifically designed for cork flooring to refresh and protect the finish. Follow the manufacturer’s recommendations for application and frequency.
4. Area Rugs: Use area rugs in high-traffic areas to protect the cork flooring from wear and tear. Ensure the rugs have non-slip backings to prevent accidents and moisture buildup.
5. Reapplying Sealer: Periodically reapply a water-resistant sealer to maintain the floor’s protective barrier. This helps preserve the finish and extends the floor’s lifespan.
Addressing Damage
1. Minor Scratches: For minor scratches, use a touch-up kit designed for cork flooring. These kits usually include a wax or filler that can be applied to the scratch and buffed to blend with the surrounding area.
2. Deep Scratches: Deep scratches may require sanding and refinishing to restore the surface. Sand the affected area gently and apply a new coat of sealer to protect the cork.
3. Water Damage: If water damage occurs, address it immediately to prevent further issues. Remove the affected area and allow it to dry completely before repairing or replacing the damaged tiles or planks.
4. Professional Repair: For extensive damage, consider hiring a professional to assess and repair the floor. Professional expertise can ensure the damage is addressed correctly and prevent future problems.
5. Preventative Measures: Implement preventative measures, such as using mats and controlling humidity, to minimize the risk of damage and maintain the floor’s integrity.
Long-Term Care
1. Regular Inspections: Regularly inspect the floor for signs of wear, damage, or moisture issues. Early detection allows for prompt repairs and prevents further deterioration.
2. Seasonal Maintenance: Adjust maintenance routines seasonally to account for changes in humidity and temperature. This helps protect the cork flooring from seasonal fluctuations that can affect its condition.
3. Professional Maintenance: Consider professional maintenance services for deep cleaning and refinishing as needed. Professional care can enhance the floor’s longevity and appearance.
4. Education: Educate household members about proper care and maintenance to ensure everyone contributes to preserving the cork flooring. Clear guidelines can prevent accidental damage and promote consistent upkeep.
5. Enjoying the Benefits: With proper care and maintenance, cork flooring can provide years of comfort, beauty, and functionality in your bathroom. Enjoy the benefits of this unique and eco-friendly flooring choice while ensuring it remains in excellent condition.
Related articles: