Made to have the physical appearance of natural tarnished wood floors, laminate is more economical, doesn't need being nailed in place, does not need finishing remedies, and is damage resistant. Understand you cannot use a feel of the product; right after it's sent to you, you might realize that it was not just what you had wanted. Do not post abrasives or scouring powder, polishes, or waxes.
Images Related to Brazilian Koa Laminate Flooring 12mm
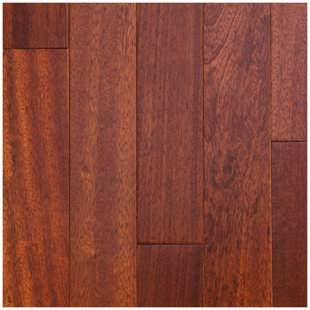
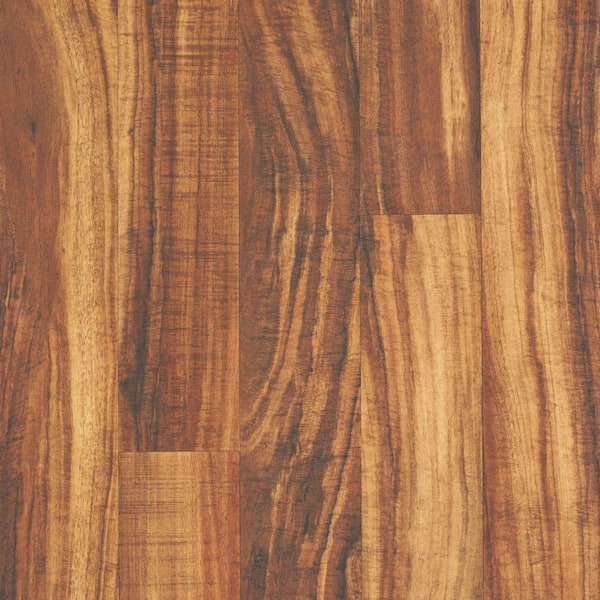
Brazilian Koa Laminate Flooring 12mm
By and large, the more expensive floor types will come with longer warranties. There's a range of variety is offered, go through them and pick the one which you think defines the design of yours in very best way. But it's certainly fallacious. Because laminate flooring is constructed from these 4 unique layers, it is considerably more reluctant to scratches and dents than actual hardwood flooring.
Brazilian Koa Laminate Wood laminate flooring, Laminate flooring

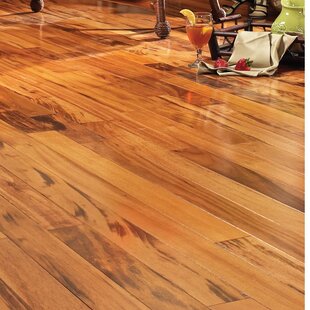
Laminate flooring also has the physical appearance of a geniun wood, however, you can get laminates for half the cost of wood flooring. In comparison with good cork flooring, laminate floorboard can easily also be classic meaning that it will not become outdated fairly quickly. You've the direct pressure laminate and the high pressure laminate. You can find laminates that look a whole lot like oak, birch, walnut, mahogany, driftwood, etc.
Dream Home – St. James – 12mm+pad Brazilian Koa Durable flooring

12mm Laminate Flooring LessCare Brazilian Cherry Smooth Finish

Brazilian Koa Laminate Laminate hardwood flooring, Flooring

PriceGrabber – Brazilian koa laminate Flooring Supplies

Brazilian Koa Laminate at Lumber Liquidators. Looks like the real

Brazilian Koa 12mm Laminate flooring 589 sqft new in boxes

Laminate 12mm

Brazilian Koa Flooring Wayfair
Luxury Safe Waterproof Easy Clean and Installation Spc Click Vinyl Plank Flooring

Take Home Sample – 12mm Water Resistant High Gloss Hills Cherry Laminate Flooring – 5 in. x 7 in.
Wood-Look Laminate Flooring LL Flooring (Lumber Liquidators)
Pergo Outlast+ 5.23 in. W Hawaiian King Koa Waterproof Laminate
Related articles:
- Coastal Laminate Flooring
- Commercial Laminate Flooring
- Slate Laminate Flooring
- Laminate Flooring Types
- Laminate Flooring Design
- Commercial Quality Laminate Flooring
- Black Laminate Flooring
- Tigerwood Laminate Flooring
- Royal Cherry Laminate Flooring
- Laminate Flooring Thickness For Basement
Brazilian Koa Laminate Flooring 12mm: The Perfect Blend of Beauty and Durability
Introduction:
When it comes to flooring options, Brazilian Koa laminate flooring 12mm stands out as an excellent choice. With its stunning appearance and exceptional durability, it has become increasingly popular among homeowners and designers. In this article, we will delve into the various aspects of Brazilian Koa laminate flooring, exploring its unique features, installation process, maintenance requirements, and more. So let’s embark on a journey to discover why Brazilian Koa laminate flooring 12mm is the perfect blend of beauty and durability.
1. What is Brazilian Koa Laminate Flooring?
Brazilian Koa laminate flooring is a synthetic alternative to traditional hardwood flooring that replicates the natural beauty of Brazilian Koa wood. It consists of multiple layers, including a high-density fiberboard (HDF) core, a photographic layer with a realistic wood print, and a protective wear layer. This composition ensures that the laminate flooring is not only aesthetically pleasing but also highly resistant to scratches, moisture, and fading.
The Advantages of Brazilian Koa Laminate Flooring:
– Authentic Look: Brazilian Koa laminate flooring mimics the rich grain patterns and warm tones of real Brazilian Koa wood. Its vibrant reddish-brown color with dark streaks creates an inviting ambiance in any space.
– Cost-effective: Compared to solid hardwood flooring, Brazilian Koa laminate is considerably more affordable while still providing a similar look. This makes it an attractive option for those who desire the elegance of hardwood without breaking the bank.
– Durability: The 12mm thickness of Brazilian Koa laminate flooring ensures exceptional durability, making it suitable for high-traffic areas in both residential and commercial settings. It can withstand heavy foot traffic without showing signs of wear and tear.
– Moisture Resistance: Unlike natural wood, Brazilian Koa laminate flooring is built to resist moisture. The HDF core prevents water from seeping in, reducing the chances of warping or swelling. This feature makes it a viable flooring option for kitchens, bathrooms, and basements.
– Easy Installation: Brazilian Koa laminate flooring is designed with a click-lock system, allowing for straightforward installation. The planks interlock seamlessly, eliminating the need for glue or nails. This makes it an ideal choice for DIY enthusiasts.
2. Installation Process:
Installing Brazilian Koa laminate flooring 12mm requires careful planning and attention to detail. While hiring a professional is always an option, many homeowners choose to tackle the installation themselves. Here are the steps involved in installing Brazilian Koa laminate flooring:
Step 1: Prepare the Subfloor – Ensure that the subfloor is clean, level, and dry before installation. Remove any existing flooring, carpeting, or debris.
Step 2: Acclimate the Flooring – Bring the Brazilian Koa laminate flooring into the room where it will be installed and allow it to acclimate for at least 48 hours. This helps the planks adjust to the temperature and humidity of their surroundings.
Step 3: Lay Underlayment – Install an underlayment over the subfloor to provide cushioning and reduce noise transmission. Follow the manufacturer’s instructions for proper installation.
Step 4: Start Installation – Begin by laying the first row of planks along the longest wall in the room, ensuring that you leave a small gap between the planks and the wall to allow for expansion. Use spacers to maintain this gap throughout the installation Process.
Step 5: Click-Lock the Planks – Connect the planks together by using the click-lock system. Start by angling the tongue of one plank into the groove of another, then gently press down to secure them in place. Use a tapping block and rubber mallet to ensure a tight fit.
Step 6: Cut and Trim – Measure and cut planks as needed to fit around obstacles such as doorways or corners. Use a saw or laminate cutter for precise cuts. Remember to leave a small gap between the planks and any vertical surfaces for expansion.
Step 7: Continue Installation – Continue laying rows of planks, making sure to stagger the joints for a more natural look. Use spacers to maintain consistent gaps between planks.
Step 8: Finish Installation – Once all the planks are laid, remove spacers and install transition pieces at doorways or where the flooring meets other types of flooring. Trim any excess underlayment or protruding edges.
Step 9: Clean and Maintain – After installation, clean the Brazilian Koa laminate flooring with a damp mop or cloth. Avoid using excessive water or harsh cleaning agents. Regularly sweep or vacuum to remove dirt and debris.
Overall, installing Brazilian Koa laminate flooring can be a rewarding DIY project that adds beauty and durability to your space. With proper preparation and attention to detail, you can enjoy the advantages of this stunning flooring option for years to come. Installing Brazilian Koa laminate flooring can be a DIY project that adds beauty and durability to your space. Here are the steps involved:
Step 1: Prepare the Subfloor – Clean, level, and dry the subfloor. Remove any existing flooring or debris.
Step 2: Acclimate the Flooring – Bring the laminate flooring into the room and let it acclimate for at least 48 hours.
Step 3: Lay Underlayment – Install underlayment over the subfloor for cushioning and noise reduction.
Step 4: Start Installation – Begin by laying the first row of planks along the longest wall, leaving a small gap between the planks and the wall. Use spacers to maintain this gap.
Step 5: Click-Lock the Planks – Connect the planks using the click-lock system. Angle the tongue of one plank into the groove of another and press down to secure them. Use a tapping block and rubber mallet for a tight fit.
Step 6: Cut and Trim – Measure and cut planks as needed to fit around obstacles. Leave a small gap between planks and vertical surfaces.
Step 7: Continue Installation – Lay rows of planks, staggering the joints for a natural look. Use spacers to maintain consistent gaps.
Step 8: Finish Installation – Remove spacers and install transition pieces at doorways or where flooring meets other types of flooring. Trim excess underlayment or protruding edges.
Step 9: Clean and Maintain – After installation, clean with a damp mop or cloth. Avoid excessive water or harsh cleaning agents. Regularly sweep or vacuum to remove dirt and debris.
By following these steps with proper preparation and attention to detail, you can enjoy the advantages of Brazilian Koa laminate flooring for years to come. Installing Brazilian Koa laminate flooring can be a DIY project that adds beauty and durability to your space. Here are the steps involved:
Step 1: Prepare the Subfloor – Clean, level, and dry the subfloor. Remove any existing flooring or debris.
Step 2: Acclimate the Flooring – Bring the laminate flooring into the room and let it acclimate for at least 48 hours.
Step 3: Lay Underlayment – Install underlayment over the subfloor for cushioning and noise reduction.
Step 4: Start Installation – Begin by laying the first row of planks along the longest wall, leaving a small gap between the planks and the wall. Use spacers to maintain this gap.
Step 5: Click-Lock the Planks – Connect the planks using the click-lock system. Angle the tongue of one plank into the groove of another and press down to secure them. Use a tapping block and rubber mallet for a tight fit.
Step 6: Cut and Trim – Measure and cut planks as needed to fit around obstacles. Leave a small gap between planks and vertical surfaces.
Step 7: Continue Installation – Lay rows of planks, staggering the joints for a natural look. Use spacers to maintain consistent gaps between planks.
Step 8: Finish Installation – Once all the planks are laid, remove spacers and install transition pieces at doorways or where the flooring meets other types of flooring. Trim any excess underlayment or protruding edges.
Step 9: Clean and Maintain – After installation, clean the Brazilian Koa laminate flooring with a damp mop or cloth. Avoid using excessive water or harsh cleaning agents. Regularly sweep or vacuum to remove dirt and debris.
Overall, by following these steps with proper preparation and attention to detail, you can enjoy the advantages of Brazilian Koa laminate flooring for years to come.