As one of probably the busiest rooms in the home, it has standing up to its fair share of deterioration. Cut different colored vinyl into small squares or perhaps rectangles to make nice borders for the bathroom floor. If you would like cork flooring for the bathroom of yours, you are going to find a lot of prefinished options which are water resistant as well as in a position to stand up to heavy foot traffic.
Here are Images about Basic Bathroom Floor Plans
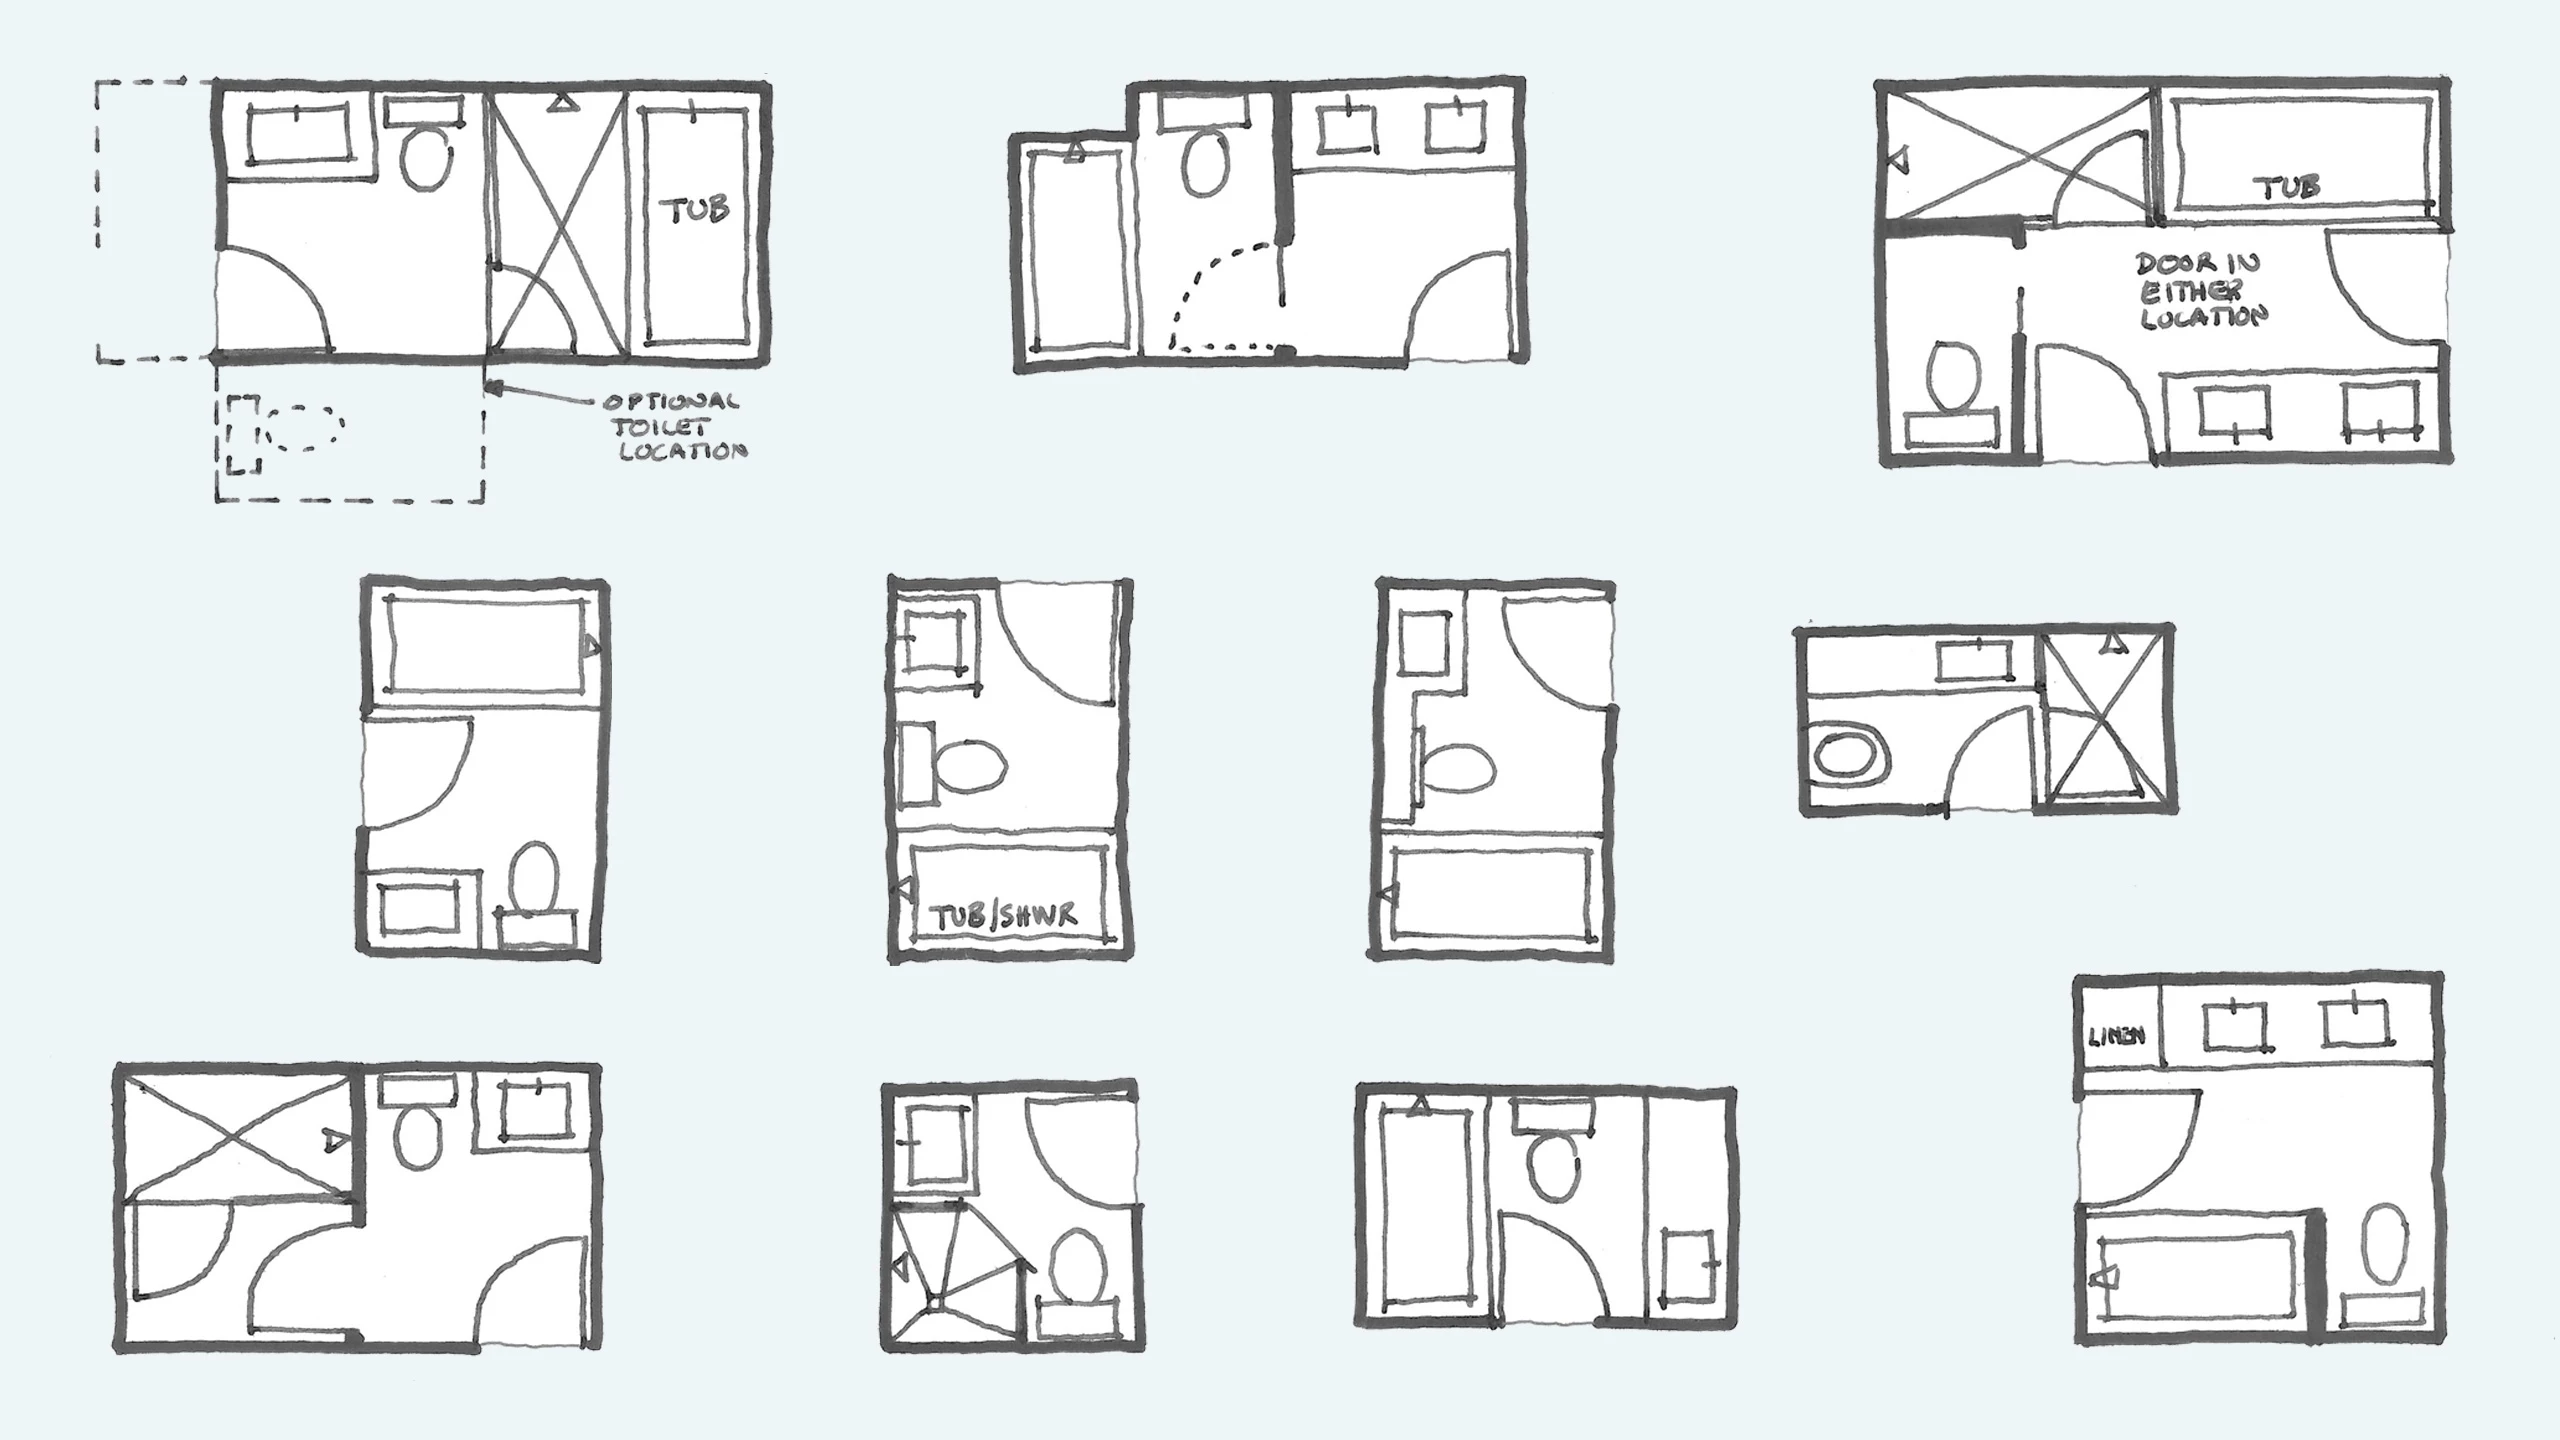
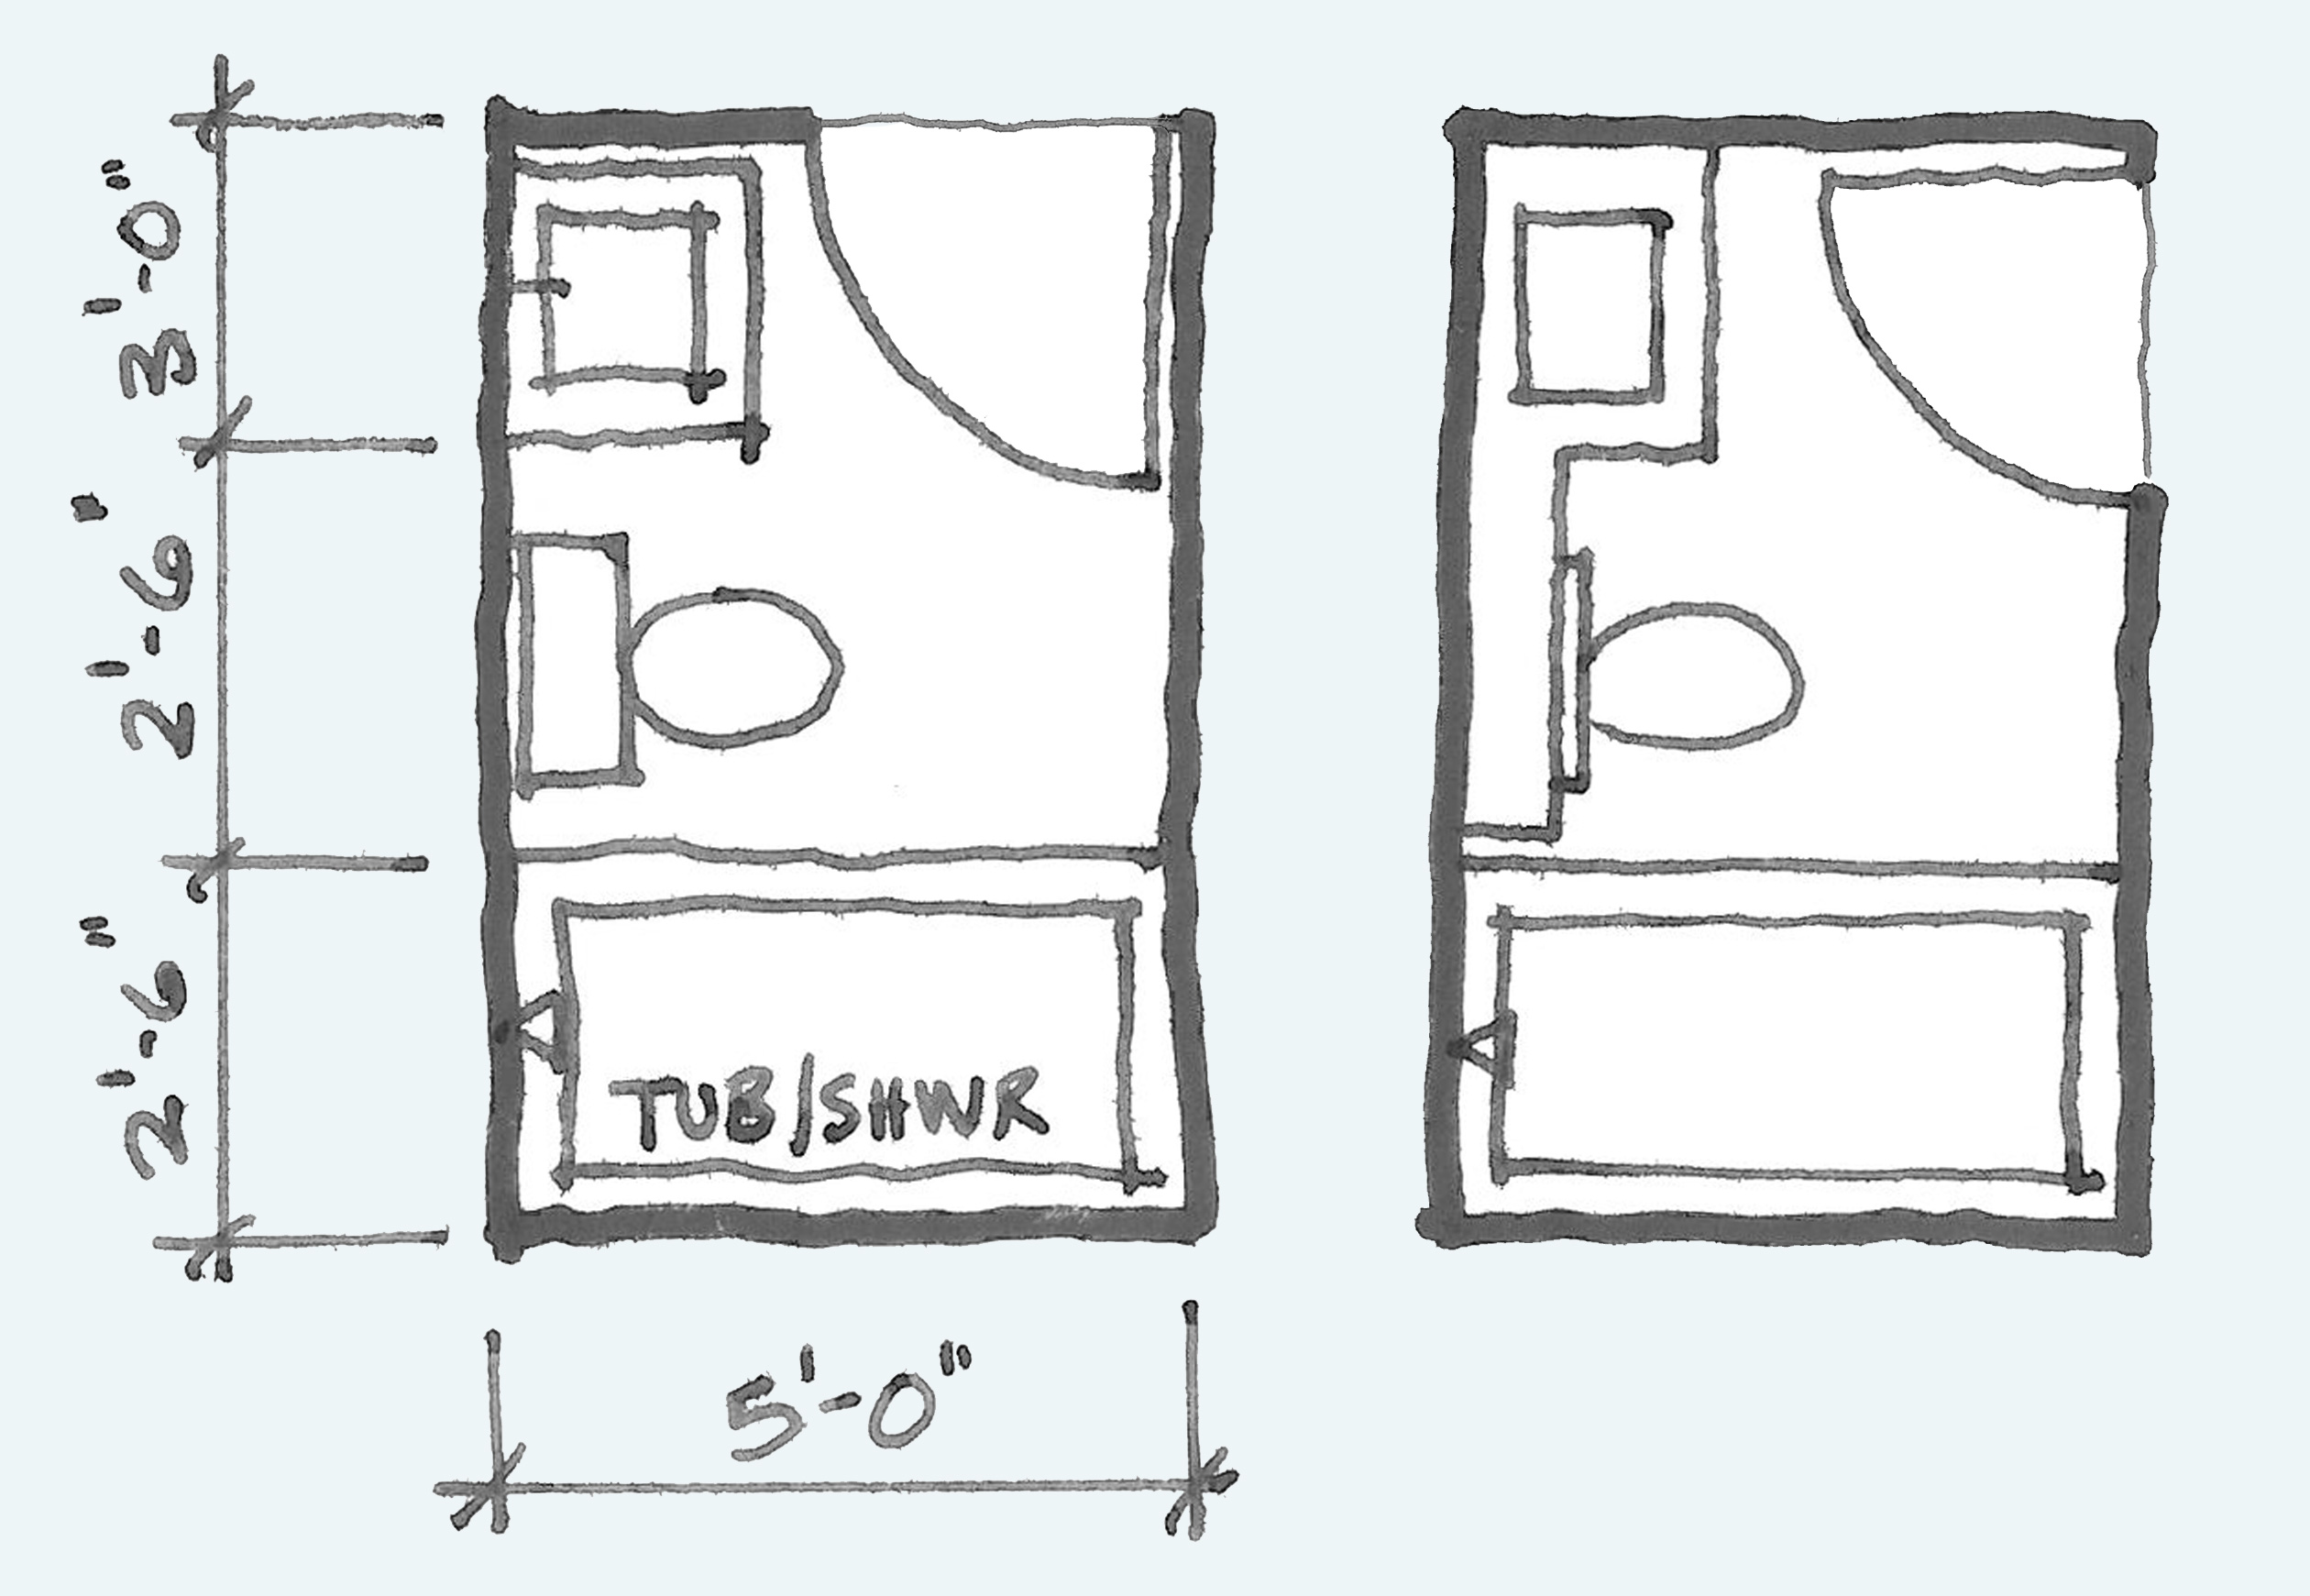
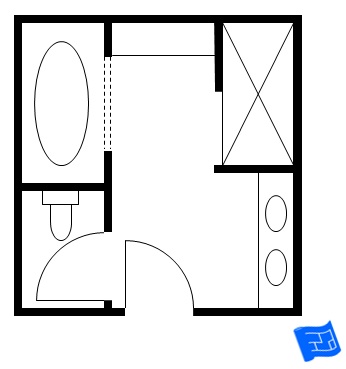
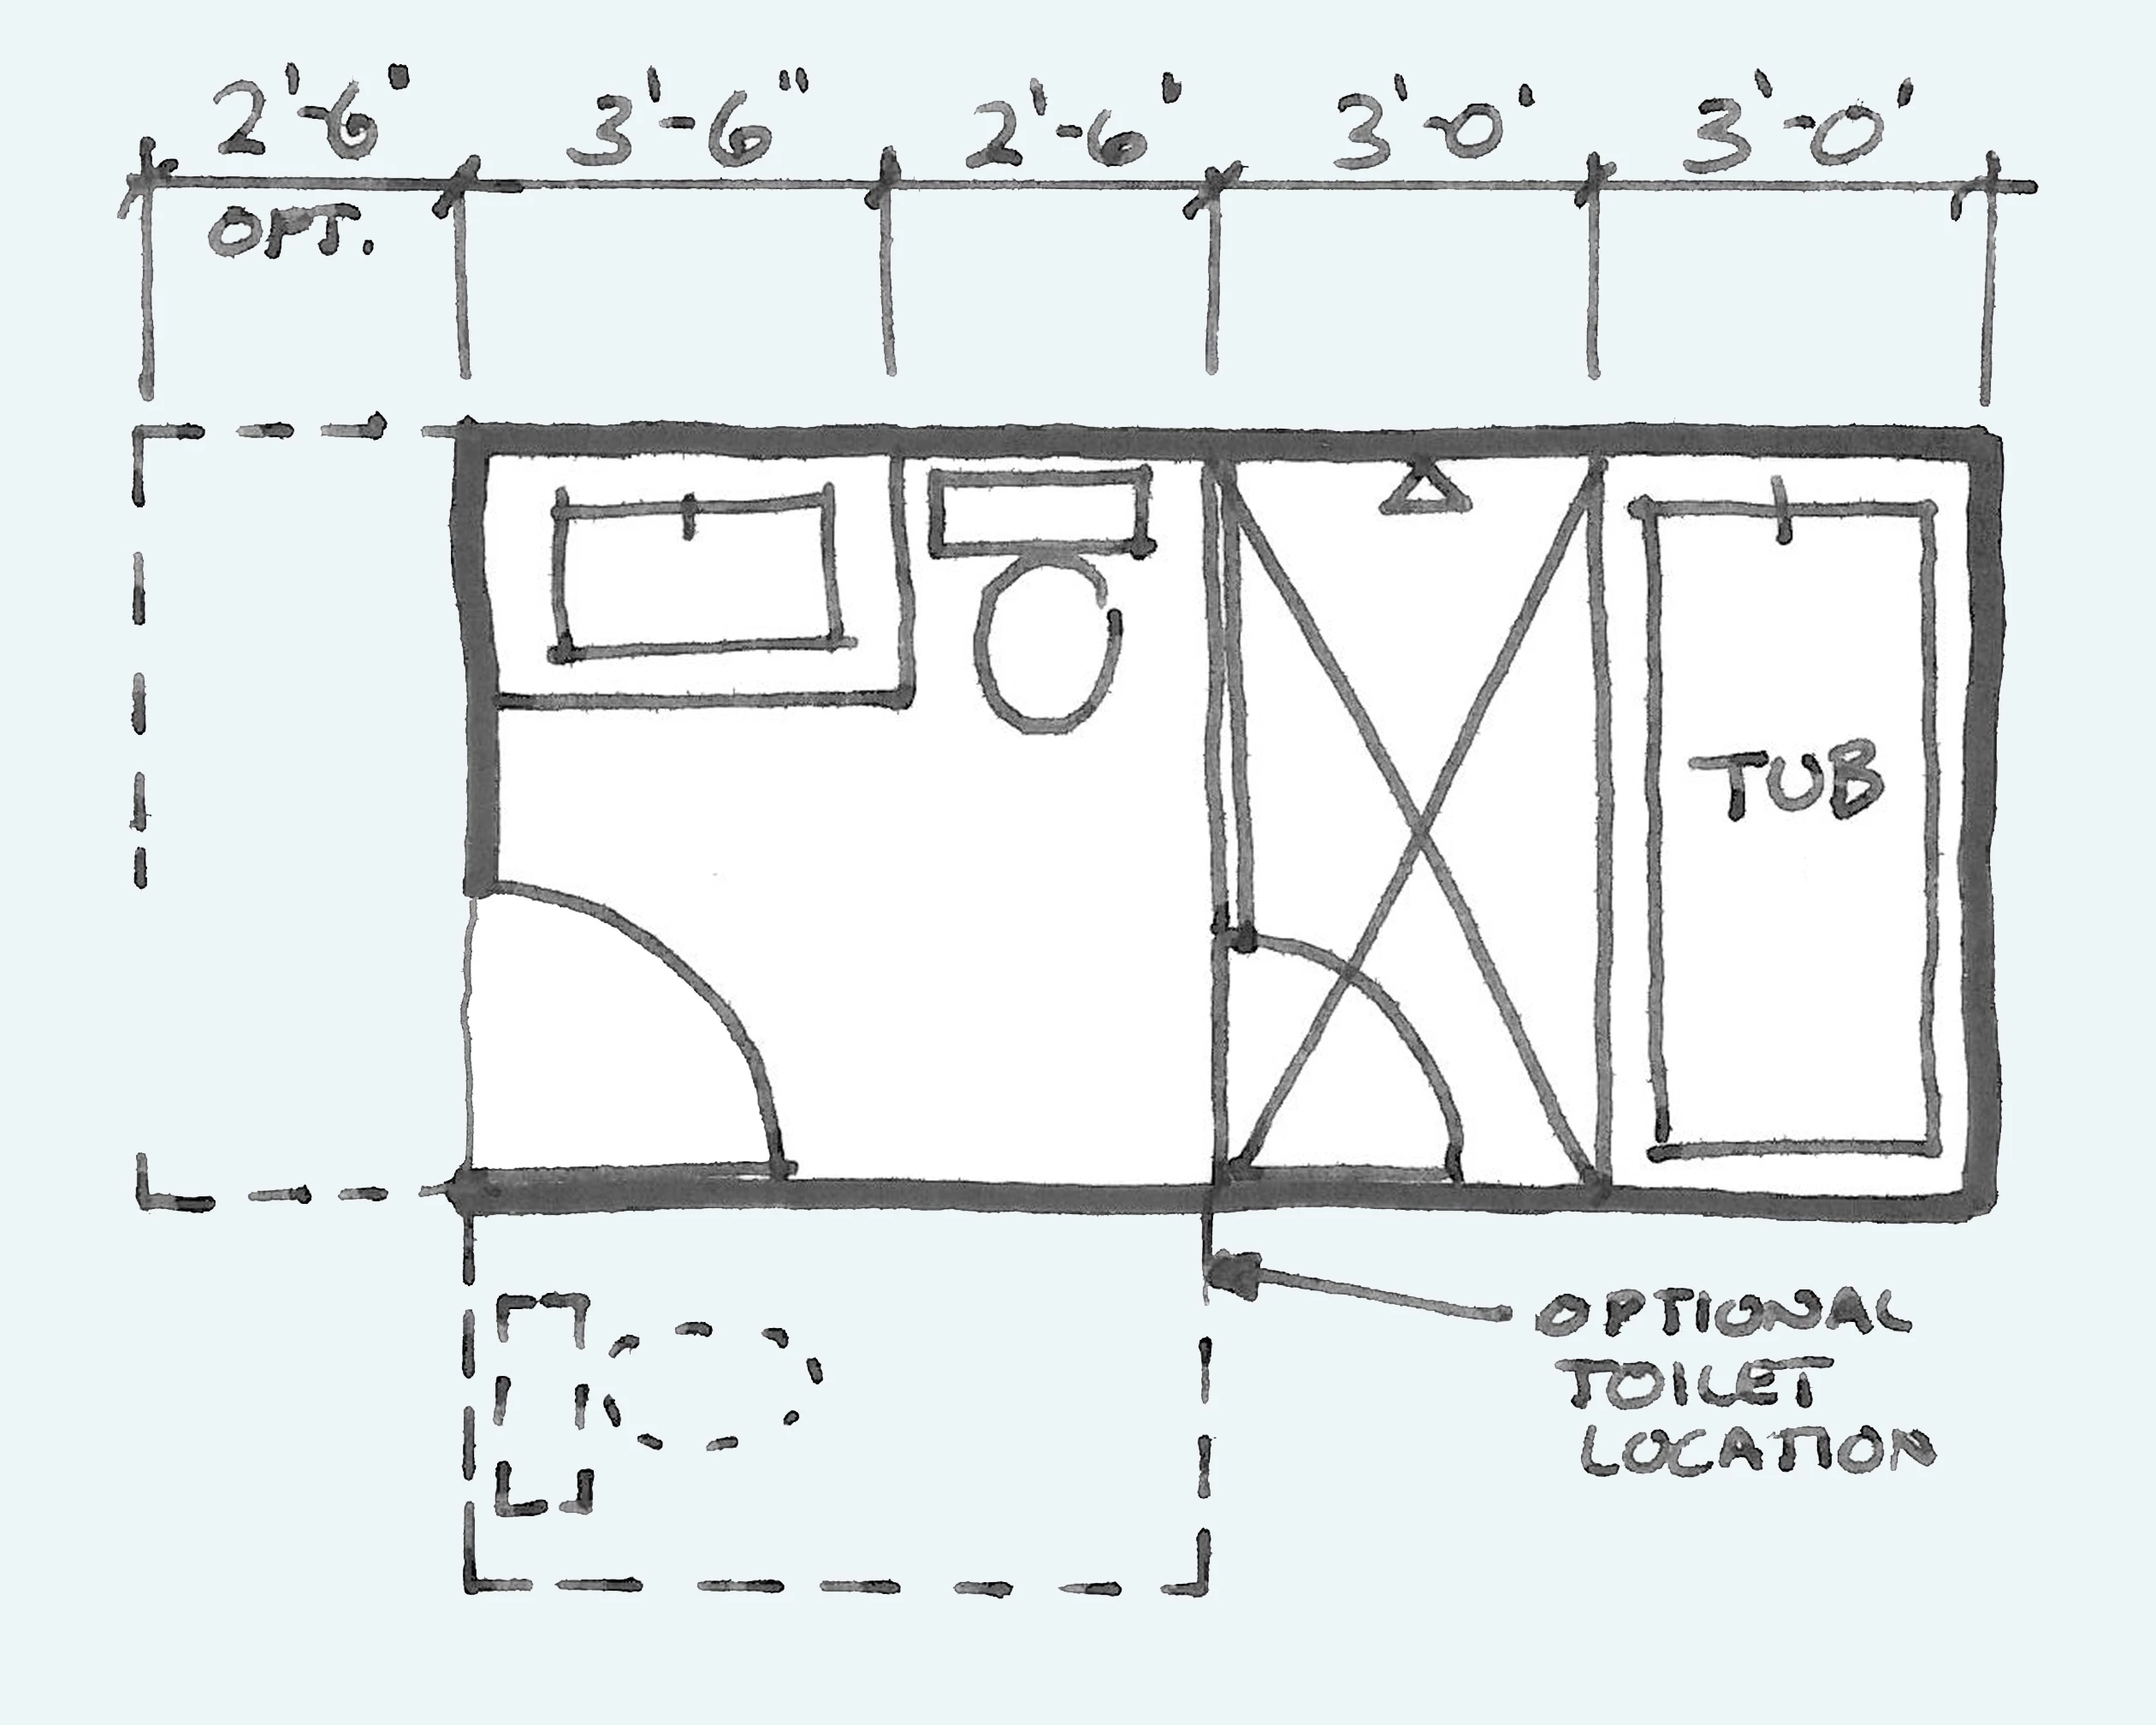
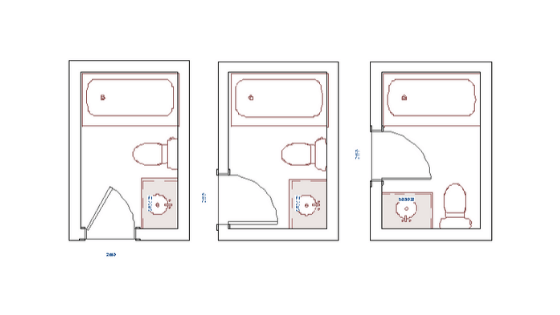
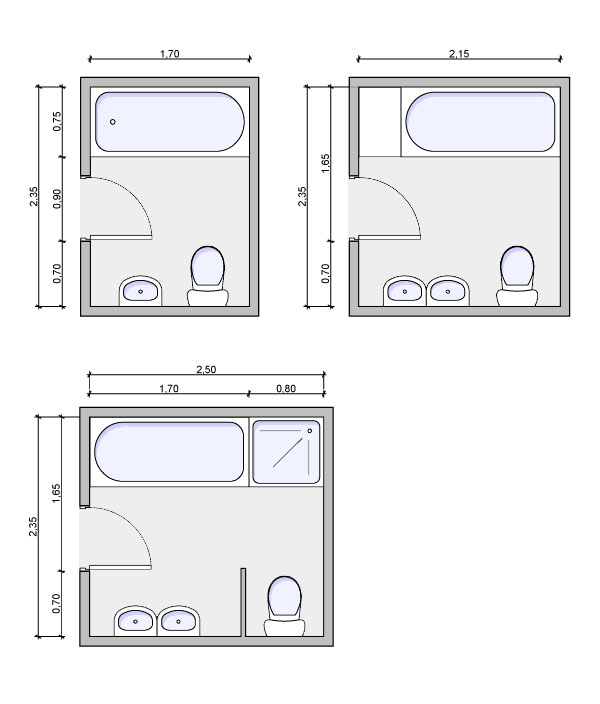
Basic Bathroom Floor Plans
When you finally get past looks, durability, cost and other commonalities, you have to contemplate one factor that not one other area of the house of yours has (except the basement) – water. The price range in addition varies. They also give good grip and stop one from slipping. Another good suggestion will be to randomly intersperse brightly colored tiles on a whitish tiled floor.
Get the Ideal Bathroom Layout From These Floor Plans
:max_bytes(150000):strip_icc()/free-bathroom-floor-plans-1821397-04-Final-91919b724bb842bfba1c2978b1c8c24b.png)
There are numerous options from which you are able to choose your preferred flooring layout. Printed tiles use out faster however, they're cheaper and permit you to experiment with different styles and patterns. You'll find various flooring types you can get with regards to your living spaces and bedrooms but you can't select any & every flooring material as bath room flooring.
Images Related to Basic Bathroom Floor Plans
Get the Ideal Bathroom Layout From These Floor Plans
:max_bytes(150000):strip_icc()/free-bathroom-floor-plans-1821397-08-Final-e58d38225a314749ba54ee6f5106daf8.png)
Common Bathroom Floor Plans: Rules of Thumb for Layout u2013 Board
Bathroom Layouts
10 Essential Bathroom Floor Plans
%20(1).jpg?widthu003d800u0026nameu003d2-01%20(1)%20(1).jpg)
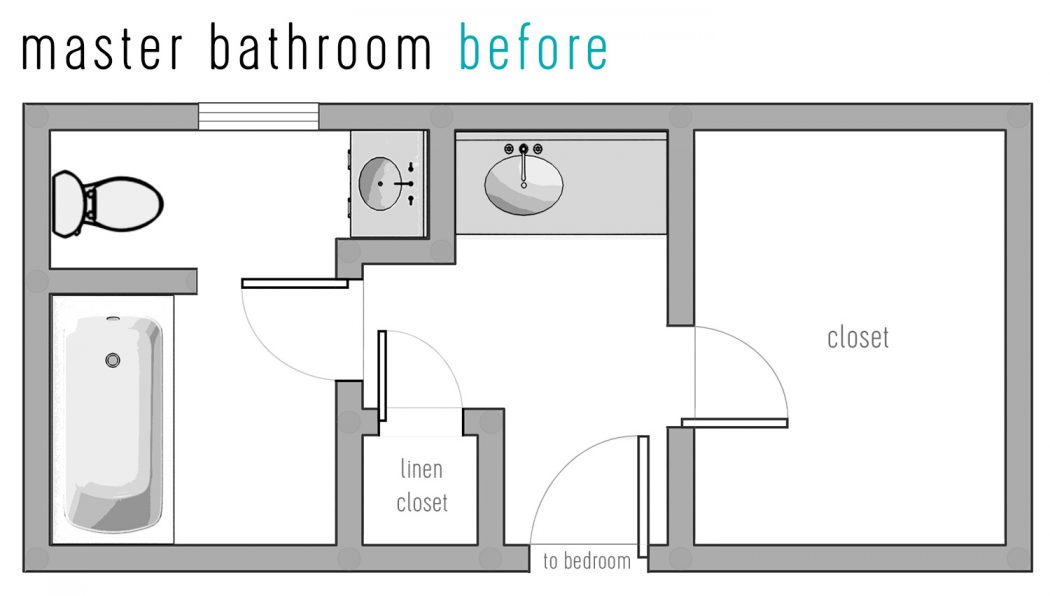
Our Bathroom Reno: The Floor Plan u0026 Tile Picks! Young House Love
Bathroom Floor Plan Examples

Small Bathroom Layout Ideas That Work – This Old House
:no_upscale()/cdn.vox-cdn.com/uploads/chorus_asset/file/19996634/01_fl_plan.jpg)
Common Bathroom Floor Plans: Rules of Thumb for Layout u2013 Board
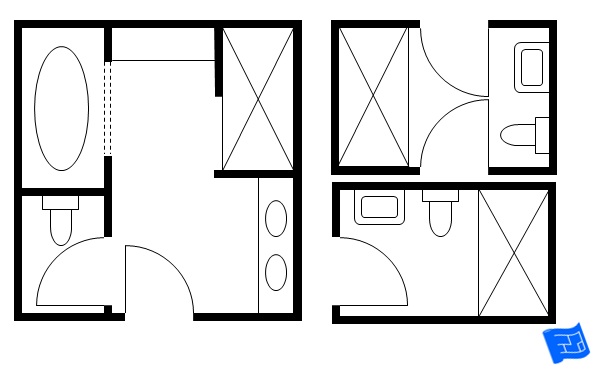
Master Bathroom Floor Plans
Common Bathroom Floor Plans: Rules of Thumb for Layout u2013 Board
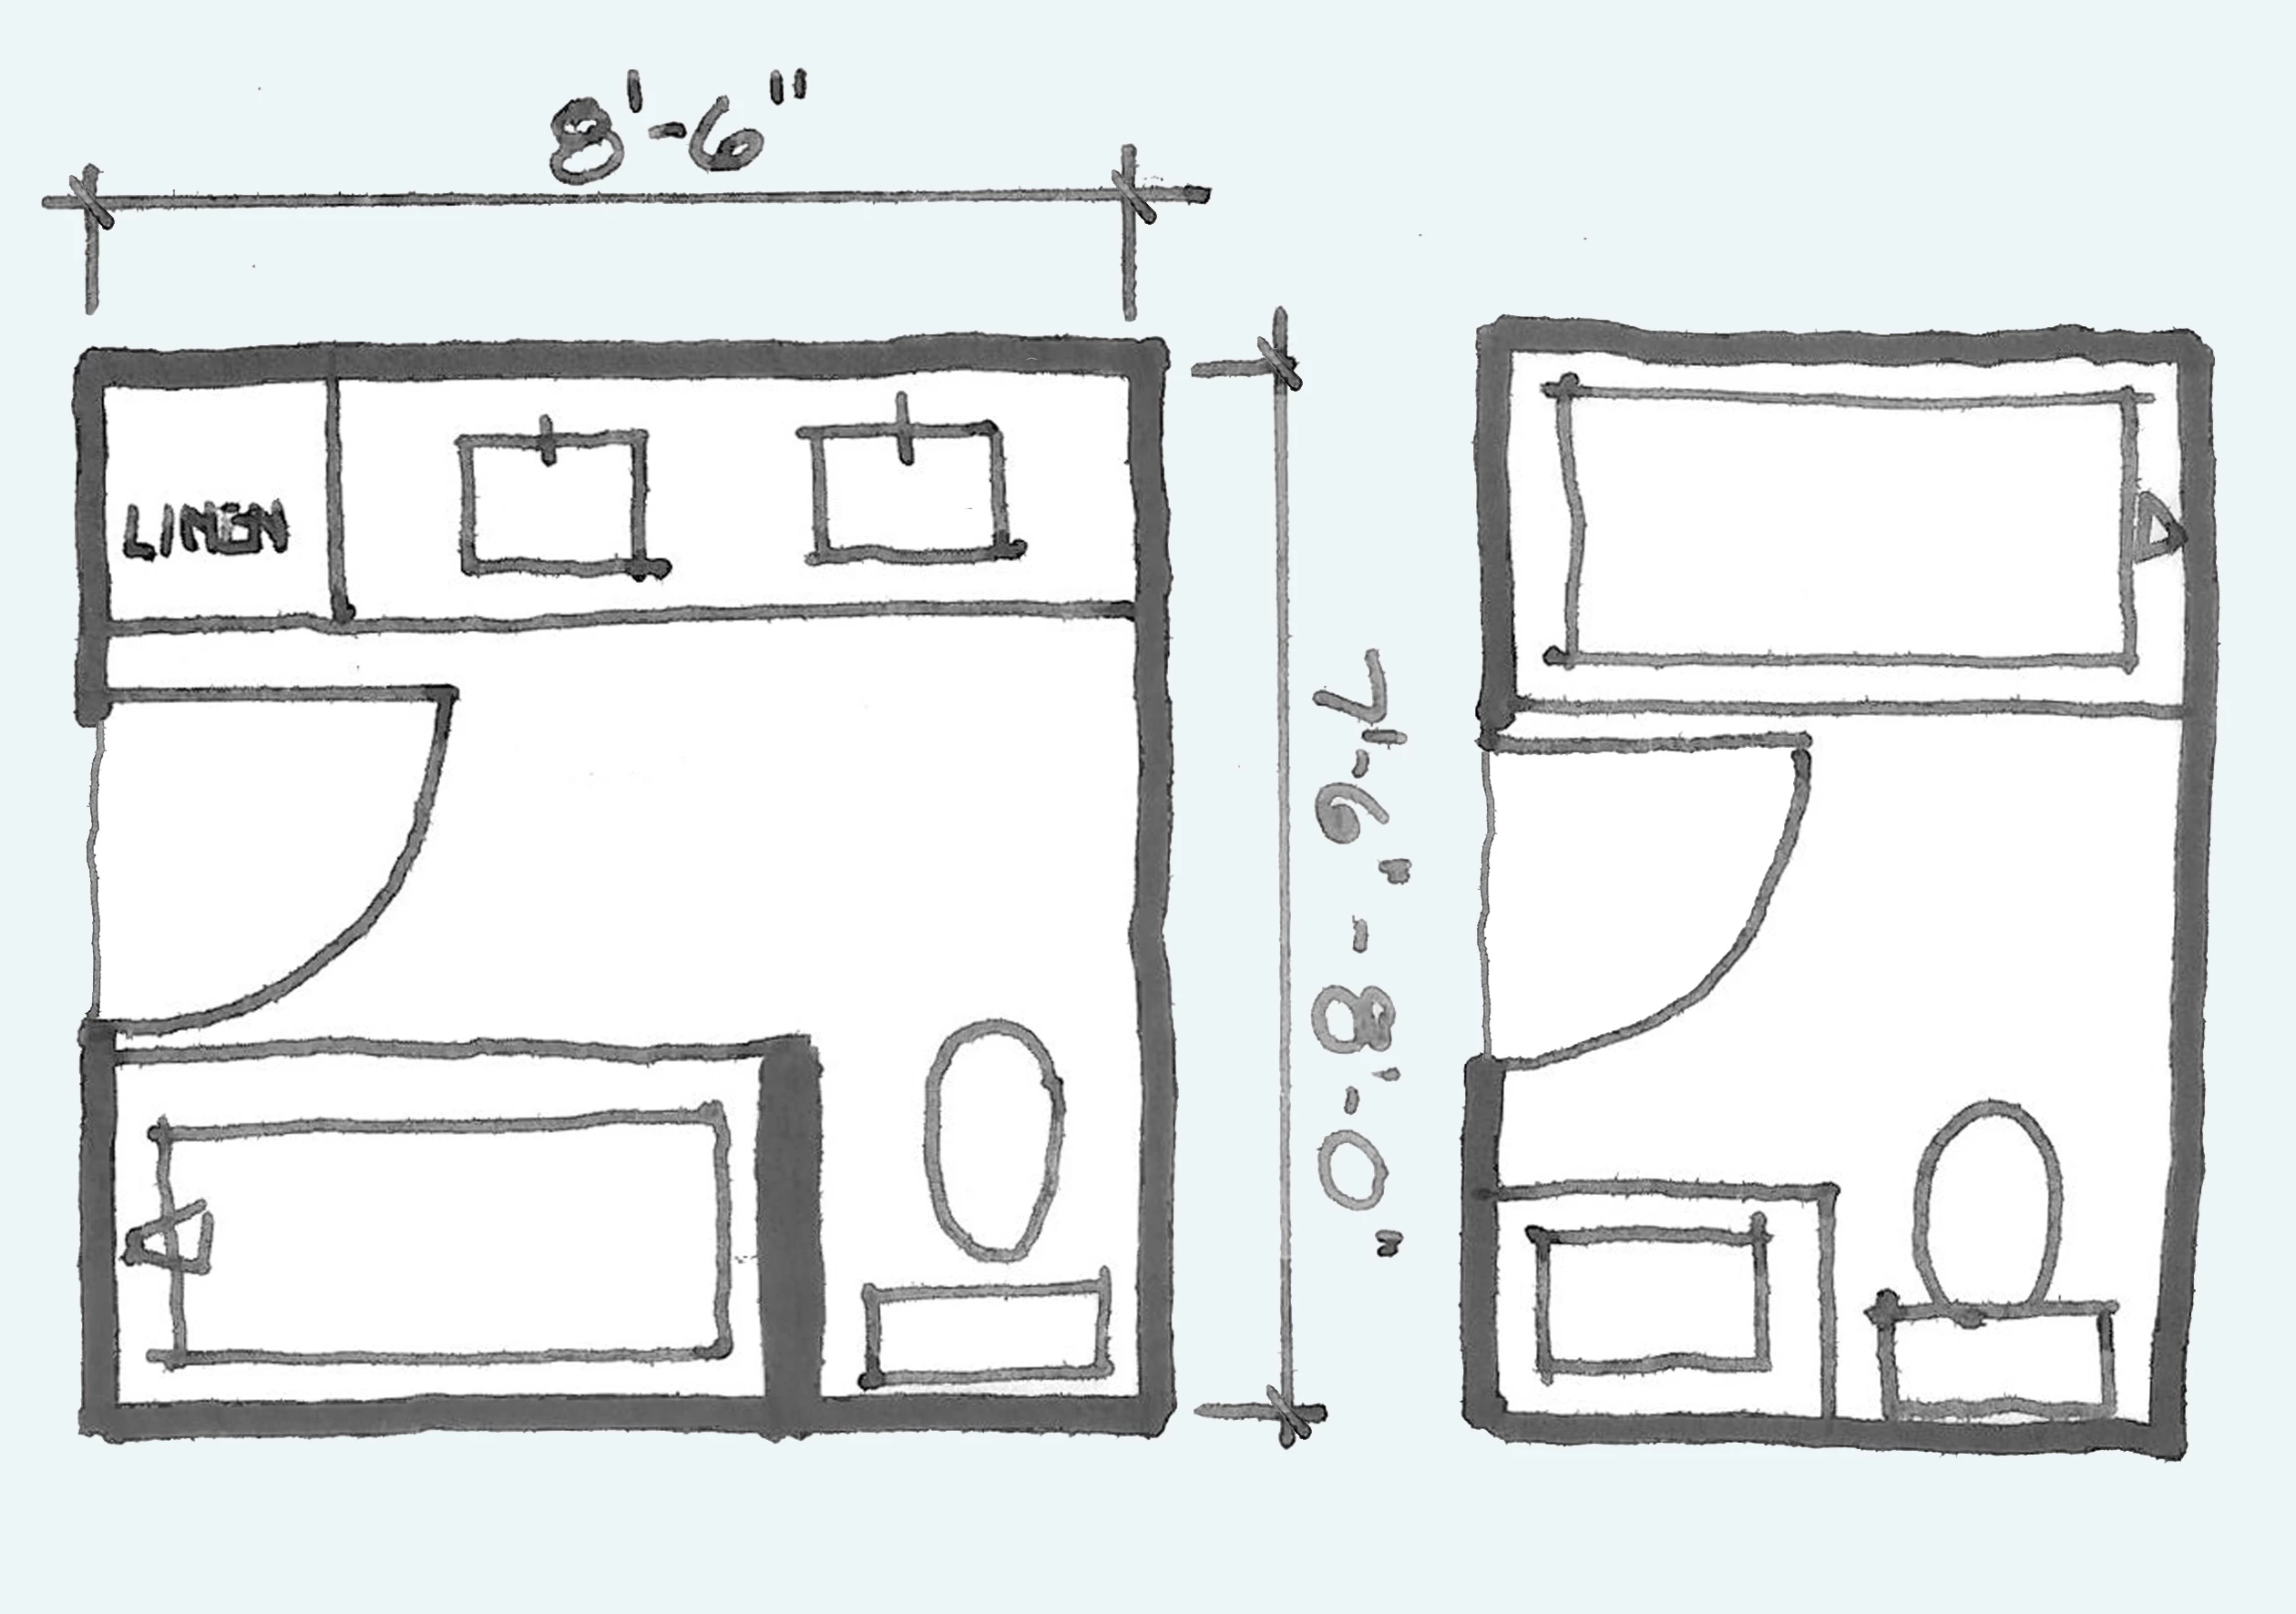
The Best 5u0027 x 8u0027 Bathroom Layouts And Designs To Make The Most Of
Types of bathrooms and layouts
Related articles:
- Vintage Bathroom Floor Tile Patterns
- Bathroom Floor Tile DIY
- Limestone Bathroom Floor Tiles
- Bathroom Floor Porcelain Tile
- Concrete Bathroom Floor Ideas
- White Bathroom Ceramic Tiles
- Bathroom Floor Baseboard
- Rustic Bathroom Flooring Ideas
- Bathroom Flooring Options
- Bamboo Bathroom Flooring Ideas
Basic Bathroom Floor Plans: Designing Your Dream Bathroom
Introduction:
Designing a bathroom can be an exciting and creative process. From selecting the perfect fixtures to choosing the right flooring, every decision contributes to the overall look and functionality of the space. One of the first steps in bathroom design is creating a floor plan that suits your needs and maximizes the available space. In this article, we will explore the various aspects of basic bathroom floor plans, including layout options, considerations for small spaces, common FAQs, and expert tips for creating a functional and visually appealing bathroom.
I. Layout Options:
When it comes to bathroom floor plans, there are several layout options to consider. The choice of layout depends on the size and shape of your bathroom, as well as your personal preferences. Let’s delve into some popular layouts:
1. One-Wall Layout:
Ideal for small bathrooms or powder rooms, the one-wall layout features all fixtures aligned along a single wall. This layout is efficient in terms of space utilization but may compromise on storage options. To maximize storage, consider incorporating a vanity with built-in cabinets or installing shelves above the toilet.
FAQ: Can I install a bathtub in a one-wall layout?
Answer: While it is possible to install a bathtub in a one-wall layout, it may consume a significant amount of space. Consider opting for a compact bathtub or exploring alternative layouts such as an L-shaped or U-shaped design if you prioritize having a bathtub.
2. Galley Layout:
Similar to kitchen galley layouts, the galley bathroom layout features fixtures placed on opposite walls with a corridor-like space in between. This layout works well for narrow bathrooms as it optimizes functionality without sacrificing aesthetics.
FAQ: How can I make a galley bathroom feel more spacious?
Answer: To create an illusion of space in a galley bathroom, choose light-colored tiles or paint for walls and flooring. Incorporate mirrors strategically to reflect natural light and make the space appear larger. Additionally, consider installing recessed lighting to brighten up the area.
3. L-Shaped Layout:
The L-shaped bathroom layout consists of fixtures arranged along two adjacent walls, forming an “L” shape. This design offers flexibility in terms of fixture placement and works well for both small and large bathrooms. It allows for efficient utilization of corners and provides ample space for storage and movement.
FAQ: Can I include a separate shower enclosure in an L-shaped layout?
Answer: Absolutely! An L-shaped layout can accommodate a separate shower enclosure by placing it at the end of one leg of the “L.” This arrangement creates a defined showering area while leaving enough space for other fixtures.
4. U-Shaped Layout:
Larger bathrooms can benefit from a U-shaped layout, which features fixtures placed along three walls, forming a U-shape. This design provides ample space for multiple users and allows for more storage options. It also offers a luxurious feel, similar to that of a spa.
FAQ: How can I maintain privacy in a U-shaped layout?
Answer: To ensure privacy in a U-shaped bathroom, consider placing the toilet or shower enclosure behind a partition wall or adding frosted glass panels to provide visual separation without compromising natural light.
II. Small Bathroom Considerations:
Designing a small bathroom requires careful planning to maximize functionality while maintaining an aesthetically pleasing appearance. Here are some considerations to keep in mind when creating a floor plan for a small bathroom:
1. Compact Fixtures:
Opt for compact fixtures that save space Such as a small toilet, a corner sink, or a narrow bathtub. These fixtures are designed specifically for small bathrooms and can help optimize the available space.
2. Storage Solutions:
Incorporate storage solutions that utilize vertical space, such as wall-mounted cabinets or shelves. Consider using recessed shelving in the shower area or installing a vanity with built-in storage to maximize storage options without taking up additional floor space.
3. Light Colors:
Choose light colors for walls, flooring, and fixtures to create an illusion of space and make the bathroom feel brighter and more open. Light-colored tiles or paint can help reflect natural light and make the room appear larger.
4. Mirrors:
Strategically place mirrors to reflect light and create a sense of depth in the small bathroom. Consider installing a large mirror above the sink or incorporating mirrored cabinets to add functionality and visually expand the space.
5. Shower Curtains:
Instead of using a glass shower enclosure, opt for a shower curtain which takes up less visual space. Choose a light-colored or transparent curtain to maintain an open feel in the bathroom.
6. Pocket Doors:
Consider installing pocket doors instead of traditional swinging doors to save space and improve flow in the small bathroom. Pocket doors slide into a wall cavity when opened, allowing for more usable floor space.
7. Lighting:
Ensure proper lighting in the small bathroom to make it feel more spacious and functional. Incorporate recessed lighting, wall sconces, or pendant lights to provide ample illumination without cluttering the limited space.
8. Minimalist Design:
Adopting a minimalist design approach can help create a clean and uncluttered look in a small bathroom. Avoid excessive decorations or unnecessary items that can make the space feel cramped.
By considering these factors and implementing appropriate design strategies, you can create a functional and visually appealing small bathroom layout. Some additional considerations to keep in mind when designing a small bathroom layout without compromising natural light include:
9. Window Treatments: Choose window treatments that allow natural light to enter the bathroom while still providing privacy. Consider using sheer curtains or blinds that can be easily adjusted to control the amount of light coming in.
10. Skylights: If possible, consider adding a skylight to bring in additional natural light. Skylights can be a great way to maximize natural light in a small bathroom without taking up any floor or wall space.
11. Frosted Glass: If privacy is a concern, consider using frosted glass for windows or shower enclosures. Frosted glass allows light to pass through while still providing privacy.
12. Open Shelving: Instead of using closed cabinets or storage units, opt for open shelving to maintain an open and airy feel in the bathroom. Open shelving allows light to pass through and visually expands the space.
13. Reflective Surfaces: Incorporate reflective surfaces such as glass tiles or shiny countertops to bounce natural light around the room and create a brighter space.
14. Utilize Natural Light Sources: Take advantage of any existing natural light sources, such as windows or skylights, by positioning key fixtures near these areas. This will help maximize the amount of natural light that reaches different parts of the bathroom.
15. Use Light-Colored Materials: Choose light-colored materials for flooring, countertops, and backsplashes to reflect more natural light and make the space feel larger.
By incorporating these additional considerations into your small bathroom design, you can create a layout that maximizes natural light while still maintaining functionality and aesthetics.